블로그 이미지
Every unexpected event is a path to learning for you.

카테고리

분류 전체보기 (2737)
Unity3D (817)
Programming (474)
Server (33)
Unreal (4)
Gamebryo (56)
Tip & Tech (228)
협업 (58)
3DS Max (3)
Game (12)
Utility (136)
Etc (96)
Link (32)
Portfolio (19)
Subject (90)
iOS,OSX (53)
Android (14)
Linux (5)
잉여 프로젝트 (2)
게임이야기 (3)
Memories (20)
Interest (38)
Thinking (38)
한글 (30)
PaperCraft (5)
Animation (408)
Wallpaper (2)
재테크 (18)
Exercise (3)
나만의 맛집 (3)
냥이 (10)
육아 (16)
Total
Today
Yesterday
04-20 00:00

[펌] UnityCoverFlow

Unity3D/UGUI / 2019. 5. 14. 17:23

UnityCoverFlow

Unity3D UI CoverFlow and other Layout options

Overview

Some years ago I was required to build a simple Cover Flow Layout (think, iTunes Carousel). Originally I build the project in a Windows Forms application for a client we were working with. Sometime later we then needed a similar system in a project we were doing in Unity3D.

This is just a simple recreation of that work.

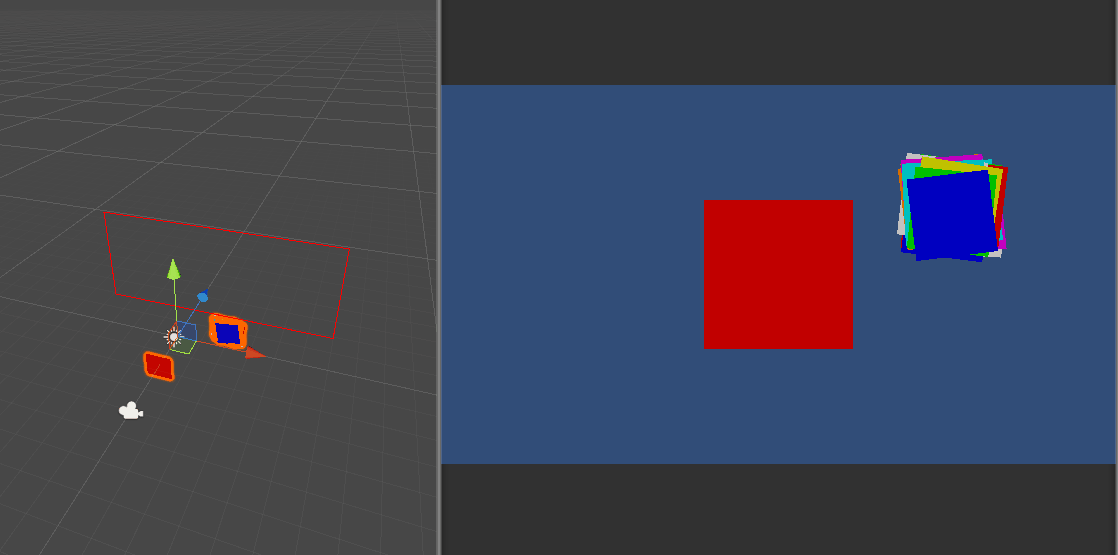
Its very old, and it wasn’t originally done in GitHub so I’ve just commited the whole project in one commit.

There are some simple layouts included to demonstrate the flexibility of the system,

  • The classic Cover Flow layout (iTunes Album Artwork style)
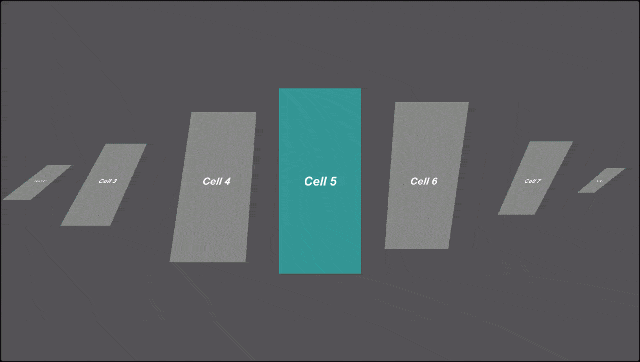
  • A Carousel Layout (Z-Depth carousel)
  • A “Messy Paper” Layout - Cells shift from 1 messy pile to another

Further Features

Cell reuse is supported using a simple Cell Pool with UICollectionCells registering Prefabs as “nibs” to be reused.

Data “binding” can be expanded upon with the cell reuse.

All layouts have various settings to tweak positions, speeds, snapping, wrapping and the like. These can also be updated at runtime in the editor to see results in real time.

Demos

Here’s a few GIFs showing the layouts in action in the editor (GIFs are only at 30fps and appear to have bad artifacts in them, running in the editor is obviously at full FPS with no rendering issues).

  • Cover Flow Layout 

  • Carousel Layout 

  • Messy Paper Layout 

  • Layouts can have multiple configurable elements, here’s an example of the Cover Flow properties being edited at runtime…


[출처] https://unitylist.com/p/1xt/Unity-Cover-Flow


Unity Cover Flow

Unity3D UI CoverFlow and other Layout options

unitylist.com


반응형
Posted by blueasa
, |


[링크]

https://github.com/setchi/FancyScrollView


setchi/FancyScrollView

A scrollview component that can implement highly flexible animation. - setchi/FancyScrollView

github.com


FancyScrollView 

English (by Google Translate)

高度に柔軟なアニメーションを実装できる汎用の ScrollView コンポーネントです。 無限スクロールもサポートしています。


Requirements

Installation

Unity Asset Store

Asset Store からパッケージをプロジェクトにインストールします。

Unity Package Manager (Example scenes not included)

プロジェクトディレクトリの Packages/manifest.json ファイルにリポジトリへの参照を追加します。

{ "dependencies": { "jp.setchi.fancyscrollview": "https://github.com/setchi/FancyScrollView.git#upm" } }

Manual

このリポジトリを Clone または Download します。

Features

自由にスクロールアニメーションを実装できます

FancyScrollView はセルの位置を更新するとき、可視領域の正規化された値を各セルに渡します。セル側では、0.0 ~ 1.0 の値に基づいてスクロールの外観を自由に制御できます。サンプルでは Animator を使用してセルの動きを制御しています。

データ件数が多くても軽快に動作します

表示に必要なセル数のみが生成され、セルは再利用されます。

セルとスクロールビュー間で自由にメッセージのやりとりができます

Context 経由で、セルがクリックされたことをスクロールビューで検知したり、スクロールビューからセルに指示を出す処理がシンプルに実装できます。実装例(Examples/02_FocusOn)が含まれていますので、参考にしてください。

特定のセルにスクロールやジャンプができます

移動にかける秒数や Easing の指定もできます。詳しくは API Reference の Scroller - Methods を参照してください。

スクロールの挙動を細かく設定できます

慣性の有無、減速率などスクロールに関する挙動の設定ができます。詳しくは API Reference の Scroller - Inspector を参照してください。

スナップをサポートしています

スナップを有効にすると、スクロールが止まる直前に最寄りのセルへ移動します。スナップがはじまる速度のしきい値、移動にかける秒数、 Easing を指定できます。

無限スクロールをサポートしています

Inspector で下記の設定をすることで無限スクロールを実装できます。

  1. FancyScrollView  Loop をオンにするとセルが循環し、先頭のセルの前に末尾のセル、末尾のセルの後に先頭のセルが並ぶようになります。
  2. サンプルで使用されている Scroller を使うときは、 Movement Type  Unrestricted に設定することで、スクロール範囲が無制限になります。 1. と組み合わせることで無限スクロールを実現できます。

実装例(Examples/03_InfiniteScroll)が含まれていますので、こちらも参考にしてください。

Examples

FancyScrollView/Examples を参照してください。

NameDescription

01_Basic 最もシンプルな構成の実装例です。
02_FocusOn ボタンで左右のセルにフォーカスする実装例です。
03_InfiniteScroll 無限スクロールの実装例です。

Usage

もっともシンプルな構成では、

  • セルにデータを渡すためのオブジェクト
  • セル
  • スクロールビュー

の実装が必要です。

Implementation

セルにデータを渡すためのオブジェクトを定義します。

public class ItemData { public string Message; }

FancyScrollViewCell<TItemData> を継承して自分のセルを実装します。

using UnityEngine; using UnityEngine.UI; using FancyScrollView; public class MyScrollViewCell : FancyScrollViewCell<ItemData> { [SerializeField] Text message = default; public override void UpdateContent(ItemData itemData) { message.text = itemData.Message; } public override void UpdatePosition(float position) { // position は 0.0 ~ 1.0 の値です // position に基づいてスクロールの外観を自由に制御できます } }

FancyScrollView<TItemData> を継承して自分のスクロールビューを実装します。

using UnityEngine; using System.Linq; using FancyScrollView; public class MyScrollView : FancyScrollView<ItemData> { [SerializeField] Scroller scroller = default; [SerializeField] GameObject cellPrefab = default; protected override GameObject CellPrefab => cellPrefab; void Start() { scroller.OnValueChanged(base.UpdatePosition); } public void UpdateData(IList<ItemData> items) { base.UpdateContents(items); scroller.SetTotalCount(items.Count); } }

スクロールビューにデータを流し込みます。

using UnityEngine; using System.Linq; public class EntryPoint : MonoBehaviour { [SerializeField] MyScrollView myScrollView = default; void Start() { var items = Enumerable.Range(0, 20) .Select(i => new ItemData {Message = $"Cell {i}"}) .ToArray(); myScrollView.UpdateData(items); } }


API Reference

FancyScrollView<TItemData, TContext>

セルを制御するスクロールビューの抽象基底クラスです。

public abstract class FancyScrollView<TItemData, TContext> : MonoBehaviour where TContext : class, new()

Context が不要な場合はこちらを使用します。

public abstract class FancyScrollView<TItemData> : FancyScrollView<TItemData, FancyScrollViewNullContext>

Inspector

TypeNameSummary

float Cell Spacing セル同士の間隔を float.Epsilon ~ 1.0 の間で指定します.
float Scroll Offset スクロールのオフセットを指定します.たとえば、 0.5 を指定してスクロール位置が 0 の場合、最初のセルの位置は 0.5 になります.
bool Loop オンにするとセルが循環し、最初のセルの前に最後のセル、最後のセルの後に最初のセルが並ぶようになります.無限スクロールさせたい場合はオンにします.
Transform Cell Container セルの親要素となる Transform を指定します.

Properties

TypeNameSummary

GameObject CellPrefab Cell prefab.
IList<TItemData> ItemsSource Items source.
TContext Context Context.

Methods

TypeNameSummary

void UpdateContents(IList<TItemData> itemsSource) Updates the contents.
void Refresh() Refreshes the cells.
void UpdatePosition(float position) Updates the scroll position.

FancyScrollViewCell<TItemData, TContext>

セルの抽象基底クラスです。

public abstract class FancyScrollViewCell<TItemData, TContext> : MonoBehaviour where TContext : class, new()

Context が不要な場合はこちらを使用します。

public abstract class FancyScrollViewCell<TItemData> : FancyScrollViewCell<TItemData, FancyScrollViewNullContext>

Properties

TypeNameSummary

int Index Gets or sets the index of the data.
bool IsVisible Gets a value indicating whether this cell is visible.
TContext Context Context.

Methods

TypeNameSummary

void SetupContext(TContext context) Setup the context.
void SetVisible(bool visible) Sets the visible.
void UpdateContent(TItemData itemData) Updates the content.
void UpdatePosition(float position) Updates the position.

Scroller

スクロール位置を制御するコンポーネントです。

public class Scroller : UIBehaviour, IBeginDragHandler, IEndDragHandler, IDragHandler

Inspector

TypeNameSummary

RectTransform Viewport ビューポートとなる RectTransform を指定します.ここで指定された RectTransform の範囲内でジェスチャーの検出を行います.
ScrollDirection Direction Of Recognize ジェスチャーを認識する方向を Vertical か Horizontal で指定します.
MovementType Movement Type コンテンツがスクロール範囲を越えて移動するときに使用する挙動を指定します.
float Elasticity コンテンツがスクロール範囲を越えて移動するときに使用する弾力性の量を指定します.
float Scroll Sensitivity スクロールの感度を指定します.
bool Inertia 慣性のオン/オフを指定します.
float Deceleration Rate Inertia がオンの場合のみ有効です.減速率を指定します.
bool Snap.Enable Snap を有効にする場合オンにします.
float Snap.Velocity Threshold Snap がはじまる閾値となる速度を指定します.
float Snap.Duration Snap 時の移動時間を秒数で指定します.
Ease Snap.Easing Snap 時の Easing を指定します.

Methods

TypeNameSummary

void OnValueChanged(Action<float> callback) スクロール位置が変化したときのコールバックを設定します.
void OnSelectionChanged(Action<int> callback) 選択セルが変化したときのコールバックを設定します.
void JumpTo(int index) 指定したセルまでジャンプします.
void ScrollTo(int index, float duration) 指定したセルまでスクロールします.
void ScrollTo(int index, float duration, Ease easing) 指定したセルまでスクロールします.
void ScrollTo(int index, float duration, Func<float, float> easingFunction) 指定したセルまでスクロールします.
void SetTotalCount(int totalCount) アイテムの総数を設定します. ( index: 0 ~ totalCount - 1 )

Author

setchi

License

MIT

반응형
Posted by blueasa
, |

首先原帖子在这里:
http://game.ceeger.com/forum/read.php?tid=1383
 
这楼主做得非常好了,我都不知道怎么优化才好,但是本人是厌恶OnGUI主义者,所以决定要把一切OnGUI的东西根除...
 
然后附加了镜面效果,看着还行,不说那么多先来个图:
1
 
2
 
3
 
下面是NGUI的排布
5
 
4
 
主要代码,红色为修改的部分
using UnityEngine;
using System.Collections;
using System.Collections.Generic;
 
public class NGUICoverFlow : MonoBehaviour {
    private List<GameObject> photos = new List<GameObject>();
    private int photosCount = 5;
 
    private int currentIndex = 0;
    private float MARGIN_X = 3f;  //plane 之间的间隔
    private float ITEM_W = 10f;   //plane长宽为10M(10个单位长度)
 
    private float sliderValue = 4f;
    public UISlider uiSlider;
    void Start()
    {
        loadImages();
       //uiSlider.numberOfSteps = photosCount; //这里可设成Steps模式  随个人喜好
    }
 
    void loadImages()
    {
        for (int i = 0; i < photosCount; i++)
        {
            GameObject photo = GameObject.CreatePrimitive(PrimitiveType.Plane);
            photos.Add(photo);
            photo.layer = 14; //我的相片全部作为一个单独的层  这样镜面渲染就好办了
            photo.transform.eulerAngles = new Vector3(-90f, 0f, 0f);
            photo.transform.localScale = new Vector3(1.5f, 1f, -1f);   //根据图片设定长宽比,z:-1,使图正向
            photo.renderer.material.mainTexture = Resources.Load("photo" + i.ToString(), typeof(Texture2D)) as Texture2D;
            photo.transform.parent = gameObject.transform;
        }
        moveSlider(photos.Count / 2);
    }
 
    void moveSlider(int id)
    {
        if (currentIndex == id)
            return;
        currentIndex = id;
 
        for (int i = 0; i < photosCount; i++)
        {
            float targetX = 0f;
            float targetZ = 0f;
            float targetRot = 0f;
 
            targetX = MARGIN_X * (i - id);
            //left slides
            if (i < id)
            {
                targetX -= ITEM_W * 0.6f;
                targetZ = ITEM_W * 3f / 4;
                targetRot = -60f;
 
            }
            //right slides
            else if (i > id)
            {
                targetX += ITEM_W * 0.6f;
                targetZ = ITEM_W * 3f / 4;
                targetRot = 60f;
            }
            else
            {
                targetX += 0f;
                targetZ = 0f;
                targetRot = 0f;
            }
 
            GameObject photo = photos;
            float ys = photo.transform.position.y;
            Vector3 ea = photo.transform.eulerAngles;

            iTween.MoveTo(photo, new Vector3(targetX, ys, targetZ), 1f);
            iTween.RotateTo(photo, new Vector3(ea.x, targetRot, targetZ), 1f);
        }
    }
   public void OnSliderChange(float value)

   {
       Debug.Log(value);
       moveSlider((int)(value * photosCount));
   }
}
下面是uiSlider的设置

 
镜面效果是我从某个网页找到的,请点击看:
http://blog.163.com/lnwanggang@yeah/blog/static/165332162201010611107883/
这个效果写得很好,我就不复制黏贴了,
主要是搞一个shader和一个调用的文件MirrorReflection.cs:
其实这两个东西到底什么意思我也没看懂,我会吐槽么

反正我是拿来用了
其实感觉不写shader也可以  直接拿FX/Mirror Reflection那个来用 
但是那个MirrorReflection.cs是一定要写的
几个参数默认就好了,只有m_ReflectLayers这个设置为picture的层就行了 


不过我对比过好像这个多了一句shader语句好像是image效果的意义不明
 
再自己用ps新建一个64*64的图片
rgb为106,107,106, 整个图片的透明度为40%,然后保存成png放入场景中,作为镜面的材质色

一定要
最后调整一下各个方向的位置和角度,
搞定!~ 自己动手丰衣足食   项目我就不放出来了


[출처] http://www.ceeger.com/forum/read.php?tid=1411

반응형
Posted by blueasa
, |

링크 : http://hompy.info/664


CoverFlowScroll.unitypackage


요즘 제작중인 RPG 게임 GUI 에서 영웅 생성을 위해 캐릭터를 선택하는 UI 를 커버플로우(Cover Flow)로 구성하게 되어 NGUI 를 조금 응용해서 심플하게 구성해봤습니다. 아래 동영상과 유니티 데모를 보시면 대략 어떤 것인지 아실 수 있을 것이며 혹시나 구현 방법에 대해 관심 있는 분들은 첨부 파일을 받아서 패키지 임포트로 유니티에서 가져가 내용을 살펴 보시면 되겠습니다. NGUI 외에도 트위닝 모션을 위해 HOTween 플러그인을 사용하는 코드가 있으나 수정해서 쓰셔도 되겠습니다. 그리고 데모에 보이는 캐릭터 디자인 소스는 에셋 스토어에서 구입한 것이네요. NGUI 플러그인에 이런 기능도 포함되면 좋을 것 같은데 안된다면 아쉽지만 저처럼 이렇게 구현해야 되겠지요.^^ 여러분은 지금 어떤 기능들을 추가해보고 있나요?

[유니티 데모 링크] http://www.hompydesign.com/tmp/coverflow/

[패키지 첨부파일]  CoverFlowScroll.unitypackage

using UnityEngine;
using System.Collections;
using System.Collections.Generic;
using Holoville.HOTween;
using Holoville.HOTween.Plugins;

public class HeroTable : MonoBehaviour {
   UISprite[] heros;

   Transform mTrans;
   bool mIsDragging = false;
   Vector3 mPosition, mLocalPosition;
   Vector3 mDragStartPosition;
   Vector3 mDragPosition;
   Vector3 mStartPosition;
   
   public float cellWidth = 160f;
   public float downScale = 0.4f;
   public int cellTotal = 6;
   public int seq = 3;
   
   public UILabel titleLabel;
   
   // Use this for initialization
   void Start () {
       StartCoroutine( DelayStart(1f) );
   }
   void Awake(){
       mTrans = transform;
       mPosition = mTrans.position;
       mLocalPosition = mTrans.localPosition;
   }
   
   IEnumerator DelayStart(float delayTime) {
       yield return new WaitForSeconds(delayTime);
       heros = gameObject.GetComponentsInChildren<UISprite>();
       SetPosition(false);
   }
   
   void SetSequence(bool isRight){
       Vector3 dist = mLocalPosition - mTrans.localPosition;
       float distX = Mathf.Round(dist.x/cellWidth);
       seq = (int)distX;
       if (seq >= cellTotal) seq = cellTotal - 1;
       if (seq <= 0) seq = 0;
   }
   
   void SetPosition(bool isMotion){
       Vector3 pos = mLocalPosition;
       pos -= new Vector3(seq * cellWidth, 0f0f);
       if (isMotion) {
           TweenParms parms = new TweenParms();
           parms.Prop("localPosition", pos);
           parms.Ease(EaseType.Linear);
           HOTween.To(mTrans, 0.1f, parms);
           HOTween.Play();
       else {
           mTrans.localPosition = pos;
       }
       titleLabel.text = heros[seq].spriteName;
   }

   void Drop () {
       Vector3 dist = mDragPosition - mDragStartPosition;
       if (dist.x>0f) SetSequence(true);
       else SetSequence(false);
       SetPosition(true);
   }

   void OnDrag (Vector2 delta) {
       Ray ray = UICamera.currentCamera.ScreenPointToRay(UICamera.lastTouchPosition);
       float dist = 0f;
       Vector3 currentPos = ray.GetPoint(dist);

       if (UICamera.currentTouchID == -|| UICamera.currentTouchID == 0) {
           if (!mIsDragging) {
               mIsDragging = true;
               mDragPosition = currentPos;
           else {
               Vector3 pos = mStartPosition - (mDragStartPosition - currentPos);
               Vector3 cpos = new Vector3(pos.x, mTrans.position.y, mTrans.position.z);
               mTrans.position = cpos;
           }
       }
   }

   void OnPress (bool isPressed) {
       mIsDragging = false;
       Collider col = collider;
       if (col != null) {
           Ray ray = UICamera.currentCamera.ScreenPointToRay(UICamera.lastTouchPosition);
           float dist = 0f;
           mDragStartPosition = ray.GetPoint(dist);
           mStartPosition = mTrans.position;
           col.enabled = !isPressed;
       }
       if (!isPressed) Drop();
   }
}

using UnityEngine;
using System.Collections;

public class HeroItem : MonoBehaviour {
   Transform mTrans, mParent;
   Vector3 scale;
   float cellWidth;
   float downScale;
   HeroTable hTable;

   void Start () {
       mTrans = transform;
       scale = mTrans.localScale;
       mParent = mTrans.parent;
       hTable = mParent.GetComponent<HeroTable>();
       cellWidth = hTable.cellWidth;
       downScale = hTable.downScale;
   }
   
   void Update () {
       Vector3 pos = mTrans.localPosition + mParent.localPosition;
       float dist = Mathf.Clamp(Mathf.Abs(pos.x), 0f, cellWidth);
       mTrans.localScale = ((cellWidth - dist*downScale) / cellWidth) * scale;
   }
}

반응형
Posted by blueasa
, |