


[펌] Two Unity tricks for isometric games
Here are two small tricks that can help if you’re making an isometric 2D game in Unity. Ok, so not actually isometric, but that’s the term we’re used to in videogames, so we’ll go with it. These are quite basic and if you’re working on such a game you’ve probably already tackled them your own way. This is our take on it, hopefully it’s useful to someone.
Sprite Ordering
Normally in a 2D game there is no concept of depth, so if you simply place the sprites in the world, you’ll most likely have objects appearing in the wrong order than what you’d expect in an isometric game.
Thankfully Unity exposes Sorting Layer and Order In Layer properties for Renderers.
A quick fix is to set the value of Order in Layer to depend on the Y position of the object.
[ExecuteInEditMode]
[RequireComponent(typeof(Renderer))]
public class DepthSortByY : MonoBehaviour
{

    private const int IsometricRangePerYUnit = 100;

    void Update()
    {
        Renderer renderer = GetComponent();
        renderer.sortingOrder = -(int)(transform.position.y * IsometricRangePerYUnit);
    }
}
This solves the problem for the simplest case, when we assume all objects rest on the ground.
Let’s assume we want to have an object that is above the ground in the world, like placing a bird house on that tree. Just trying to place it in the world will treat the pivot of the object as being at ground level, with no way to both place it at a proper height and sort it correctly.
There are several options for this. Just to get it out of the system, the first option is to add empty space to the texture below the bird house to make sure the pivot is at ground level (in Unity, the pivot can’t be outside of the sprite). This is baaaad! This is wasting texture space, and all instances of that object will need to be at the same height in the game. There are other, less insane, options.
One is having a height property in the DepthSortByY behavior and subtract it from transform.position.y when computing the sorting order.
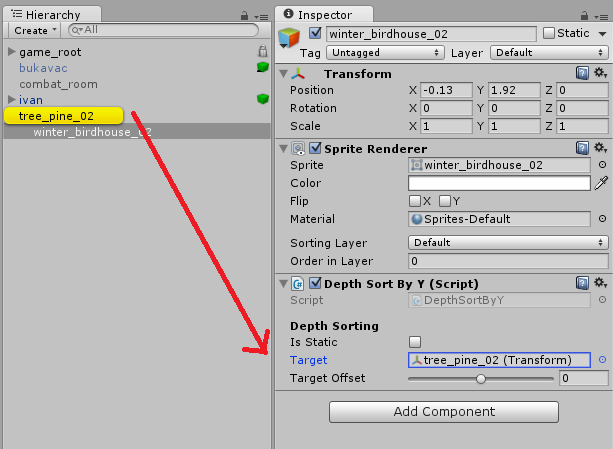
Another solution (which we went with) is allowing the DepthSortByY behavior to make the depth computation based on another object’s transform. This way, the objects will be considered to be at the same point in space as their target and they’ll have the same depth order, even if they’re at different Y positions in the scene. In the bird house example, the bird house uses the tree’s world position for its depth computations.
This solution works better for our game, because it allows artists to move the item freely while staying at the depth (and not have to deal with editing the “height” parameter). And mainly because all the gameplay takes place in the ground’s 2D plane anyway so all objects are guaranteed to have a root object that has the ground position. In your own game, it might be easier to just use the first option.
[ExecuteInEditMode]
[RequireComponent(typeof(Renderer))]
public class IsometricObject : MonoBehaviour
{
   private const int IsometricRangePerYUnit = 100;

   [Tooltip("Will use this object to compute z-order")]
    public Transform Target;

    [Tooltip("Use this to offset the object slightly in front or behind the Target object")]
    public int TargetOffset = 0;

    void Update()
    {
        if (Target == null)
            Target = transform;
        Renderer renderer = GetComponent();
        renderer.sortingOrder = -(int)(Target.position.y * IsometricRangePerYUnit) + TargetOffset;
    }
}
This is how this example is set up in Unity:
And this is how it behaves in practice:
Ground Projection
For certain visual elements and effect, we wanted them to look properly projected on the ground, but also not spend too much time on making art for them. The ‘isometric’ view of the game means that anything that is horizontally on the ground should look squashed vertically.
For simple sprites, this is quite easy. Just draw them directly with the correct perspective and place them in the game.

Things get more complicated when you need something that should be able to rotate in any direction. Like something to show the direction the character is moving in, or some visual effect sweeping the ground towards your attacking direction. Especially if these are things that are animated, drawing them manually for all possible orientations is out of the question (or so the artists claim).
Our solution is: the artists draw and animate these effects as if viewed top-down, and the programmers take care of transforming them at runtime to look as if they were projected on the ground. Without any transformation, just taken from the artists and placed in the game rotating them to match the player’s direction they look like below.
We need to squash them vertically. For a sprite that doesn’t rotate, just scaling on the Y dimension does the job. But for a rotating sprite this doesn’t work, and it’s even worse for animations. The first thing we tried was a custom shader that transformed the vertices in the local space to squash them vertically (naturally, we went with the most complex solution first), but this needed to break batching to work properly with all sprites and animations. Or I was just bad at writing that shader, maybe…
The final solution is absurdly simple. Just rotate the object around the X axis, and it works!
However, we also wanted to:
- apply the rotation automatically and consistently, and not have to remember or care about setting the X component of the rotation ourselves
- be able to set the Z component of the rotation (to make the effect rotate towards any game world direction)
- not have to visit all ‘ground projected’ effects when changing the amount of squashing
Basically, the game should not have to know that a rotation on X axis is happening. If an object has the ProjectOnGround behavior attached, it should just draw properly without additional effort. So we do the math just before rendering, and restore the rotation to its normal value right after. This hides the rotation around the X axis from the rest of the code.
[ExecuteInEditMode]
    public class ProjectOnGround : MonoBehaviour
    {
        private Quaternion savedRotation;

        // called before rendering the object
        void OnWillRenderObject()
        {
            savedRotation = transform.rotation;
            var eulers = transform.rotation.eulerAngles;
            transform.rotation = Quaternion.Euler(Constants.Isometric.PerspectiveAngle, eulers.y, eulers.z);
        }

        //called right after rendering the object
        void OnRenderObject()
        {
            transform.rotation = savedRotation;
        }
    }
Simple and easy. Too bad I wasted time trying to write a shader for this. The result looks good and we can simple ‘project’ any object by just adding this behavior to it.
[출처] https://breadcrumbsinteractive.com/two-unity-tricks-isometric-games/
Two Unity tricks for isometric games - Breadcrumbs
Here are two small tricks that can help if you’re making an isometric 2D game in Unity. Ok, so not actually isometric, but that’s the term we’re used to in videogames, so we’ll go with it. These are quite basic and if you’re working on such a gam
breadcrumbsinteractive.com
'Unity3D > Tips' 카테고리의 다른 글
| [TMP] 한글 문장 단위 자동 줄바꿈이 안될 때 (0) | 2021.09.27 |
|---|---|
| [Tip] Sprite Mask + Soft Clip Trick (+ MeshRenderer Mask) (0) | 2021.09.02 |
| [펌][Unity3d] Exclude files or folders from importing (0) | 2021.06.28 |
| [Unity] 앱 이름 변경/현지화(로컬라이징) (0) | 2021.02.25 |
| [펌] 겔럭시 S10이상의 폰에서 게임화면이 하얗게 나오는 현상 (0) | 2021.02.05 |
 $AlphaNumericSort.cs