블로그 이미지
Every unexpected event is a path to learning for you. blueasa

카테고리

분류 전체보기 (2861)
Unity3D (899)
Programming (479)
Server (33)
Unreal (4)
Gamebryo (56)
Tip & Tech (192)
협업 (65)
3DS Max (3)
Game (12)
Utility (142)
Etc (99)
Link (34)
Portfolio (19)
Subject (90)
iOS,OSX (53)
Android (16)
Linux (5)
잉여 프로젝트 (2)
게임이야기 (3)
Memories (20)
Interest (38)
Thinking (38)
한글 (30)
PaperCraft (5)
Animation (408)
Wallpaper (2)
재테크 (19)
Exercise (3)
나만의 맛집 (3)
냥이 (10)
육아 (16)
Total
Today
Yesterday
Hey guys,

Just wanted to post a snippet in case it turns out to be helpful for anyone using an alternate localization solution with NGUI.

I'm currently using Smart Localization which can be found here: http://forum.unity3d.com/threads/173837-RELEASED-Smart-Localization-for-Unity3D

It's really good, it's free and has some neat features such as Microsoft Translate integration.

In order to use it with NGUI, simply type your string key into the label field and drag this script on.

Cheers!

Code (csharp):
  1.  
  2. using UnityEngine;
  3. using System.Collections;
  4. using System.Globalization;
  5.  
  6. [RequireComponent(typeof(UIWidget))]
  7. [AddComponentMenu("NGUI/UI/LocalizeWidget")]
  8. public class LocalizeWidget : MonoBehaviour
  9. {
  10.     // No public variables, we'll get the key from the widget field
  11.     private string key;
  12.     private string mLanguage;
  13.     private LanguageManager loc;
  14.  
  15.     // Localize the widget on start.
  16.     private void Start()
  17.     {
  18.         // Reference the language manager
  19.         loc = LanguageManager.Instance;
  20.        
  21.         // Hook up a delegate to run the localize script whenever a language was changed
  22.         loc.OnChangeLanguage += new ChangeLanguageEventHandler(Localize);
  23.        
  24.         // Initial localize run
  25.         Localize();
  26.     }
  27.    
  28.     // Incase the script didn't get the message from being inactive
  29.     private void OnEnable()
  30.     {
  31.         if(mLanguage != loc.language)
  32.             Localize();
  33.     }
  34.    
  35.     // Force-localize the widget.
  36.     private void Localize(LanguageManager thisLanguage=null)
  37.     {
  38.         UIWidget w = GetComponent<UIWidget>();
  39.         UILabel lbl = w as UILabel;
  40.         UISprite sp = w as UISprite;
  41.  
  42.         // If no localization key has been specified, use the label's text as the key
  43.         if (lbl != null)
  44.             key = lbl.text;
  45.        
  46.         string val = loc.GetTextValue(key);
  47.        
  48.         if(string.IsNullOrEmpty(val))
  49.             val = "Missing String";
  50.  
  51.         if (lbl != null)
  52.         {
  53.             // If this is a label used by input, we should localize its default value instead
  54.             UIInput input = NGUITools.FindInParents<UIInput>(lbl.gameObject);
  55.            
  56.             if (input != null  input.label == lbl)
  57.                 input.defaultText = val;
  58.             else
  59.                 lbl.text = val;
  60.         }
  61.         else if (sp != null)
  62.         {
  63.             sp.spriteName = val;
  64.             sp.MakePixelPerfect();
  65.         }
  66.        
  67.         // Set this widget's current language
  68.         mLanguage = loc.language;
  69.     }
  70. }
  71.  


출처 : http://forum.unity3d.com/threads/smart-localization-with-ngui.189253/


참조 : http://forum.unity3d.com/threads/released-smart-localization-for-unity3d.173837/

반응형
Posted by blueasa
, |

Unity로 안드로이드 앱을 개발하다보면 스크롤 안에 버튼이 들어갈 경우가 종종 있다.

PC에서 테스트 할 때는 마우스로 잘 눌리던 버튼이 스마트 폰에 넣어서 테스트 해보면 간혹 잘 눌리지 않는 경우가 있다. 이럴때 EventSystem 설정을 바꿔줘야하는데 다음과 같이 세팅 하면 적당하다.


10
11
12
13
14
15
16
17
18
19
20
21
22
23
24
25
26
27
28
29
30
31
private const float inchToCm = 2.54f;
     
[SerializeField]
private EventSystem eventSystem = null;
     
[SerializeField]
private float dragThresholdCM = 0.5f;
//For drag Threshold
     
private void SetDragThreshold()
{
    if (eventSystem != null)
    {
        eventSystem.pixelDragThreshold = (int)(dragThresholdCM * Screen.dpi / inchToCm);
    }
}
  
  
void Awake()
{
    SetDragThreshold();
}


출처 : http://knightk.tistory.com/12

반응형
Posted by blueasa
, |
App initially starts:
  • OnApplicationFocus(true) is called
App is soft closed:
  • OnApplicationFocus(false) is called
  • OnApplicationPause(true) is called
App is brought forward after soft closing:
  • OnApplicationPause(false) is called
  • OnApplicationFocus(true) is called
Hope that helps


[출처] http://pjsmemo.tistory.com/34

반응형
Posted by blueasa
, |


[Link] https://www.assetstore.unity3d.com/kr/#!/content/59382


Disk/storage capacity check helper methods for Windows, OSX, iOS, and Android platform. 

Simply checks free, busy, and total storage space of your platform. 

Main methods: 
・CheckAvailableSpace(); 
・CheckBusySpace(); 
・CheckTotalSpace(); 

File managing functions like save and delete to text or binary file with special cases handling are also provided. 

Enjoy! 

Notes: 
1. Tested on Windows, OSX, iOS, and Android platform. 

2. Implemented file handling methods are not including methods that are already covered in standard library (most likely on System.IO). 


See and help me on Git:https://github.com/dkrprasetya/simple-disk-utils


[참조] http://forum.unity3d.com/threads/get-available-disk-space.251192/

반응형
Posted by blueasa
, |


Force Module Active가 체크 돼 있다면 체크해제 해 주자.

(현재 Unity 5.4.x 기준)


[참조] http://blog.naver.com/dunkydonk/220256297382

반응형
Posted by blueasa
, |

Objective

The main objective of this post is to Keep you updated with the latest optimization Techniques for Games developed in Unity.


Your game lags?
Players unhappy?
don't know what to do?

Well the answer is, your game needs "OPTIMIZATION !"

"Optimization is every important part while developing any game, As exciting and challenging as this may be, it makes it difficult for developers to get the information they need."

I found it almost impossible to get hold of information about techniques and algorithms that real developers used in their Optimized games. There is usually an atmosphere of secrecy about the coding techniques in top studios.

We realized that the time spent on optimizing a game is quite high, and decided that it is high time to share to the world of game developers, what we know about this important process.

So we have taken up an initiative and share valuable tips every day, and keep the community updated. we would also be very happy to welcome your ideas and techniques for the same.

Let us create an open community, and together move forward towards developing high quality AAA titles. :D


- See more at: http://www.theappguruz.com/blog/unity-optimization-initiative#sthash.0YKWVMH2.dpuf


[출처] http://www.theappguruz.com/blog/unity-optimization-initiative

반응형
Posted by blueasa
, |

[펌] Audio Clip

Unity3D/Tips / 2016. 9. 7. 14:33

원문 - http://docs.unity3d.com/Manual/class-AudioClip.html

음향 쪽 볼일이 생겨 번역해서 적어놓습니다. 오역이 있을 수 있습니다. T_T


Audio Clip

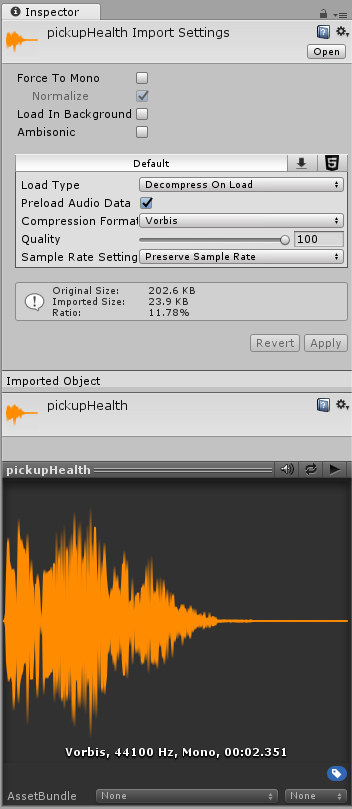
Audio Clip은 Audio Source가 사용하는 음향 정보를 포함하고 있습니다. 유니티는 모노널, 스테레오와 다 채널 음향 자산(최대 8채널)을 지원합니다. 유니티가 사용할 수 있는 음향 파일 포맷은 .aif, .wav, .mp3와 .ogg이며 .xm, .mod, .it와 .s3m 포맷인 tracker module도 사용할 수 있습니다. tracker module 자산은 자산 추출 조사기(asset import inspector) 탭에서 파형 미리 보기가 불가능하지만 다른 음향 자산과 같은 방식으로 동작합니다.


Audio Clip 조사기


속성

Load type(불러오기 방식)

실행 시 유니티가 음향 자산을 불러오는 데 사용하는 방법.

Decompress on load(불러올 때 압축해제)

음향 파일이 불러오는 즉시 압축이 해제됩니다. 즉시 압축 해제로 생기는 성능 부담(overhead)을 피하려면 이 옵션은 압축된 작은 소리에 사용하세요. Vorbis로 인코딩된 소리를 불러와 압축을 해제하면 압축 때보다 대략 열 배 정도의 메모리를 더 사용하게 되니 (ADPCM 인코딩의 경우는 대략 3.5배) 이 옵션을 큰 파일에는 사용하지 마세요.

Compressed in memory(메모리에 압축)

메모리에 소리를 압축된 상태로 유지하며 재생 중에 압축 해제합니다. 이 설정은 약간의 성능 부담(특히 Ogg/Vorbis 압축 파일)이 생기므로 불러와서 압축 해제시 메모리의 양(파일 크기)이 엄청나게 큰 파일에만 사용하세요. 압축 해제는 합성 스레드에서 일어나며, 분석기 창의 음향 구획의 "DSP CPU" 항목에서 확인할 수 있습니다.

Streaming(바로 재생)

소리를 바로 디코딩합니다. 이 방식은 압축된 데이터를 재생하는 데 필요한 최소한의 메모리만을 사용하기 때문에 디스크 읽기가 증가하고 바로 디코딩합니다. 각각의 스레드에서 일어나는 압축해제는 분석기 창의 음향 구획의 "Streaming CPU" 항목에서 확인할 수 있습니다.


Compression Format(압축 포맷)

실행 시 소리에 사용될 특정 포맷. 이 설정이 사용 가능한지는 현재 선택된 빌드 타겟에 따릅니다.

PCM

이 설정은 파일 크기가 클수록 더 높은 품질을 제공합니다. 아주 짧은 효과음에 최적입니다.

ADPCM

이 포맷은 많은 양의 잡음을 포함한 소리와 발자국, 충격, 무기 같은 자주 재생해야 하는 소리에 효과적입니다. 압축 비율은 PCM 대비 3.5배 더 작지만, CPU 사용량은 MP3/Vorbis보다 더 낮아서 앞서 말한 종류의 소리에 선택 시 선호됩니다.

Vorbis/MP3

파일 압축 결과가 작지만, 음질은 PCM 음향과 비교해서 다소 떨어집니다. 압축량은 음질 조정 단추를 움직여서 조정할 수 있습니다. 이 포맷은 중간 길이의 효과음과 음악에 최적입니다.

HEVAG

PS Vita에서 사용하는 고유 포맷입니다. 사양은 ADPCM과 매우 유사합니다.


Sample Rate Setting(추출률 설정)

Preserve Sample Rate(추출률 유지)

이 설정은 추출률을 수정하지 않은 채로 유지합니다. (기본)

Optimize Sample Rate(추출률 최적화)

이 설정은 추출률을 분석된 가장 높은 주파수 성분에 따라서 자동으로 최적화합니다.

Override Sample Rate(추출률 덮어쓰기)

이 설정은 수동으로 추출률을 덮어쓸 수 있게 합니다. 주파수 성분을 무시하려 할 때 효과적입니다.


Force To Mono(강제 모노널)

설정을 켜면, 음향 클립은 단 채널 소리로 내림 합성됩니다. 내림 합성한 신호는 최고치로 평균화되는데 이는 신호의 내림 합성 진행 결과물이 보통 원본보다 소리가 더 작기 때문이며, 이로 인해 최고치로 평균화된 신호는 향후 AudioSource의 음량 설정을 통한 조정을 위해 상단 부분(headroom)을 더 줍니다.


Load In Background(뒤에서 불러오기)

설정을 켜면, 음향 클립은 주 스레드를 멎게(stall) 하지 않기 위해 뒤에서 불립니다. 이 설정은 장면 재생이 시작될 때 모든 음향 클립을 불러와 완료하는 표준 유니티 행동을 확실히 하기 위해 기본으로 꺼져 있습니다. 뒤에서 아직 불러오고 있는 음향 클립에 대한 재생 요청은 클립 불러오기가 완료될 때까지 지연된다는 것을 알아두세요. 불러오기 상태는 AudioClip.loadState 속성으로 질의할 수 있습니다.


Preload Audio Data(음향 자료 미리 불러오기)

설정을 켜면, 음향 클립이 장면이 불릴 때 미리 불리게 됩니다. 이 설정은 장면 재생이 시작될 때 모든 음향 클립을 불러와 완료하는 표준 유니티 행동을 나타내기 위해 기본으로 켜져 있습니다. 이 설정이 지정되어 있지 않으면, 음향 데이터는 AudioSource.Play()/AudioSource.PlayOneShot()을 처음 사용할 때나 AudioSource.LoadAudioData()를 통해 불릴 수 있으며 AudioSource.UnloadAudioData()를 통해 불러오기를 다시 되돌릴 수 있습니다.


Quality(음질)

압축 포맷 클립의 압축량을 결정합니다. PCM/ADPCM/HEAVG 포맷은 적용되지 않습니다. 파일 크기 통계는 조사기에서 볼 수 있습니다. 이 값을 조정하는 좋은 방법은 조정 단추를 배포 사양에 맞춰 파일 크기는 작게 유지하며 재생 시 '충분히 좋은' 위치에 끌어다 놓는 것입니다. (당연한 소리 아닌가?!) 원본 크기는 원본 파일과 연관이 있는 점을 알아두세요. 파일이 MP3이고 압축 포맷이 PCM으로 설정되어 있으면, (즉 무압축) 파일은 이제 무압축으로 담기고 원본 MP3보다 공간을 더 사용하기 때문에 결과 비율은 100%보다 클 것입니다.


미리 보기 창

미리 보기 창은 세 가지 아이콘을 갖고 있습니다.

 선택된 클립을 자동으로 바로 재생하려 할 때.

 클립을 연속으로 반복해서 재생하려 할 때.

 클립을 재생합니다.


음향 자산 가져오기

유니티는 넓은 범위의 원본 파일 포맷을 읽을 수 있습니다. 파일을 가져오게 되면 빌드 타겟과 소리 종류에 맞춰 포맷을 변환합니다. 이는 조사기안에 있는 압축 포맷 설정을 통해 선택할 수 있습니다.

보통 PCM과 Vorbis/MP3 포맷은 원본에 가능한 근접하게 소리를 유지할 수 있어 주로 사용됩니다. PCM은 소리가 압축되지 않고 메모리에서 바로 읽을 수 있으므로 CPU에 요구하는 사양이 아주 적습니다. Vorbis/MP3은 음질 조정 단추를 조정해서 듣기 어려운 정보를 무시할 수 있습니다.

ADPCM은 무 압축된 PCM 설정보다 약단 더 CPU를 사용하므로 CPU와 메모리 사용량 사이를 절충하지만, Vorbis나 MP3 압축으로 얻을 수 있는 압축보다 보통 약 3배 정도 좋지 않은 압축비 3.5를 일정하게 얻게 됩니다. 더욱이 ADPCM은 (PCM과 같이) 자동 최적화나 소리의 주파수 성분과 적당한 품질 저하를 사용한 수동 추출률 지정을 통해 꽉 찬 소리 자산의 크기를 좀 더 줄일 수 있습니다.

module 파일(.mod, .it, .s3m, .xm)은 극히 작은 크기로 고품질을 낼 수 있습니다. 특별히 원하지 않는 이상 module 파일을 사용할 때는 불러오기 방식을 Compressed In Memory으로 설정했는지 확인하세요. 왜냐하면, Decompress On Load로 설정되어 있으면 전체 곡이 압축해제 되기 때문입니다. 이는 이런 종류의 클립 또한 GetData/SetData 사용을 허용하는 유니티 5.0의 새로운 동작 방식이지만 tracker module을 사용하는 일반적이고 기본적인 경우에는 Compressed In Memory으로 설정해야 합니다.

일반적인 경험에 따르면 압축된 음향(이나 module)은 배경음이나 대화 같은 긴 파일에 최적이며, PCM과 ADPCM은 부드러운 신호에서 누가 봐도 심한 ADPCM의 아티팩트 같은 약간의 잡음을 포함한 효과음에 최적입니다. 압축 조정 단추를 사용해서 압축량을 조정할 수 있습니다. 높은 압축에서 시작해 음질 저하를 인지할 수 있는 지점까지 서서히 설정을 내립니다. 그다음 음질 저하가 사라지는 걸 알 수 있을 때까지 약간씩 올립니다.


플랫폼별 특정 세부내용

iOS/Android

휴대용 플랫폼에서는 명시적으로 MP3를 선택하지 않으면 Vorbis 코덱으로 인코딩됩니다.


[출처] http://fetchinist.com/blogs/?p=984

반응형
Posted by blueasa
, |

유니티를 기반으로 모바일 게임을 만들고, 다른 나라로 Localizing 작업을 할 때 여러가지 최적화를 할 것이다.

여러가지 최적화 기법중 우리가 가장 애먹는게 아마도 용량이 아닐까 생각한다.

텍스쳐 용량은 그런대로 줄였다고 하자. 문제가 되는 것은 두번째의 폰트용량이다.

각각의 나라에 맞춘 폰트는 용량이 비대하게 늘어나기 시작할 것이며, 50M를 넘는일이 빈번하게 될 것이다.

여기서 쉬운 방법은 첫째 라이브 서버를 구축하므로써 서버로 데이터를 받던가.

두번째는 50M를 넘어서 그냥 올리는 방법일 것이다.


하지만 Packed Fonts 방법을 이용하면 폰트의 최적화가 가능해진다.


먼저 링크를 공유한다.


Youtube Link : https://www.youtube.com/watch?v=dY6jQ7d2ius


위 링크에서는 Packed Fonts 를 만드는 방법을 자세하게 서술하고 있다.


링크를 보지 않은 사람들을 위해 글로 정리를 하자면


1. R G B A의 각각 채널에 문자를 저장하는 방법이다.

2. R G B A 각각 채널에 문자를 저장하므로써 기존 2048 * 2048의 문자 텍스쳐가 4개가 있었다면 한개로 정리가 되므로 약 70M를 줄일 수 있게된다.


하지만 이런 장점에도 단점이 있으니..


1. 각각 RGBA 채널에 저장하므로 그림자등 고퀄리티의 효과를 사용할 수 없다.

2. 알파블랜딩이 불가능해진다.

3. NGUI Atlas 사용이 불가능하다.


여러모로 계륵같은 기능이지만. 폰트가 엄청 많고 그만한 대가를 수반할때는 사용이 가능할 듯 싶다.


[출처]

http://vallista.tistory.com/entry/Unity-Packed-Fonts-%ED%8F%B0%ED%8A%B8-%EC%B5%9C%EC%A0%81%ED%99%94

반응형
Posted by blueasa
, |

[파일]

Dvornik-Unity-Distortion.zip


Unity 3D Anoxemia Heat Distort Tutorial


Hello. It is a part of Anoxemia tutorials. Here I want to share some experience of creating 2D game with Unity

What we going to do here:


DOWNLOAD:
https://dl.dropboxusercontent.com/u/106482752/Dvornik-Unity-Distortion.zip

Root tutorial: http://kostiantyn-dvornik.blogspot.com/2014/07/anoxemia-unity-2d-tutorial.html


If you ever want to create cool effects like hot air waving or thick glass refraction or some underwater streams you will came to Detonator package and HeatDistort shader.But as for me it looks very complicated, so write my own and use it well with latest Unity 2D system.

NOTE: it works only with Unity Pro and Deffered lighting on. It works the same way how Detonator'a works. It tooks image and project it correctly on a plane with texture distortion.

We will split tutorial into 2 steps.
1.Explain shader
2. How to use it.

1.
Lets take a look at the shader:

Shader "Dvornik/Distort" {
Properties {
_Refraction ("Refraction", Range (0.00, 100.0)) = 1.0
_DistortTex ("Base (RGB)", 2D) = "white" {}
}

SubShader {

Tags { "RenderType"="Transparent" "Queue"="Overlay" }
LOD 100

GrabPass
{

}

CGPROGRAM
#pragma surface surf NoLighting
#pragma vertex vert

fixed4 LightingNoLighting(SurfaceOutput s, fixed3 lightDir, fixed atten){
        fixed4 c;
        c.rgb = s.Albedo;
        c.a = s.Alpha;
        return c;
  }

sampler2D _GrabTexture : register(s0);
sampler2D _DistortTex : register(s2);
float _Refraction;

float4 _GrabTexture_TexelSize;

struct Input {
float2 uv_DistortTex;
float3 color;
float3 worldRefl;
float4 screenPos;
INTERNAL_DATA
};

void vert (inout appdata_full v, out Input o) {
  UNITY_INITIALIZE_OUTPUT(Input,o);
  o.color = v.color;
}

void surf (Input IN, inout SurfaceOutput o) {

    float3 distort = tex2D(_DistortTex, IN.uv_DistortTex) * float3(IN.color.r,IN.color.g,IN.color.b );
    float2 offset = distort * _Refraction * _GrabTexture_TexelSize.xy;
    IN.screenPos.xy = offset * IN.screenPos.z + IN.screenPos.xy;
    float4 refrColor = tex2Dproj(_GrabTexture, IN.screenPos);
    o.Alpha = refrColor.a;
    o.Emission = refrColor.rgb;
}
ENDCG
}
}

We have just 2 properties. It is

_Refraction -amount of distortion
_DistortText - texture according to what we gonna distort our environment. You can use any colored texture. To make distortion. But in fact only Red and Green channels are working as distortion vector.

Tags { "RenderType"="Transparent" "Queue"="Overlay" } - We set Queue to Overlay because we want to render this effect after everything.

#pragma surface surf NoLighting
#pragma vertex vert

We used custom NoLigthing model and custom vertex shader to have deal with vertex color that used in particle system. There is a little chunk, cuz we write only Emission to have absolutely No Lighting shader.

 float3 distort = tex2D(_DistortTex, IN.uv_DistortTex) * float3(IN.color.r,IN.color.g,IN.color.b );
 float2 offset = distort * _Refraction * _GrabTexture_TexelSize.xy;
 IN.screenPos.xy = offset * IN.screenPos.z + IN.screenPos.xy;
 float4 refrColor = tex2Dproj(_GrabTexture, IN.screenPos);

Here we read distort texture, calculate offset of the screen and project on the model correctly. That's it.

2. 
Create a simple material and apply that shader. Next if you use particle system apply particle render order script to that. Other way some object will be rendered after distortion so it will looks weird. You can use particle Color or Color Over LifeTime to make distortion more/less. I often setup it thats way:

to make distortion fade in and fade out. Thats probabbly all that you need to know about.

Know bugs:
1.

How to resolve:
Add particle order script to PS and set order to  bigger then foreground sprite.
Effect is not working with orthographic camera

2. To much distortion on large distance to camera

How to resolve: add script that decreasing material property distortion with distance to camera.


[출처] http://kostiantyn-dvornik.blogspot.kr/2014/10/unity-3d-anoxemia-heat-distort-tutorial.html

반응형
Posted by blueasa
, |

[출처]

http://geekcoders.tistory.com/entry/Unity-%EC%9C%A0%EB%8B%88%ED%8B%B0-%ED%94%84%EB%A1%9C%EA%B7%B8%EB%9E%98%EB%A8%B8%EA%B0%80-%EC%95%8C%EC%95%84%EC%95%BC-%ED%95%A0-%EC%BD%94%EB%93%9C%EC%9E%91%EC%84%B1%EB%B2%95


댓글에 개인적인 문의가 작성되면 삭제하고 있습니다.
개인적인 문의는 페이스북이나 메일로 부탁드립니다.

email : master@geekdev-korea.com

출처표기는 삭제하지 말아주세요.

- 령호 -


계속 업데이트 됩니다.

마지막업데이트 15.05.29
- String병합 내용 제거 - 


하나하나 내용에 대해서 깊고 자세하게 작성할 수 없습니다.
자세한 내용에 대해서는 직접 검색해보시길 권합니다.


개인블로그에서 그룹블로그로 전환하면서 많은 글들을 삭제했습니다.
천천히 다시 정리합니다. 테스트는 모바일 기준입니다.

유니티 버전은 4.6.1 기준으로 테스트됩니다.


1. Loop


C# 자료구조에는 여러가지 루프문이 제공된다.
for, foreach, enumerator
어느 루프문을 사용해야 할까?
보통 본인에게 편한 루프문을 택한다.
하지만 성능이 다르다면?


- 테스트과정
각각루프를 도는 스크립트를 만들고, 하나의 스크립트에서 컴포넌트로 통합한다.
모바일로 빌드, 프로파일러를 확인한다.

테스트모바일은 갤럭시 노트3다.


-- 소스코드 --


-- 결과 --


- 정리 

Foreach는 속도도 가장 느리고, GC도 24Byte를 남겼다.

Enumerator는 Foreach보다 빠르게 동작했으며,

For는 Enumerator의 2배나 빠르게 동작한다.


가끔 프로파일러의 변동이 있을 때도 있지만 평균적으론 위 성능을 보인다.


- 추가

Dictionary<int, string>


-- 소스코드 --


--  결과 --


foreach

enumerator


이 부분을 보이는게 더 명확할듯 하다.

foreach문의 경우 그래프가 깨지는 구간이 더 많이 존재 한다. (프레임이 끊길 수 있다)

enumerator는 foreach에 비해 안정적이다.


- 결론

For문으로 루프문을 작성하지 못할 경우, enumerator

For문으로 루프문을 작성할 수 있을 경우, for


2. Parse


C#에서 지원하는 Parse는 여러가지가 존재한다.

그 중에서 가장 많이 사용하는 자료형은 string을 다른자료형으로 변환하거나 그 반대로 다른자료형을 string으로 변환하는 일이 잦다.

이번 테스트는 변환방법에 따른 성능을 테스트해본다.

string은 특수한 자료형이지만

그 외 기본자료형들은 비슷한 속도를 낼 거라고 생각한다.


- 테스트과정

string -> int, int -> string 각각루프를 도는 스크립트를 만들고, 하나의 스크립트에서 컴포넌트로 통합한다.
모바일로 빌드, 프로파일러를 확인한다.

테스트모바일은 갤럭시 노트3다.

(루프 10만번 돌렸다가 폰이 죽었다...)


-- 소스코드 --


-- 결과 --


- 정리

int -> string은 사실 이 결과를 믿을 수 없다.

최대한 평균값을 뽑으려고 노력했으나 그냥 뒤죽박죽이다.

코드로 평균값을 뽑아도 오르락 내리락한다.

그냥 입맛에 따라 쓰면 될 것 같다.


string -> int는 의외의 결과다.

tryParse가 눈에 띄게 느리지 않다.

코드로 평균값을 뽑아보면 1000회당 0.01ms정도 느리다.

안전한 코드를 위해 tryParse를 쓰는게 좋을 듯 하다.


- 결론

int -> string은 작성자의 입맛에 따라, string -> int는 tryParse를 사용한다.


3. callback


c#은 간단한 방법의 callback을 제공한다.

그 중에 System.Action, System.Func<T>를 성능 테스트를 해본다.


- 테스트과정

System.Action을 인자로 받는 함수는 두가지 케이스로 나눈다.

인자가 null이면 실행하지 않는 함수

인자를 빈 delegate로 채우는 함수


System.Func는 그냥 콜하고 처리시간 정도만 알아본다.


모바일로 빌드, 프로파일러를 확인한다.
테스트모바일은 갤럭시 노트3다.


-- 소스코드 --


-- 결과


- 정리

UseDelegateEmpty와 UseFunction은 순서가 자주 뒤바뀐다.

평균적으로 비슷한 속도를 뽑아낸다.

null 체크의 경우 약 3배 빠르다.


- 결론

빈 delegate를 작성하지 말자.

소스코드의 안정성과 속도를 위해 callback을 받는 부분에선 무조건 null체크를 하고, null을 인자로 작성한다.


4. transform caching


우리는 유니티에서 transform에 접근 하는 경우가 잦다.

하지만 transform에 접근하는 게 성능에 부담된다는 사실은 잘 모른다.

그리고, 이 성능의 부담은 caching으로 해결 할 수 있다.


- 테스트 과정

루프를 돌며 this.transform.localPosition을 가져오는 두개의 스크립트 작성

하나의 스크립트는 transform을 재정의한다.


모바일로 빌드, 프로파일러를 확인한다.
테스트모바일은 갤럭시 노트3다.


-- 소스코드 --


-- 결과 --


- 정리

이 전에 정리된 사례들을 보면 어느정도 부담되는 지 감이 온다.

caching된 transform이 non-caching trnasform보다 2배정도 빠르다.


- 결론

transform에 자주 접근하게 되는 객체에선 caching은 선택이 아닌 필수다.


5. string compare


개발하다보면 유니티 뿐만 아니라 많은 어플리케이션에서 string을 비교할 일이 많다.

string을 비교하는 방법은 여러가지가 존재한다.

string 비교 방법이 많은 건 이유가 있으니, 찾아보길 권장한다.

현재 테스트는 길이가 1000~1999까지의 문자열을 비교한다.

테스트 조건을 명확히 알아야한다. 무조건 이게 빠르다. 라고 가정해버리면 안된다.

문자열의 성능은 여러가지 변수에 의해 좌우될 수 있다. 사실 이 이유로 인해 문자열 비교는 포스팅하지 않으려 했다.

모든 문자열이 길이가 4이고 비교했을때 이 방법이 가장 빨랐구나. 정도로 이해하면 된다.

조건에 대해서는 계속 명시한다.


- 테스트 과정

루프를 돌며 문자열을 비교하는 다섯가지의 스크립트 작성

1. string.Compare

2. string.CompareTo

3. Equals

4. Operator

5. Hash Operator


모바일로 빌드, 프로파일러를 확인한다.
테스트모바일은 갤럭시 노트3다.


-- 소스코드 --


-- 결과 -- 


- 정리

위와 같은 조건일 때, 빠른 속도로 나열하자면

Operator, HashOperator, Equals, CompareTo, Compare

순이 된다.


- 결론

여러가지 경험을 비추어 봤을 때 문자열을 연산자 이용해서 비교하는 건 사실 권장하지 않는다.

bool string.Equals(string a, string b) 함수를 사용한다.


6. Debug.Log


개발하면서 많은 Debug.Log, Debug.LogWarning, Debug.LogError로 로그들을 남기면서 개발 했을거라고 예상된다.

프로파일링을 할때마다 Debug.Log가 눈에 거슬렸고, 그에 대한 성능 측정 결과 엄청난 비용을 차지하고 있었다.

그에 따른 이유는 검색으로 많은 이유들을 찾아 볼 수 있다.

내가 진행하던 프로젝트에서 Debug. 으로 검색하니 결과는 약 3천개

빌드전에 모든 로그들을 검색해서 지우기엔 시간이 오래걸릴 수 있다.

개발기간 1년, 2년간 쌓인 로그들 한번에 정리해보자.

그리고, 로그를 정리된 성능과 정리되지 않은 성능을 비교한다.


- 로그정리 구현과정

참조 : https://gist.github.com/kimsama/4123043


위 깃허브에 접속해보면 소스코드가 있다. 해당 소스코드를 수정해서 사용한다.

약 2년 전에 처음으로 깃허브에서 이 소스코드를 찾았다.

그 후, 깃허브에 올라오는 유니티 프로젝트에서 이 코드가 간간히 보이기 시작했다.

아직 로그를 그대로 노출시키는 프로젝트도 많다.


기존 소스코드는 유니티 에디터면 로그를 출력하고, 빌드버전에선 로그를 출력하지 않는다.

하지만 난 문제점 확인과 잘 돌아가는지 확인을 위해 로그를 출력하기 원하면 빌드버전에서도 보고 싶다.

그럼 소스코드를 편하게 사용할 수 있도록 수정해보자.


1
2
3
4
5
6
7
8
9
10
11
12
13
14
15
16
17
18
19
20
21
22
23
24
25
26
27
28
29
30
31
32
33
34
35
36
37
38
39
40
41
42
43
44
45
46
47
48
49
50
51
52
53
54
55
56
57
58
59
60
61
62
63
64
65
66
67
68
69
70
71
72
73
74
75
76
77
78
79
80
81
82
83
84
#if UNITY_EDITOR
#define ENABLE_LOG
#endif
 
using UnityEngine;
 
/// 
/// It overrides UnityEngine.Debug to mute debug messages completely on a platform-specific basis.
/// 
/// Putting this inside of 'Plugins' foloder is ok.
/// 
/// Important:
///     Other preprocessor directives than 'UNITY_EDITOR' does not correctly work.
/// 
/// Note:
///     [Conditional] attribute indicates to compilers that a method call or attribute should be 
///     ignored unless a specified conditional compilation symbol is defined.
/// 
/// See Also: 
///     http://msdn.microsoft.com/en-us/library/system.diagnostics.conditionalattribute.aspx
/// 
/// 2012.11. @kimsama
/// 
public static class Debug
{
    public static bool isDebugBuild
    {
        get { return UnityEngine.Debug.isDebugBuild; }
    }
 
    [System.Diagnostics.Conditional("ENABLE_LOG")]
    public static void Log(object message)
    {
        UnityEngine.Debug.Log(message);
    }
 
    [System.Diagnostics.Conditional("ENABLE_LOG")]
    public static void Log(object message, UnityEngine.Object context)
    {
        UnityEngine.Debug.Log(message, context);
    }
 
    [System.Diagnostics.Conditional("ENABLE_LOG")]
    public static void LogError(object message)
    {
        UnityEngine.Debug.LogError(message);
    }
 
    [System.Diagnostics.Conditional("ENABLE_LOG")]
    public static void LogError(object message, UnityEngine.Object context)
    {
        UnityEngine.Debug.LogError(message, context);
    }
 
    [System.Diagnostics.Conditional("ENABLE_LOG")]
    public static void LogWarning(object message)
    {
        UnityEngine.Debug.LogWarning(message.ToString());
    }
 
    [System.Diagnostics.Conditional("ENABLE_LOG")]
    public static void LogWarning(object message, UnityEngine.Object context)
    {
        UnityEngine.Debug.LogWarning(message.ToString(), context);
    }
 
    [System.Diagnostics.Conditional("ENABLE_LOG")]
    public static void DrawLine(Vector3 start, Vector3 end, Color color = default(Color), float duration = 0.0f, bool depthTest = true)
    {
        UnityEngine.Debug.DrawLine(start, end, color, duration, depthTest);
    }
 
    [System.Diagnostics.Conditional("ENABLE_LOG")]
    public static void DrawRay(Vector3 start, Vector3 dir, Color color = default(Color), float duration = 0.0f, bool depthTest = true)
    {
        UnityEngine.Debug.DrawRay(start, dir, color, duration, depthTest);
    }
 
    [System.Diagnostics.Conditional("ENABLE_LOG")]
    public static void Assert(bool condition)
    {
        if (!condition) throw new System.Exception();
    }
}
cs


이렇게.


유니티에디터에선 무조건 로그를 출력한다.

빌드시에는 ENABLE_LOG를 정의했을 경우에 출력한다.


빌드세팅에서 Player Settings -> Other Settings -> Scripting Define Symbols 에 정의하면 된다.


- 테스트 과정

루프를 돌며 100번의 로그를 찍는 스크립트 작성

1. 로그를 출력하지 않는 빌드 프로그램으로 프로파일링 한다.

2. 로그를 출력하는 빌드 프로그램으로 프로파일링 한다.


테스트모바일은 갤럭시 노트3다.


-- 소스코드 --


-- 결과 --


(로그 출력O)


(로그 출력X)


- 정리

로그는 여러면에서 엄청난 비용을 차지한다.

GC, time ms...


- 결론

왠만한 소스코드들은 따라가지 못할 성능을 잡아먹는다.

아무리 소스코드를 최적화 신경써서 작성했다고 하더라도 로그를 많이 찍을 경우 다 무용지물일 것 이다.


그리고 다른 얘기를 해볼까 한다.

현재 마켓에서 다운받을 수 있는 프로젝트들도 몇몇개도 로그를 노출시키고 있다.

중요해 보이는 로그도 찍히는 경우가 있다.


보안상  노출시키지 않아야 하고,

프로그램 성능상 출력하지 말아야 한다.


배포되는 빌드에선 필수로 막아야한다. 


로그를 삭제 시키는 일은 선택이 아닌 필수다.


반응형
Posted by blueasa
, |