병합과 재정렬은 대개 한 Topic(작업 단위)의 작업이 끝난 다음, 작업 내용을 Master branch에 반영해야 할 경우 수행하는 작업입니다.
새로운 Topic에 대한 작업을 할 때는 대개 Master Branch에서 새로운 Branch를 따서 작업한 뒤, 나중에 다시 Master Branch에 합치는 순으로 작업을 진행합니다.
병합과 재정렬에 대한 이해는 GIT으로 작업하기 위해 PM 뿐만 아니라 팀원도 알고 있어야 합니다. 병합과 재정렬에 관련된 작업 흐름을 어느 정도 이해하고 있어야 불필요한 추가 작업을 막을 수 있고, '이렇게 해도 되는데 왜 꼭 이렇게 하라고 하는거지?'라는 불만을 갖지 않게 될테니까요.^-^
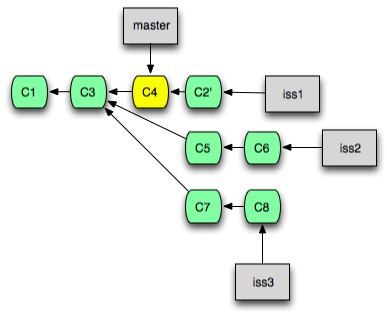
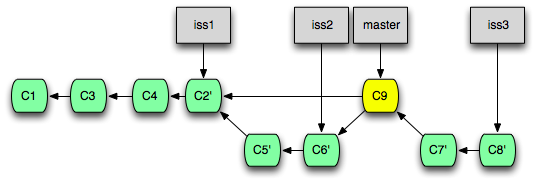
특정 Commit을 선택해서 반영하기 - cherry-pick
다른 Branch에 있는 Commit을 선별적으로 현재 Branch에 반영하기 위한 명령어입니다. Cherry-pick이라는 이름에서 뭐에 쓰는 건지 예측이 될 것입니다.
체리 나무에 달려 있는 체리를 하나씩 골라 따듯이, 커밋들이 달려 있는 커밋 나무(?)에서 필요한 커밋들을 하나씩 선별해서 가져 오기 위한 명령어가 바로 cherry-pick입니다.
git cherry-pick {Commit ID}
|
이 때, 현재 Branch는 작업 내역을 반영할 Branch(대개 Master)여야 하고, 가져오려는 Commit이 여러개인 경우 먼저 작성한 Commit부터 순서대로 가져와야 합니다.
Cherry-pick은 엄연히 말하면 Commit을 가져 오는 것이 아니라, 가져올 Commit과 같은 Commit을 새로 만들어서 현재 Branch에 덧붙이는 작업입니다. 즉, 현재 Branch에 붙는 Commit은 Commit ID가 달라집니다.
왜냐하면 A를 X로 바꾸는 Commit과 B를 X로 바꾸는 Commit은 작업 내용이 서로 다른 Commit이기 때문입니다. 설명이 복잡해 졌는데, 이해가 잘 안간다면 다음 한 문장만 기억해 두면 됩니다.
'Cherry-pick은 Commit을 새로 하는 것과 같다.'
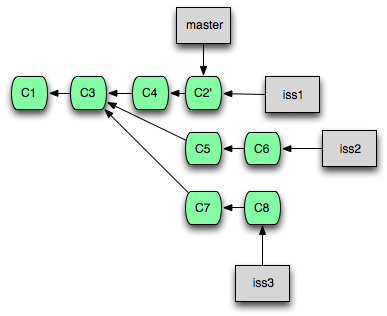
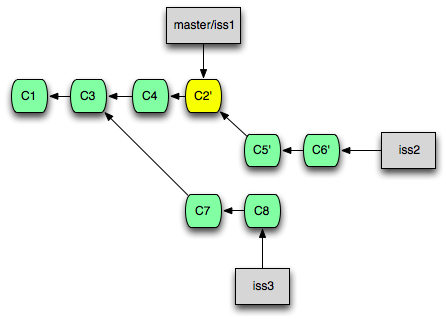
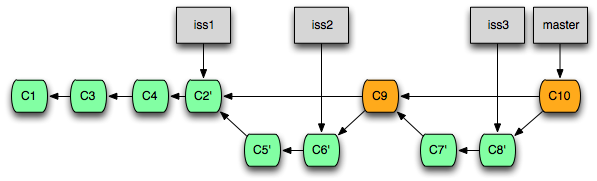
여러 개의 Commit을 반영하기 - rebase
Rebase는 Cherry-pick과 유사하지만, 여러 개의 Commit을 동시에 다룰 수 있습니다. 즉, Cherry-pick으로 하는 작업은 Rebase 명령어로도 할 수 있습니다. 다만, Rebase는 여러 개의 Commit을 하나로 합치거나, 특정 Commit을 건너 뛰는 등 보다 복잡한 작업을 수행할 수 있습니다.
여러 개의 Commit을 순서대로 가져와서 반영하기
대상 Branch의 변경 사항을 모두 가져와서 현재 Branch에 반영하려 할 때 다음과 같은 명령어를 사용합니다.
즉, 현재 Branch와 대상 Branch의 공통 조상부터 대상 Branch의 마지막 Commit까지의 모든 Commit을 순서대로 하나씩 가져와서 현재 Branch에 덧붙입니다.
git rebase {가져올 Branch 이름}
|
결과적으로, 대상 Branch는 변경되지 않고 현재 Branch에만 새로운 Commit이 생성되어 덧붙여집니다.
Commit의 순서를 재정렬하고 첨삭하기
Rebase 명령에 -i(interactive) 옵션을 덧붙여 사용하면 Commit들의 순서를 바꾸고 첨삭하거나, 몇 개의 Commit을 하나로 합치는 등의 작업을 수행한 뒤 가져올 수 있습니다.
Rebase 명령과 -i 옵션의 조합은 '리베이시'라고도 불리우며, 병합 작업 뿐만 아니라 현재 Branch에서 최근에 작업한 몇 개의 Commit들을 편집하고자 할 때도 유용하게 사용할 수 있습니다.
예를 들어, 다음과 같이 입력하면 현재 Branch의 HEAD로부터 3개의 Commit들을 편집할 수 있습니다.
이 때, Rebase 작업 이후 Commit들은 Cherry-pick과 마찬가지로 모두 ID가 바뀝니다.
쉽게 생각해서 위 명령은 HEAD로부터 3개의 Commit들을 현재 Branch에서 모두 '들어낸 뒤', 순서를 바꾸거나 합치는 등의 작업을 하고 다시 하나씩 새로 Commit하는 것입니다.
'리베이시' 명령은 개발을 진행하면서 은근히 많이 사용되므로 눈여겨 보는 것이 좋습니다. 특히 위에서 예로 든 명령의 경우 심심치 않게 자주 사용하게 될 것입니다.
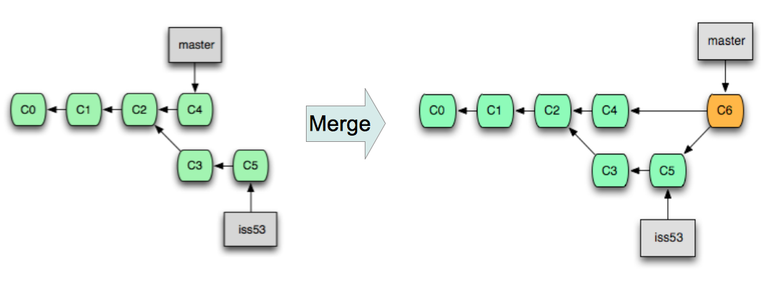
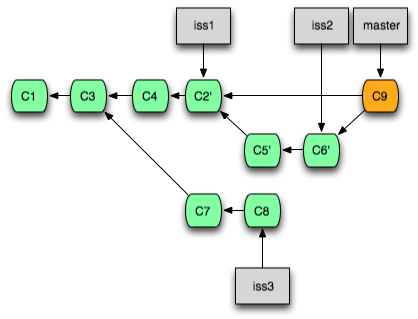
두 개의 Branch를 하나로 합치기 - Merge
3-Way Merge
3-Way Merge란 하나의 Branch를 다른 Branch에 합치는 작업을 의미합니다. 엄연히 말하면 부모 Commit이 둘 이상인 새로운 Commit을 만들어서 현재 Branch에 덧붙이는 작업입니다.
git merge --no-ff {합칠 Branch 이름}
|
옵션으로 넣은 --no-ff 는 Fast-forward Merge가 가능하더라도, 무조건 3-Way Merge를 수행하라는 의미입니다.
3-Way Merge 작업을 수행하고 나면 합칠 Branch에서 가져온 Commit이 몇 개 였던지 간에 현재 Branch에는 딱 하나의 Commit만 새로 생성됩니다. 따라서, Merge를 취소하고 싶다면 새로 생성된 Commit만 삭제해 주면 됩니다.
Fast-forward Merge
Fast-forward Merge는 합칠 Branch가 현재 Branch와 분기된 이후, 현재 Branch에 새로 생성된 Commit이 없을 경우 현재 Branch를 가리키는 HEAD를 합칠 Branch의 마지막 Commit으로 옮김으로써 Merge를 수행하는 방법입니다.
뭔가 복잡한 설명이 되었는데요, 그림을 보면서 설명해 드리도록 하겠습니다.

( 그림 출처: http://www.deferredprocrastination.co.uk/blog/2012/git-un-merge/ )
왼쪽 그림은 Commit B의 위치에서 develop branch를 새로 만든 뒤, 이후 develop branch에서 C, D, E의 세 개 Commit을 작성한 상황을 나타내고 있습니다.
develop branch에서 세 개의 Commit을 새로 작성하는 동안, master branch에는 새로운 Commit이 하나도 추가되지 않았습니다. 이 상황이 바로 Fast-forward Merge가 가능한 상황입니다.
여기에서 Fast-forward Merge를 수행하면 3-Way Merge처럼 두 개의 조상을 갖는 새로운 Commit을 만들어서 master에 덧붙이는 것이 아닌, master branch를 가리키는 Commit Pointer를 E Commit으로 옮기는 것으로 Merge를 끝마치게 됩니다.
즉, 결과적으로 Master branch에서 C, D, E Commit을 새로 작성하고 E commit에 develop이라는 새로운 이름을 붙여 준 것과 같아집니다.
Fast-forward Merge는 수행 속도가 빠르고 불필요한 Branch를 없애 주는 역할을 하지만, 두 개의 branch의 구분이 사라지기 때문에 프로젝트 관리 면에서 모호함이 발생할 수 있습니다. (위 그림을 보면 master branch와 develop branch의 구분이 사라졌음을 알 수 있습니다.)
Merge 명령에 별도의 옵션을 주지 않으면 기본적으로 Fast-forward Merge를 수행합니다. 단, Fast-forward Merge가 불가능한 조건일 경우 3-Way Merge를 수행합니다.
경우에 따라서 작업 기록을 남겨 두기 위해 Fast-forward Merge를 수행하지 말아야 될 경우가 있습니다. 이 경우 --no-ff 옵션을 주어서 3-Way Merge를 수행하면 됩니다.
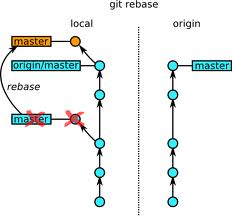
Rebase VS Merge
Rebase와 Merge 모두 새로운 작업 내용을 Master branch와 합치는 데 사용할 수 있는 유용한 명령어입니다. 다만, 이 둘을 각각 언제 사용해야 할 지 잘 모르겠다면 다음 문장을 기억하고 있으면 됩니다.
'Merge는 Commit ID가 보존되고, Rebase는 새로운 Commit이 생성되므로 Commit ID가 바뀐다.'
그래도 잘 모르겠다면 PM에게 물어보면 됩니다. PM이 작업을 진행하는 스타일에 따라서 작업 내용을 Main stream branch에 반영할 때 Merge를 사용할 지, Rebase를 사용할지 달라지기 때문입니다.
GIT에 처음 입문하면 Commit ID가 달라지던 말던 작업 내용이 잘 반영되면 그만이지, 뭐가 중요하냐고 생각할 수도 있습니다. 하지만, 프로젝트의 규모가 커지면 이야기가 달라집니다.
원격 저장소에는 가급적 같은 작업을 수행한 Commit이 두 개 이상 존재하지 않도록 유지해야 합니다. 같은 작업 내용을 갖는 Commit이 두 개 이상 존재하면 지저분해지고, 프로젝트 관리상 좋지 않기 때문입니다.
역사가 오랜(?) 오픈소스 작업을 할 때는 Commit Log에 작업을 위한 정보가 담겨 있는 경우가 많고, 따라서 오랜 옛날의 Commit Log를 뒤져야 하는 경우가 많습니다. 이럴 때 같은 작업을 수행한 Commit이 둘 이상이라면 그것들을 모두 살펴봐야 하는 불상사가 발생합니다.
일반적으로, 로컬 저장소에서 병합하고 Push하는지, 혹은 작업 Branch를 Push하고 병합하는지에 따라 무엇을 사용할지가 결정됩니다.
핵심은 같은 작업을 하는 Commit이 둘 이상 발생하지 않도록 하는 것이므로, 다음과 같이 구분해서 사용하면 됩니다.
Rebase
로컬 저장소에서 작업을 위해 개인적으로 만든 Branch를 Main stream branch에 반영하여 Push 하기 위해 사용합니다. 로컬에 개인적으로 만든 Branch는 Push 이후 정리를 하면서 대개 삭제합니다. 대개 Hotfix와 같이 단기간에 끝나는 Topic의 경우 이 방법으로 작업합니다.
Merge
로컬 저장소에서 분기하고 작업한 Branch를 리뷰 등을 위해 원격 저장소에서 Push한 뒤, Review가 끝나고 PM이 Main stream branch에 병합하는 순서로 작업을 진행할 때 사용합니다. Branch가 그대로 유지되기 때문에 나중에 추가 작업을 해야 할 경우나, 큰 규모의 Topic인 경우 이 방법으로 작업합니다.
[출처] https://www.tuwlab.com/ece/22218