

[링크] Unity 에서 Cursor AI를 활용해 게임 기능을 쉽게 구현해 보기
협업/AI / 2025. 5. 29. 13:59
반응형
'협업 > AI' 카테고리의 다른 글
| [링크] 개발환경) Unity External : 커서 AI (Cursor AI) 사용하기 (0) | 2025.06.16 |
|---|---|
| [github] mcp-unity (0) | 2025.05.29 |

|
| [링크] 개발환경) Unity External : 커서 AI (Cursor AI) 사용하기 (0) | 2025.06.16 |
|---|---|
| [github] mcp-unity (0) | 2025.05.29 |
WinForm에서 커서 파일을 Resources에 넣고 쓰는 방법(VS2013 한글판 기준)
[설정]
1. 프로젝트-(맨아래)프로젝트 속성 Click or 솔루션 탐색기-해당 프로젝트에서 우클릭-속성 Click
2. 리소스-리소스 추가(R) 우측의 화살표 Click
3. 기존 파일 추가(E) Click
4. 원하는 커서 파일(*.cur) 선택해서 추가.(예: Arrow.cur 추가)
[사용방법]
5. 커서를 사용하는 곳에 대입.
예) Cursor myCursor = new Cursor(new System.IO.MemoryStream(Properties.Resources.Arrow));
참조 : http://csharphelper.com/blog/2013/03/load-a-cursor-from-a-resource-in-c/
| [펌] C# WinForm "인증서 저장소에서 매니페스트 서명 인증서를 찾을 수 없습니다." (0) | 2019.01.25 |
|---|---|
| BackGroundWorker 예제 ( Thread 대용품 ) (0) | 2014.11.04 |
| BackgroundWorker 클래스 (0) | 2014.11.04 |
| 쓰레드 선호도 (Thread Affinity) (0) | 2014.11.03 |
| Cursors in C# (0) | 2014.11.03 |
Link : http://www.c-sharpcorner.com/UploadFile/mahesh/cursors-in-C-Sharp/
A cursor in Windows is an icon that is displayed when you move a mouse, a pen, or a trackball. Usually, a different cursor image is displayed for different activity. For instance, the default cursor is different than a wait cursor.
Cursors may be different for different operating systems. Figure 1 displays some of the cursors available on machine loaded with Windows 7 operating system. As you can presume from Figure 1, the Default cursor is loaded most of the time, the AppStarting cursor is displayed when any application is starting and loading, and the Size cursors are loaded when you are resizing an application.
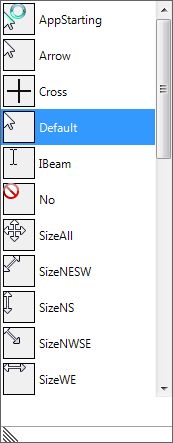
Figure 1
Windows Forms allows us to change this cursor image using the Cursor and its related classes and enumerations.
listBox1.Cursor =Cursors.No;
button1.Cursor = Cursors.Hand
listBox1.Cursor = Cursors.No
Creating a Cursor
Cursor is not a typical Windows Forms control. It is used as a helper control and does not have a user interface or design view. The Cursor class represents a cursor and it is created either using the Cursors class or load a cursor form a file. The following code snippet creates a cursor.
Cursor cur = Cursors.WaitCursor;
this.Cursor = cur;
VB.NET Code:
Dim cur As Cursor = Cursors.WaitCursor
Me.Cursor = cur
Creating and Loading Custom Cursors
Visual Studio allows you to create cursor (.cur) files. A cursor file is a bitmap file with .cur extension. To create a cursor file, right click on your project and select Add New Item menu item. After that, select Cursor File from the items. This action will add a default Cursor1.cur file. See Figure 2.
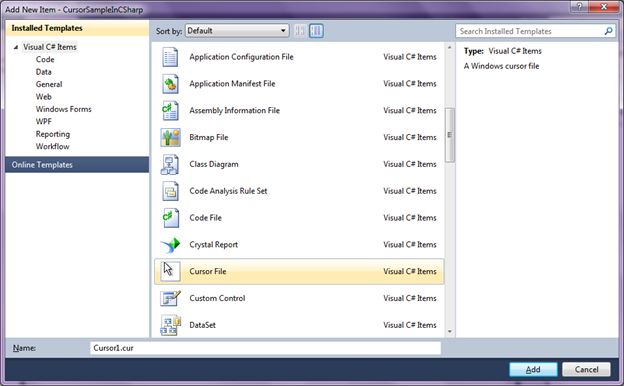
Figure 2
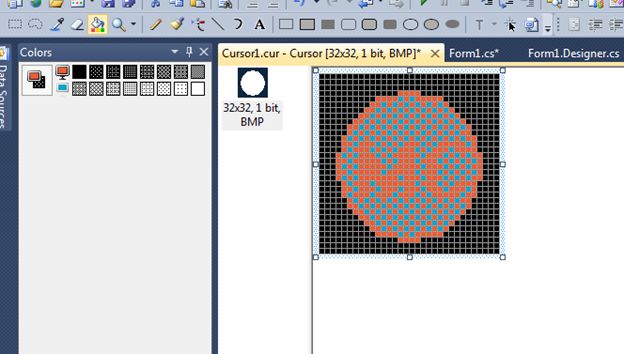
Figure 3
Once you're done editing your file, save it.
Now copy Cursor1.cur file to your Debug or Release folder where your executable file is stored.
Once a file is saved, we can create a cursor from the cursor file using following code snippet.
C# Code:
Me.Cursor = New Cursor(Application.StartupPath + "\Cursor1.cur")
Current Cursor
Cursor.Current static property gets and sets the current cursor. The following code snippet gets and sets the current cursor.
this.Cursor = Cursor.Current;
VB.NET Code:
Me.Cursor = Cursor.Current
Move a Cursor Position
The Position property of Cursor class is used to change the position of a cursor.
Cursor.Position = new Point(Cursor.Position.X - 150, Cursor.Position.Y - 150);
Cursor.Position = New Point(Cursor.Position.X - 150, Cursor.Position.Y - 150)
Show and Hide a Cursor
The Hide and Show static methods of Cursor class are used to hide and show a cursor in a Windows application. The following code snippet hides and displays a cursor.
C# Code:
Cursor.Hide();
Cursor.Show();
VB.NET Code:
Cursor.Hide()
Cursor.Show()
Set and Change Current Cursor
There are occasions when you need to change cursors based on some activity. For example, if you have a lengthy file copy or processing operation, you may want uses to wait and display a wait cursor for that. But once the processing is done, you change the cursor back the default cursor.
this.Cursor = Cursors.WaitCursor;
// Do something here
this.Cursor = Cursors.Default;
VB.NET Code:
Me.Cursor = Cursors.WaitCursor
Me.Cursor = Cursors.Default
Summary
In this article, I discussed how to create and user cursors in your Windows Forms applications. We also discussed how to create custom cursors and set other cursor properties.
| [펌] C# WinForm "인증서 저장소에서 매니페스트 서명 인증서를 찾을 수 없습니다." (0) | 2019.01.25 |
|---|---|
| Load a Cursor from a Resources in C# (0) | 2014.11.07 |
| BackGroundWorker 예제 ( Thread 대용품 ) (0) | 2014.11.04 |
| BackgroundWorker 클래스 (0) | 2014.11.04 |
| 쓰레드 선호도 (Thread Affinity) (0) | 2014.11.03 |