

[펌] Photoshop Blend Modes Without Backbuffer Copy
[링크] www.elopezr.com/photoshop-blend-modes-in-unity/
Photoshop Blend Modes Without Backbuffer Copy
[latexpage] For the past couple of weeks, I have been trying to replicate the Photoshop blend modes in Unity. It is no easy task; despite the advances of modern graphics hardware, the blend unit st…
www.elopezr.com
Photoshop Blend Modes Without Backbuffer Copy
BY ADMINOCTOBER 7, 2016GRAPHICS, UNITY
For the past couple of weeks, I have been trying to replicate the Photoshop blend modes in Unity. It is no easy task; despite the advances of modern graphics hardware, the blend unit still resists being programmable and will probably remain fixed for some time. Some OpenGL ES extensions implement this functionality, but most hardware and APIs don’t. So what options do we have?
1) Backbuffer copy
A common approach is to copy the entire backbuffer before doing the blending. This is what Unity does. After that it’s trivial to implement any blending you want in shader code. The obvious problem with this approach is that you need to do a full backbuffer copy before you do the blending operation. There are certainly some possible optimizations like only copying what you need to a smaller texture of some sort, but it gets complicated once you have many objects using blend modes. You can also do just a single backbuffer copy and re-use it, but then you can’t stack different blended objects on top of each other. In Unity, this is done via a GrabPass. It is the approach used by the Blend Modes plugin.
2) Leveraging the Blend Unit
Modern GPUs have a little unit at the end of the graphics pipeline called the Output Merger. It’s the hardware responsible for getting the output of a pixel shader and blending it with the backbuffer. It’s not programmable, as to do so has quite a lot of complications (you can read about it here) so current GPUs don’t have one.
The blend mode formulas were obtained here and here. Use it as reference to compare it with what I provide. There are many other sources. One thing I’ve noticed is that provided formulas often neglect to mention that Photoshop actually uses modified formulas and clamps quantities in a different manner, especially when dealing with alpha. Gimp does the same. This is my experience recreating the Photoshop blend modes exclusively using a combination of blend unit and shaders. The first few blend modes are simple, but as we progress we’ll have to resort to more and more tricks to get what we want.
Two caveats before we start. First off, Photoshop blend modes do their blending in sRGB space, which means if you do them in linear space they will look wrong. Generally this isn’t a problem, but due to the amount of trickery we’ll be doing for these blend modes, many of the values need to go beyond the 0 – 1 range, which means we need an HDR buffer to do the calculations. Unity can do this by setting the camera to be HDR in the camera settings, and also setting Gamma for the color space in the Player Settings. This is clearly undesirable if you do your lighting calculations in linear space. In a custom engine you would probably be able to set this up in a different manner (to allow for linear lighting).
If you want to try the code out while you read ahead, download it here.
[File]
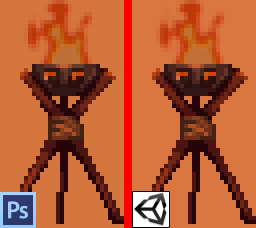
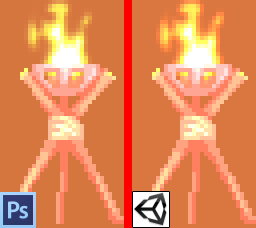
A) Darken
| Formula | min(SrcColor, DstColor) |
| Shader Output | color.rgb = lerp(float3(1, 1, 1), color.rgb, color.a); |
| Blend Unit | Min(SrcColor · One, DstColor · One) |

As alpha approaches 0, we need to tend the minimum value to DstColor, by forcing SrcColor to be the maximum possible color float3(1, 1, 1)
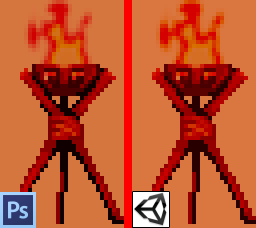
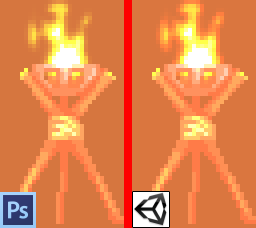
B) Multiply
| Formula | SrcColor · DstColor |
| Shader Output | color.rgb = color.rgb * color.a; |
| Blend Unit | SrcColor · DstColor + DstColor · OneMinusSrcAlpha |
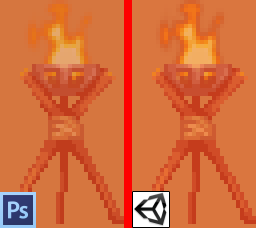
C) Color Burn
| Formula | 1 – (1 – DstColor) / SrcColor |
| Shader Output | color.rgb = 1.0 - (1.0 / max(0.001, color.rgb * color.a + 1.0 - color.a)); // max to avoid infinity |
| Blend Unit | SrcColor · One + DstColor · OneMinusSrcColor |
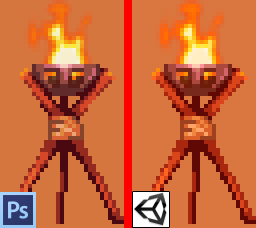
D) Linear Burn
| Formula | SrcColor + DstColor – 1 |
| Shader Output | color.rgb = (color.rgb - 1.0) * color.a; |
| Blend Unit | SrcColor · One + DstColor · One |
E) Lighten
| Formula | Max(SrcColor, DstColor) |
| Shader Output | color.rgb = lerp(float3(0, 0, 0), color.rgb, color.a); |
| Blend Unit | Max(SrcColor · One, DstColor · One) |
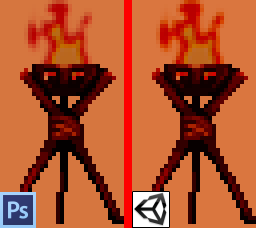
F) Screen
| Formula | 1 – (1 – DstColor) · (1 – SrcColor) = Src + Dst – Src · Dst |
| Shader Output | color.rgb = color.rgb * color.a; |
| Blend Unit | SrcColor · One + DstColor · OneMinusSrcColor |

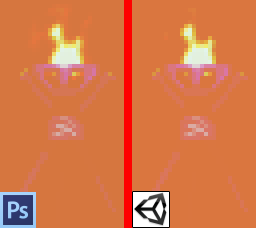
G) Color Dodge
| Formula | DstColor / (1 – SrcColor) |
| Shader Output | color.rgb = 1.0 / max(0.01, (1.0 - color.rgb * color.a)); |
| Blend Unit | SrcColor · DstColor + DstColor · Zero |
You can see discrepancies between the Photoshop and the Unity version in the alpha blending, especially at the edges.
H) Linear Dodge
| Formula | SrcColor + DstColor |
| Shader Output | color.rgb = color.rgb; |
| Blend Unit | SrcColor · SrcAlpha + DstColor · One |
This one also exhibits color “bleeding” at the edges. To be honest I prefer the one to the right just because it looks more “alive” than the other one. Same goes for Color Dodge. However this limits the 1-to-1 mapping to Photoshop/Gimp.
All of the previous blend modes have simple formulas and one way or another they can be implemented via a few instructions and the correct blending mode. However, some blend modes have conditional behavior or complex expressions (complex relative to the blend unit) that need a bit of re-thinking. Most of the blend modes that follow needed a two-pass approach (using the Pass syntax in your shader). Two-pass shaders in Unity have a limitation in that the two passes aren’t guaranteed to render one after the other for a given material. These blend modes rely on the previous pass, so you’ll get weird artifacts. If you have two overlapping sprites (as in a 2D game, such as our use case) the sorting will be undefined. The workaround around this is to move the Order in Layer property to force them to sort properly.
I) Overlay
| Formula | 1 – (1 – 2 · (DstColor – 0.5)) · (1 – SrcColor), if DstColor > 0.5 2 · DstColor · SrcColor, if DstColor <= 0.5 |
| Shader Pass 1 | color.rgb *= color.a; float3 A = (4.0 * color.rgb - 1.0) / (2.0 - 4.0 * color.rgb); float3 B = (1.0 * color.a) / ((2.0 - 4.0 * color.rgb) * max(0.001, color.a)); color.rgb = A + B; |
| Blend Pass 1 | SrcColor · DstColor + DstColor · DstColor |
| Shader Pass 2 | color.rgb = (2.0 - 4.0 * color.rgb * color.a) * max(0.001, color.a); |
| Blend Pass 2 | SrcColor · DstColor + DstColor · Zero |

How I ended up with Overlay requires an explanation. We take the original formula and approximate via a linear blend:

We simplify as much as we can and end up with this

The only way I found to get DstColor · DstColor is to isolate the term and do it in two passes, therefore we extract the same factor in both sides:

However this formula doesn’t take alpha into account. We still need to linearly interpolate this big formula with alpha, where an alpha of 0 should return Dst. Therefore

If we include the last term into the original formula, we can still do it in 2 passes. We need to be careful to clamp the alpha value with max(0.001, a) because we’re now potentially dividing by 0. The final formula is


J) Soft Light
| Formula | 1 – (1 – DstColor) · (1 – (SrcColor – 0.5)), if SrcColor > 0.5 DstColor · (SrcColor + 0.5), if SrcColor <= 0.5 |
| Shader Pass 1 |
float3 A = 2.0 * color.rgb * color.a / (1.0 - 2.0 * color.rgb * color.a); |
| Blend Pass 1 | SrcColor · DstColor + SrcColor · DstColor |
| Shader Pass 2 | color.rgb = (1.0 - 2.0 * color.rgb * color.a) * max(0.001, color.a); |
| Blend Pass 2 | SrcColor · DstColor + SrcColor * Zero |
For the Soft Light we apply a very similar reasoning to Overlay, which in the end leads us to Pegtop’s formula. Both are different from Photoshop’s version in that they don’t have discontinuities. This one also has a darker fringe when alpha blending.
K) Hard Light
| Formula | 1 – (1 – DstColor) · (1 – 2 · (SrcColor – 0.5)), if SrcColor> 0.5 DstColor · (2 · SrcColor), if SrcColor <= 0.5 |
| Shader Pass 1 |
float3 A = (2.0 * color.rgb * color.rgb - color.rgb) * color.a; float3 B = max(0.001, (4.0 * color.rgb - 4.0 * color.rgb * color.rgb) * color.a + 1.0 - color.a); color.rgb = A / B; |
| Blend Pass 1 | SrcColor · One + DstColor · One |
| Shader Pass 2 | color.rgb = max(0.001, (4.0 * color.rgb - 4.0 * color.rgb * color.rgb) * color.a + 1.0 - color.a); |
| Blend Pass 2 | SrcColor · DstColor + SrcColor * Zero |
Hard Light has a very delicate hack that allows it to work and blend with alpha. In the first pass we divide by some magic number, only to multiply it back in the second pass! That’s because when alpha is 0 it needs to result in DstColor, but it was resulting in black.
L) Vivid Light
| Formula | 1 – (1 – DstColor) / (2 · (SrcColor – 0.5)), if SrcColor > 0.5 DstColor / (1 – 2 · SrcColor), if SrcColor <= 0.5 |
| Shader Pass 1 |
color.rgb *= color.a; color.rgb = color.rgb >= 0.5 ? 1.0 / max(0.0001, 2.0 - 2.0 * color.rgb) : 1.0); |
| Blend Pass 1 | SrcColor · DstColor + SrcColor · Zero |
| Shader Pass 2 | color.rgb = color.rgb < 0.5 ? (color.a - color.a / max(0.0001, 2.0 * color.rgb)) : 0.0; |
| Blend Pass 2 | SrcColor · One + SrcColor · OneMinusSrcColor |
M) Linear Light
| Formula | DstColor + 2 · (SrcColor – 0.5), if SrcColor > 0.5 DstColor + 2 · SrcColor – 1, if SrcColor <= 0.5 |
| Shader Output | color.rgb = (2 * color.rgb - 1.0) * color.a; |
| Blend Unit | SrcColor · One + DstColor · One |
[29/04/2019] Roman in the comments below reports that he couldn’t get Linear Light to work using the proposed method and found an alternative. His reasoning is that the output color becomes negative which gets clamped. I’m not sure what changed in Unity between when I did it and now but perhaps it relied on having an RGBA16F render target which may have changed since then to some other HDR format such as RG11B10F or RGB10A2 which do not support negative values. His alternative becomes (using RevSub as the blend op):
| Formula | DstColor + 2 · (SrcColor – 0.5), if SrcColor > 0.5 DstColor + 2 · SrcColor – 1, if SrcColor <= 0.5 |
| Shader Output | color.rgb = -(2 * color.rgb - 1.0) * color.a; |
| Blend Unit | DstColor · One – SrcColor · One |
'Unity3D > Shader' 카테고리의 다른 글
| [링크] Unity Cel Shading - 카툰렌더링 (0) | 2021.03.30 |
|---|---|
| [펌] [Unity, NGUI, Shader] Transparent Colored Blur shader (0) | 2021.02.03 |
| [링크] 쉐이더 코드 사이트 (0) | 2020.06.18 |
| [Link] Rim lighting and realtime shadows for sprites in Unity (2D) (0) | 2019.08.19 |
| [펌] 유니티에서 셰이더로 원, 둥근 사각형 만들기 (0) | 2019.08.06 |