[펌] Unity에서 iPhoneX 대응 NGUI의 UIAnchor에 SafeArea의 보정 처리를 넣어 보았다
우선, NGUI의 UIAnchor 대해 SafeAreas 대응 할 수 있기 때문에 참고.
이외에도 SafeAreas으로 다음의 대응이 필요하지만,이 기사에서는 UIAnchor의 대처 방법을 설명합니다.
필요할 수 :
· UIRect의 Anchor
· UIScrollView의 표시 범위 조정 (Anchor의 기준이 변화하기 때문에 UI 조정해야 할)
Contents [ hide ]
전제 조건 :
이 문서는 다음을 전제로 이야기를 진행합니다.
· Unity5.6.6를 사용하여 개발하고 있습니다.
· iOSSafeAreasPlugin을 다운로드하여 가져올 수 있음
Plugin 다운로드 사이트
https://bitbucket.org/p12tic/iossafeareasplugin/src
· OS는 iOS만을 고려하고 있습니다.
소스 코드
우선 소스 코드에서 공개합니다.
안전 영역의 취득
SafeAreaScreen.cs
이 소스 코드는 주로 안전 영역의 취득을 담당하고 있습니다.
Unity 편집기에서 화면 크기를 iPhoneX와 같은 크기 (1125 × 2436)로 설정하면 Unity Player에서 디버그 할 수도 있습니다.
using System.Collections;
using System.Collections.Generic;
using UnityEngine;
using System.Runtime.InteropServices;

public class SafeAreaScreen  {

#if UNITY_IOS
    [DllImport("__Internal")]
    private extern static void GetSafeAreaImpl(out float x, out float y, out float w, out float h);
#endif

    static public Rect GetSafeArea()
    {
        float x, y, w, h;

        //初期値設定
        x = 0;
        y = 0;
        w = Screen.width;
        h = Screen.height;

#if UNITY_IOS && !UNITY_EDITOR
        //iOSSafeAreasPluginを呼び出す
        GetSafeAreaImpl(out x, out y, out w, out h);

#elif UNITY_ANDROID && !UNITY_EDITOR
        //Androidの縦長端末対応が必要になったときのために

#else


        //UnityエディタでiPhoneXのテストできるように値を設定する
        if(Screen.width == 1125 && Screen.height == 2436 ){
            y = 102;
            h = 2202;
        }

#endif
        return new Rect(x, y, w, h);
    }

    static public int GetTopOffsetY(){
        int offset = 0;

        //画面の高さとセーフエリアの高さの差分
        Rect screenSize = GetSafeArea();

        if (Screen.height != screenSize.height) {
            offset = Screen.height - (int)screenSize.height - (int)screenSize.y;
        }

        return offset;
    }

    static public int GetBottomOffsetY(){
        int offset = 0;

        //セーフエリアのyの位置取得
        Rect screenSize = GetSafeArea();

        if (Screen.height != screenSize.height) {
            offset = (int)screenSize.y;
        }

        return offset;
    }

}
NGUI의 SafeArea
NguiSafeAreaPatch.cs
SafeAreaScreen.cs에서 얻은 안전 영역을 바탕으로 Anchor의 위치를 조정합니다.
using System.Collections;
using System.Collections.Generic;
using UnityEngine;

public class NguiSafeAreaPatch : MonoBehaviour {

    void Awake()
    {
        // UIAnchorを使ってAnchorを設定している場合
        UIAnchor anchor = gameObject.GetComponent();
        if(anchor != null){

            //offsetの値を取得する
            SetUIAnchorOffset(anchor);

            return;
        }

        // UIRectをAnchorを使っている場合
        UIRect rect = gameObject.GetComponent();
        if (rect != null) {
            //現在,NGUIのソースコードを解析中
            //完成しだい公開予定
            return;
        }
    }

    private void SetUIAnchorOffset(UIAnchor anchor){

        //現在のoffsetを取得する
        Vector2 nowOffset = anchor.pixelOffset;

        //TOP側の補正値取得
        int topCorrectionOffset = SafeAreaScreen.GetTopOffsetY ();

        //Bottom側の補正値取得
        int bottomCorrectionOffset = SafeAreaScreen.GetBottomOffsetY ();

        switch (anchor.side) {

            case UIAnchor.Side.Top:
            case UIAnchor.Side.TopLeft:
            case UIAnchor.Side.TopRight:
                anchor.pixelOffset.Set(nowOffset.x, nowOffset.y - topCorrectionOffset);

            break;

            case UIAnchor.Side.Bottom:
            case UIAnchor.Side.BottomLeft:
            case UIAnchor.Side.BottomRight:
                anchor.pixelOffset.Set(nowOffset.x, nowOffset.y + bottomCorrectionOffset);
            break;


        }

    }


}
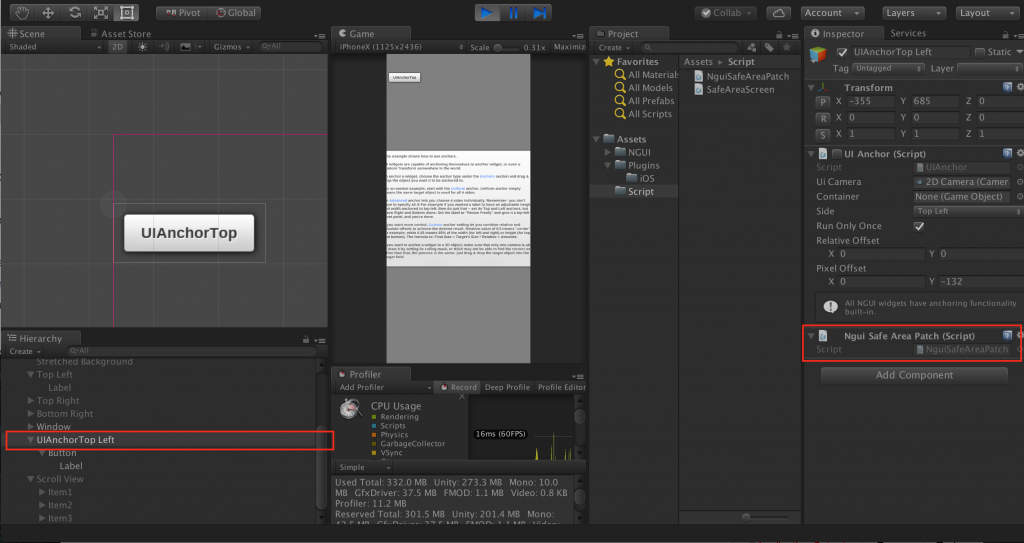
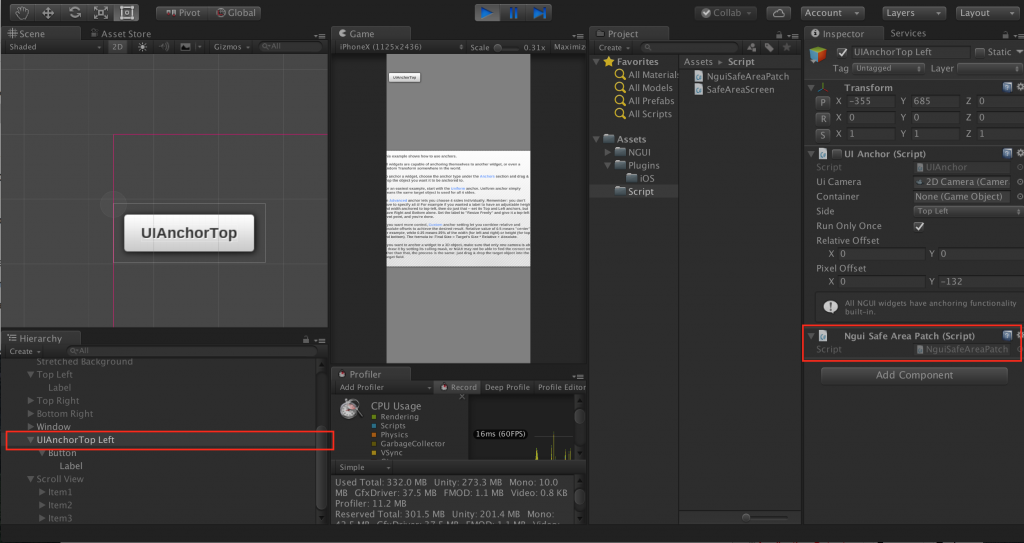
사용법은이 소스 코드를 UIAnchor가 부착되어있는 게임 객체에 첨부 할뿐.

소스에서 무슨 일을하는지는 동작 환경이 iPhoneX 판정되면 스크린과 안전 영역의 높이의 차이를 계산하여 차등 분 게임 오브젝트를 낮 춥니 다.
델타 값은 UIAnchor의 "Pixel Offset"에 할당됩니다.
소스 코드를 반영한 결과
NguiSafeAreaPatch.cs을 UIAnchor에 연결시킨 결과를 기재합니다.
■ 반영 전

■ 반영 후

그 결과 안전 영역을 기준으로 할 수있었습니다.
이것으로 UIAnchor 대해서는 SafeArea의 대처가되었습니다.
그러나, 그 밖에도 「UIRect의 Anchor '에 대해서도 SafeAreas 대응이 있습니다. 대응이 끝나는대로 수시 문서에 추가하는 것입니다.
[출처] https://dream-target.jp/2018/10/01/post-470/
UnityにてiPhoneX対応・NGUIのUIAnchorにSafeAreaの補正処理を入れてみた
とりあえず、NGUIのUIAnchorについてSafeAreas対応ができたのでメモ。 実行環境がiPhoneXと判定したら、スクリーンとセーフエリアの高さの差分を計算して、差分だけゲームオブジェクト(UIAnchorがアタッチされていること)を下げます。
dream-target.jp
'Unity3D > Tips' 카테고리의 다른 글
| [펌] [비주얼 스튜디오] 디버그를 위해 Unity에 Attach할 시 Freeze현상 (0) | 2020.02.05 |
|---|---|
| [링크] UnityAndroidNotchSupport (0) | 2019.12.13 |
| [펌] ITMS-90339: Deprecated Info.plist KEY - the Info.plist contains a key 'UIApplicationExitsOnSuspend' (0) | 2019.12.11 |
| [링크] Unity Notch(노치) 단말기 UI 설정 (0) | 2019.11.15 |
| [펌] 클라이언트의 접속지역 정보를 Rest API로 받아오기. (0) | 2019.10.23 |

