In this Unity Input System tutorial, you’ll learn how to convert player input in your existing projects from the old Input Manager to the new Input System.
Version
C# 7.3, Unity 2020.1, Unity
Handling input is a pillar of creating a successful game. Input devices help player characters perform actions inside the game such as walking, jumping and climbing.
Recently, many new platforms have come out, introducing more Unity input devices. These include touch screens, VR controllers and gamepads from different game consoles. If you want your game to support different platforms, you need to write code to handle the logic for different devices. The more platforms you support, the more complex your code will be.
Luckily, there’s a new UnityInput Systemthat helps developers deal with this situation, making input-related code easier to manage.
In this tutorial, you’ll learn:
The features of the new Input System.
How the new system works.
How to migrate apps to the new Input System from the old Input Manager.
The materials for this tutorial were built inUnity version 2020.1. You can get this version of Unity from theUnity websiteor install it with the Unity Hub.
Note: Although this tutorial is for beginners, you’ll need to have some basic knowledge of Unity development and how to work with Unity Editor to complete it. If you’re new to Unity development, check out our tutorial onGetting Started In Unity.
Getting Started
First, download the starter project for this tutorial using theDownload Materialsbutton at the top or bottom of this page. Unzip its contents and openNewUnityInputSystem-Starterin Unity.
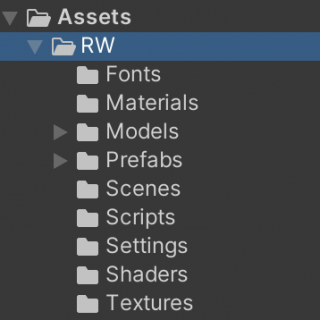
After the project loads, you’ll see theRWfolder in the Project Window:
Take a look at the organization of the folder:
Fonts: Fonts used in the scene.
Materials: Materials for the scene.
Models: 3D meshes for the player character and game environments.
Prefabs: Pre-built components composed of Scripts and Models.
Scenes: The game scene.
Scripts: Scripts with game logic.
Settings: The settings file, which is where you’ll put the input settings.
Shaders: Shaders for special effects like the player’s shadow.
Textures: The graphics used by Materials and UIs.
The starter project is a simple platformer game. You control the player character by moving around and jumping to collect coins.
The game is ready to play. OpenGameScenefrom theScenesfolder and clickPlayto try the game for yourself!
Currently, theMoveandJumpcontrols use the old Unity Input Manager. You’ll learn how to use the new Input System to replace the old system later in the tutorial.
What’s New in the Unity Input System
Before diving into the code, take a look at the new Input System’s features.
Simpler Action and Binding Architecture
The old input system checked input from different devices every frame to determine whether players took an action.
The following code, which supports both gamepads and keyboards, is an example of the old way of doing things:
The code usesif-elsebranching to handle support for different devices and their associated actions.
The newInput Systemseparates device input from code actions. That means you only have to handle the actions the players trigger. You don’t need to know which device the player is using or which button they’re clicking.
An input event in the new system is called anaction, while the mapping between an action and an input device is abinding.
Gathering Information With the Input Debug Tool
The Input System provides you with a new tool calledInput Debugger. Open it by selectingWindow ▸ Analysis ▸ Input Debuggerfrom the menu.
The Input Debugger helps developers by gathering the following information in one place:
The state of the Input System, including:
Device: Information about the connected devices.
Layout: Which controls those devices provide.
Setting: The configuration of the input system.
It also provides real-time information about a specific device. Open this by double-clicking the device from the device list in the Input Debugger window.
Here’s a demo of the Input Debugger in action:
Feel free to keep the Input Debugger open while you work through the tutorial.
Support for Multiple Devices and Platforms
With the increased flexibility from the Input System’s new architecture, Unity can support many different input devices, including:
Keyboard
Mouse
Pen
TouchScreen
Sensor
Joystick
GamePad
Note: The Input System also supports devices that implement theUSB HIDspecification. For more details, check out Unity’sSupported Devices Documentation.
Understanding the New Input System
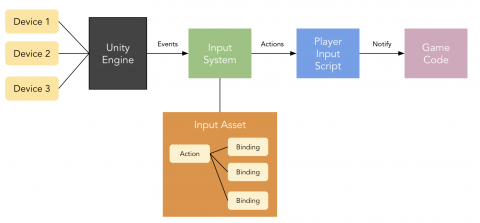
The new Input System has four building blocks that funnel events from player devices to your game code:
Input Action Assets: A settings file that contains the properties of the actions and their associated bindings.
Actions: Actions define the logical meanings of the input. You can find that information in the Input Action Assets.
Bindings: Bindings describe the connection between an action and the input device controls. You’ll find this information in the Input Action Assets, too.
PlayerInput: PlayerInput is a script that manages and links action events to the corresponding code logic.
Sometimes it’s easier to understand a new workflow if you can visualize it, so take a look at the image below:
Break this down into its simplest steps:
First, the Unity Engine collects information from theconnected devicesand sends correspondingevents, like a button click, to theInput System.
TheInput Systemthen translates thoseeventsintoactions, based on theactionandbindinginformation stored in theInput Action Assets.
It then passes theactionsto thePlayerInputscript, which invokes the corresponding methods.
Now that you know a little more about how the Input System works, you’ll use it to control the game character in the coming sections.
Installing the New Input System
The first thing you’ll do is install the newInput System package. The standardUnityinstallation doesn’t include it.
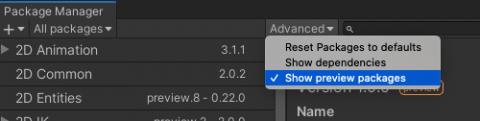
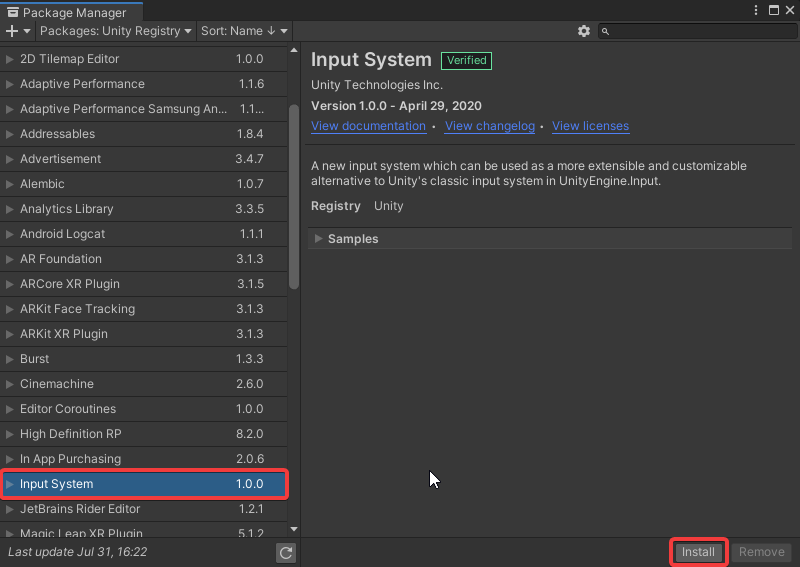
OpenWindow ▸ Package Managerin the menu bar. Make sure that you selectUnity Registryin thePackagesdropdown, if you haven’t already.
FindInput Systemon the list. Select it and clickInstall.
Creating an Input Action Asset
Once you’ve installed the Input System package, you’ll create an Input Action Asset to store the settings for your actions and bindings.
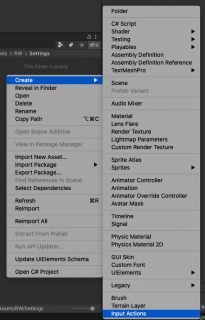
Open theProjectwindow and selectSettingsfromRW. Right-click, selectCreate ▸ Input Actionsand rename it toMyControl.
Setting up the Action Editor
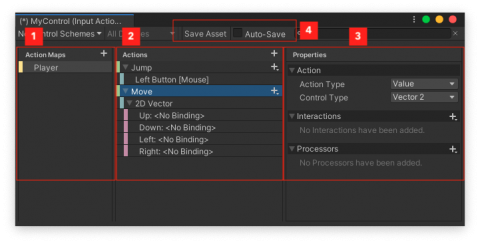
Double-clickMyControlinSettingsto open theAction Editor, which helps you manipulate actions and control bindings.
Since this is a new window, take a look at the sections:
Action Maps: Groups of actions that occur in the game. You can group actions for different purposes, like player, gameplay or UI.
Actions: The list of actions and bindings associated with the selected Action Map. In this panel, you create, modify or delete actions and bindings.
Properties: Edit the action or binding properties in this panel, such the type of action and the controls you associated with the binding.
Save Assets: This is a very important function: You must clickSave Assetafter making any changes to theInput Action Asset. If you forget to save, the setting won’t work. Thus, you won’t see the expected result and may think there’s a bug in the code.
You can switch onAuto Saveto prevent the problem, but it’s quite slow.
Now you’re ready to create your first action, theJumpaction.
Creating a Jump Action
First, open theAction Editorand click the+icon in theActionMapto create a newAction Map. Rename it from the default,New Action Map, toPlayer.
Then, in theActionpanel, double-clickNew Actionand rename it to a meaningful name:Jump.
Finally, you need to add a binding to the Jump action. You’ll bind theSpacebarandLeft Mouse Buttonto this action by following these steps:
Select theJumpaction, click the+icon and selectAdd Binding.
Click the new binding item,<No binding>.
Click thePathfield in theBinding propertiespanel.
TypeSpacebar Keyboardand selectSpace [Keyboard]to create the binding for theSpacebar.
Repeat steps 1–3 to create another binding for theLeft Mouse Button.
TypeLeft Buttonin thePathfield and selectLeft Button [Mouse]to create the binding.
Congratulations, you’ve now associated the Jump action with the Spacebar on the keyboard and the left button on the mouse.
Now to hook up those actions with your code!
Implementing the Jump Logic
First of all, you need to remove the old input logic from the project. OpenPlayer.csand navigate to theUpdate()method.
As you can see, the current code triggers the animation updates, then it checks if the player has pressed the space bar in order to start a jump.
Now that the Jump action and its control bindings are ready, the next thing to do is link the action to the code.
Linking the Jump Action to the Code
Start by deleting the code inUpdateto remove the implementation of the old Input Manager so you can add Jump logic using the new Input System.Updatewill now only control the animations.
voidUpdate() { UpdateAnimation(); }
Save the script and go back to the editor. Select thePlayerobject in the Hierarchy and add aPlayerInputcomponent from the Inspector.
Next, you’ll dragMyControltoPlayerInput’s Actions. Make sure to set theDefault MaptoPlayer.
Finally, openPlayer.csand add a new method calledOnJump()with the following code:
publicvoidOnJump() { HandleJump(); }
You’ve associated this method with the Jump action by using this pattern to name it:public void On[Action Name Goes Here]().
For example, the Jump action invokesOnJump(), while the Attack action invokesOnAttack().
ClickSave Assetin theAction Editorand run the game. Now you can use the SpaceBar or the left mouse button to make the player character jump. It’s really that easy!
Creating the Move Action
You’ve learned how to use the Input System to create a Jump action. Next up is theMoveaction!Moveis similar toJump, but it has a few key differences.
For example, the Jump action is a simple trigger event, while the Move action is an event thatcarries values: the movement direction, which comes from user input.
Again, you need to create the action and its binding. Start by going toAction Editor(double clickMyControlif you lost the window) and click the+icon in theActions panelto create a new action. Rename it toMove.
Next, open theAction properties panel, changeAction TypetoValueandControl TypetoVector 2.
Finally, remove<No Binding>by right-clicking and selectingDelete.
Now, you need to create the Move action’s bindings.
First, you’ll click the+icon in the header of the Move action. Then, selectAdd 2D Vector Composite, which will create four binding items corresponding to the up, down, left and right directions.
Now, you’ll set the path of each binding as follows:
Up: Up Arrow [Keyboard]
Down: Down Arrow [Keyboard]
Left: Left Arrow [Keyboard]
Right: Right Arrow [Keyboard]
Don’t forget to save the asset in theAction Editor!
Implementing the Move Logic
Before adding new movement logic, you need to remove the implementation of the old Unity input.
Note thatFixedUpdate()is called inevery fixed frame-rate frame.
Now, break this down:
Input.GetAxisRawreturns the value ofAxis.Input.GetAxisRaw("Horizontal")gives the value of theX-Axis, whileInput.GetAxisRaw("Vertical")gives the value ofY-Axis.
These two values define the movement vectormoveVec, which you use to control the direction of the player movement.
The logic of the player character’s behavior while it’son the ground.
The logic of the player character’s behavior while it’sjumping.
Now, delete all the code prior to theifstatement to remove the old input logic. Add the following code above the class definition:
using UnityEngine.InputSystem;
This allows you to access values from the newInput System.
When a player presses theUp,Down,LeftorRightkeys, it passes aMoveaction to this method, along with the values. Here’s how the key presses affect the values:
Up: (0, 1)
Down: (0, -1)
Left: (-1, 0)
Right: (1, 0)
No Key: (0, 0)
Up and Left: (1, -1)
InputValueis a new type you may not know. This class has aGet\()method that you can use to access its values. In this instance, you want the 2D Vector Composite you set in the binding to calculate the movement vector.
ClickPlayto test the logic.
Handling Actions
The new Input System provides four ways to handle action events.
In this tutorial, you used theSendMessagesapproach. You can change this option in theBehaviorfield in thePlayerInputcomponent.
SendMessageandBroadcastMessageare the simplest ways to handle actions. When you use these two options, the system invokes the method with a name matching the name of the action.
For example, in this tutorial, the Jump action invokesOnJump()and the Move action invokesOnMove().
BroadcastMessageis similar toSendMessage, except it can invoke the methods onany child GameObject. These two options are easy to use because you don’t need to configure anything to use them.
Using Invoke Unity Events
When usingInvoke Unity Events, you configure the action much as you’d configure a button click inUnity UI.
This approach is more flexible, letting you use different methods in different objects. Those GameObjects don’t even need to have thePlayerInputcomponent.
Using Invoke C# Events
This approach is as flexible asInvoke Unity Events. You can define the methods you want to use instead of using methods with a specific name. However, if you use this approach, you need to write code to control which methods to invoke.
Gets thePlayerInputcomponent and registers the method toonActionTriggered.
Controls which method to call for different actions.
Using the Update Cycle of the New Input System
In the old Unity Input Manager, you checked the input in every frame usingUpdate(). In the new Input System, you may wonder when actions are being sent, and if they’re sent before everyUpdate().
The new Input System uses a different update cycle that’s independent ofMonoBehaviour‘s lifecycle. You can read more about it inUnity’s Execution Order documentation.
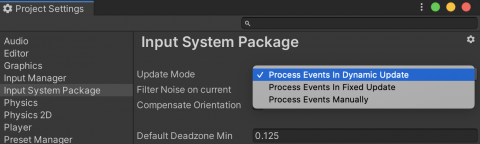
The system offers threeUpdate Modesto control the update cycle. You can configure them inProject Settings ▸ Input System Package ▸ Update Mode.
Take a look at each of these nodes:
Dynamic Update: Processes events atirregular intervalsdetermined by the current frame rate. This is the default setting.
Fixed Update: Processes events atfixed-length intervals.Time.fixedDeltaTimedetermines the length of the interval.
Manually:Events aren’t processed automatically; you process them when you callInputSystem.Update(). If you want a check similar to the old system, you can callInputSystem.Update()inUpdate().
These new options, as part of the new Input System, give you a lot more control over input, whilst also making it easier to support multiple input devices :]
Where to Go from Here?
Download the completed project using theDownload Materialsbutton at the top or bottom of this tutorial.
In this Unity Input tutorial, you’ve learned:
The basic layout of the new Input System.
How to use actions and bindings.
How to handle different kinds of player input efficiently.
To test your skill, try to add aPauseaction to the game!