요약 : Microsoft .NET Framework의 PropertyGrid 컨트롤과 이 컨트롤을 응용 프로그램에 맞게 설정하는 방법을 이해할 수 있도록 도와줍니다(37페이지/인쇄 페이지 기준).
적용 대상:
Microsoft .NET Framework
Microsoft Visual Studio .NET
목차
 PropertyGrid 컨트롤 소개
PropertyGrid 컨트롤 만들기
PropertyGrid 컨트롤을 사용할 위치
개체 선택
사용자에 맞게 PropertyGrid 컨트롤 지정
복잡한 속성 표시
속성에 대한 사용자 지정 UI 제공
결론
PropertyGrid 컨트롤 소개
Microsoft Visual Basic 또는 Microsoft Visual Studio .NET을 사용한다면 속성 브라우저를 사용하여 하나 이상의 개체 속성을 찾아보기, 보기 및 편집했습니다. Visual Studio .NET에 있는 속성 브라우저의 핵심은 .NET FrameworkPropertyGrid 컨트롤입니다. PropertyGrid 컨트롤은 개체 또는 형식의 속성을 표시하고, 주로 리플렉션을 사용하여 항목의 속성을 검색합니다. 리플렉션은 런타임에 형식 정보를 제공하는 기술입니다.
다음 스크린 샷에서는 PropertyGrid를 폼에 배치했을 때의 모양을 보여줍니다.

그림 1. 폼의 PropertyGrid
PropertyGrid에는 다음과 같은 부분이 포함되어 있습니다.
PropertyGrid 컨트롤 만들기
Visual Studio .NET을 사용하여 PropertyGrid 컨트롤을 만들려면 PropertyGrid 컨트롤을 도구 상자에 추가해야 합니다. 이 컨트롤은 기본적으로 도구 상자에 포함되어 있지 않습니다. 도구 메뉴에서 도구 상자 사용자 지정을 선택합니다. 대화 상자에서 Framework 구성 요소 탭을 선택한 다음 PropertyGrid를 선택합니다.
명령줄에서 코드를 컴파일할 경우 /reference 옵션을 사용하고 System.Windows.Forms.dll을 지정합니다.
다음 코드에서는 PropertyGrid 컨트롤을 만들어 폼에 추가하는 방법을 설명합니다.
' Visual Basic

Imports System
Imports System.Drawing
Imports System.ComponentModel
Imports System.Windows.Forms
Imports System.Globalization

Public Class OptionsDialog
   Inherits System.Windows.Forms.Form

   Private OptionsPropertyGrid As System.Windows.Forms.PropertyGrid

   Public Sub New()
      MyBase.New()

      OptionsPropertyGrid = New PropertyGrid()
      OptionsPropertyGrid.Size = New Size(300, 250)

      Me.Controls.Add(OptionsPropertyGrid)
      Me.Text = "옵션 대화 상자"
   End Sub
End Class


//C#

using System;
using System.Drawing;
using System.ComponentModel;
using System.Windows.Forms;
using System.Globalization;

public class OptionsDialog : System.Windows.Forms.Form
{
   private System.Windows.Forms.PropertyGrid OptionsPropertyGrid;
   public OptionsDialog()
   {
      OptionsPropertyGrid = new PropertyGrid();
      OptionsPropertyGrid.Size = new Size(300, 250);

      this.Controls.Add(OptionsPropertyGrid);
      this.Text = "옵션 대화 상자";
   }

   [STAThread]
   static void Main()
   {
      Application.Run(new OptionsDialog());
   }
}PropertyGrid 컨트롤을 사용할 위치
응용 프로그램에는 사용자가 PropertyGrid와 상호 작용하여 풍부한 편집을 경험할 수 있는 장소가 많이 있습니다. 한 가지 예로 사용자가 설정할 수 있는 여러 "설정"이나 옵션이 있는 응용 프로그램을 들 수 있습니다. 이러한 "설정"이나 옵션 중 일부는 복잡합니다. 라디오 단추, 콤보 상자 또는 텍스트 상자를 사용하여 이런 옵션을 나타낼 수 있습니다. 이 문서에서는 PropertyGrid 컨트롤을 사용하여 응용 프로그램 옵션을 설정하기 위한 옵션 창을 만드는 과정을 안내합니다. 위에서 만든 OptionsDialog 폼이 옵션 창의 시작이 됩니다. 이제 응용 프로그램 설정에 매핑되는 모든 속성이 포함된 AppSettings라는 클래스를 만듭니다. 개별 변수를 사용하는 대신 별도의 클래스를 만들 경우 설정을 훨씬 더 쉽게 유지 관리할 수 있습니다.
' Visual Basic

Public Class AppSettings
    Private _saveOnClose As Boolean = True
    Private _greetingText As String = "응용 프로그램을 시작합니다."
    Private _maxRepeatRate As Integer = 10
    Private _itemsInMRU As Integer = 4

    Private _settingsChanged As Boolean = False
    Private _appVersion As String = "1.0"

    Public Property SaveOnClose() As Boolean
        Get
            Return _saveOnClose
        End Get
        Set(ByVal Value As Boolean)
            SaveOnClose = Value
        End Set
    End Property

    Public Property GreetingText() As String
        Get
            Return _greetingText
        End Get
        Set(ByVal Value As String)
            _greetingText = Value
        End Set
    End Property

    Public Property ItemsInMRUList() As Integer
        Get
            Return _itemsInMRU
        End Get
        Set(ByVal Value As Integer)
            _itemsInMRU = Value
        End Set
    End Property

    Public Property MaxRepeatRate() As Integer
        Get
            Return _maxRepeatRate
        End Get
        Set(ByVal Value As Integer)
            _maxRepeatRate = Value
        End Set
    End Property

    Public Property SettingsChanged() As Boolean
        Get
            Return _settingsChanged
        End Get
        Set(ByVal Value As Boolean)
            _settingsChanged = Value
        End Set
    End Property

    Public Property AppVersion() As String
        Get
            Return _appVersion
        End Get
        Set(ByVal Value As String)
            _appVersion = Value
        End Set
    End Property
End Class


//C#

public class AppSettings{
    private bool saveOnClose = true;
    private string greetingText = "응용 프로그램을 시작합니다.";
    private int itemsInMRU = 4;
    private int maxRepeatRate = 10;
    private bool settingsChanged = false;
    private string appVersion = "1.0";
    public bool SaveOnClose
    {
        get { return saveOnClose; }
        set { saveOnClose = value;}
    }
    public string GreetingText
    {
        get { return greetingText; }
        set { greetingText = value; }
    }
    public int MaxRepeatRate
    {
        get { return maxRepeatRate; }
        set { maxRepeatRate = value; }
    }
    public int ItemsInMRUList
    {
        get { return itemsInMRU; }
        set { itemsInMRU = value; }
    }
    public bool SettingsChanged
    {
        get { return settingsChanged; }
        set { settingsChanged = value; }
    }
    public string AppVersion
    {
        get { return appVersion; }
        set { appVersion = value; }
    }
}
옵션 창의 PropertyGrid에서 이 클래스를 조작하므로, 폼의 소스 코드 아래쪽이나 새 파일에 응용 프로그램 프로젝트에 대한 클래스 정의를 추가합니다.
개체 선택
PropertyGrid에서 표시하는 내용을 확인하려면 PropertyGrid.SelectedObject 속성을 개체 인스턴스로 설정합니다.PropertyGrid에서 나머지 작업을 실행합니다. SelectedObject를 설정할 때마다 PropertyGrid에서 표시된 속성을 새로 고칩니다. 그렇게 하면 속성 새로 고침이나 런타임에서 개체 간 전환을 쉽게 실행할 수 있습니다.PropertyGrid.Refresh 메서드를 호출하여 속성을 새로 고칠 수도 있습니다.
계속하려면 OptionsDialog 생성자의 코드를 업데이트하여 AppSettings 개체를 만들어 PropertyGrid.SelectedObject속성으로 설정합니다.
' Visual Basic

   Public Sub New()
      MyBase.New()

      OptionsPropertyGrid = New PropertyGrid()
      OptionsPropertyGrid.Size = New Size(300, 250)

      Me.Controls.Add(OptionsPropertyGrid)
      Me.Text = "옵션 대화 상자"

      ' AppSettings 클래스를 만들어 PropertyGrid에 표시합니다.
      Dim appset as AppSettings = New AppSettings()
      OptionsPropertyGrid.SelectedObject = appset
   End Sub


//C#

   public OptionsDialog()
   {
      OptionsPropertyGrid = new PropertyGrid();
      OptionsPropertyGrid.Size = new Size(300, 250);

      this.Controls.Add(OptionsPropertyGrid);
      this.Text = "옵션 대화 상자";

      // AppSettings 클래스를 만들어 PropertyGrid에 표시합니다.
      AppSettings appset = new AppSettings();
      OptionsPropertyGrid.SelectedObject = appset;
   }
응용 프로그램을 컴파일하고 실행합니다. 다음 스크린 샷에서는 그 모양을 보여줍니다.

그림 2. PropertyGrid 에서 선택한 AppSettings 클래스
사용자에 맞게 PropertyGrid 컨트롤 지정
필요에 따라 PropertyGrid의 시각적인 모양을 일부 수정할 수 있습니다. 일부 속성이 표시되는 방법을 변경하거나, 일부 속성이 표시되지 않도록 선택할 수도 있습니다. PropertyGrid를 사용자에 맞게 설정하려면 어떻게 합니까
PropertyGrid의 시각적인 모양 변경
PropertyGrid의 많은 시각적인 모양을 사용자에 맞게 설정할 수 있습니다. 몇 가지 예를 들면 다음과 같습니다.
HelpBackColor, HelpForeColor 또는 HelpVisible 속성을 통해 배경색을 변경하거나, 글꼴 색을 변경하거나, 설명 창을 숨깁니다.
ToolbarVisible 속성을 통해 도구 모음을 숨기고, BackColor 속성을 통해 도구 모음의 색을 변경하고,LargeButtons 속성을 통해 큰 도구 모음 단추를 표시합니다.
PropertySort 속성을 사용하여 속성을 사전순으로 정렬하고 항목별로 정렬합니다.
BackColor 속성을 통해 분할자 색을 변경합니다.
LineColor 속성을 통해 모눈선과 테두리를 변경합니다.
이 예제의 옵션 창의 경우 도구 모음이 필요하지 않기 때문에 ToolbarVisible을 false로 설정합니다. 다른 기본 설정을 유지합니다.
속성 표시 방법 변경
일부 속성이 표시되는 방법을 변경하기 위해 속성에 다른 특성을 적용할 수 있습니다. 특성은 리플렉션을 사용하여 런타임에서 검색할 수 있는 형식, 필드, 메서드, 속성 등과 같은 프로그래밍 요소에 주석을 다는 데 사용되는 선언 태그입니다. 몇 가지 예를 들면 다음과 같습니다.
DescriptionAttribute – 속성 아래 있는 설명 도움말 창에 표시되는 속성에 대한 텍스트를 설정합니다. 포커스가 있는 속성인 활성 속성에 대한 도움말 텍스트를 제공할 수 있는 유용한 방법입니다. 이 특성을 MaxRepeatRate 속성에 적용합니다.
CategoryAttribute – 표에서 속성이 속하는 범주를 설정합니다. 속성을 범주 이름별로 그룹화할 경우에 유용합니다. 속성에 범주를 지정하지 않으면 Misc 범주가 할당됩니다. 이 특성을 모든 속성에 적용합니다.
BrowsableAttribute – 속성이 표에 표시되는지 여부를 나타냅니다. 표에서 속성을 숨기고자 할 경우에 유용합니다. 기본적으로 공개 속성은 항상 표에 표시됩니다. 이 특성을 SettingsChanged 속성에 적용합니다.
ReadOnlyAttribute – 속성이 읽기 전용인지 여부를 나타냅니다. 표에서 속성을 편집할 수 없게 할 경우에 유용합니다. 기본적으로 get 및 set 접근자 함수가 있는 공개 속성은 표에서 편집할 수 있습니다. 이 특성을 AppVersion 속성에 적용합니다.
DefaultValueAttribute – 속성의 기본값을 식별합니다. 속성에 대한 기본값을 제공하고 나중에 속성 값이 기본값과 다른지 확인할 때 유용합니다. 이 특성을 모든 속성에 적용합니다.
DefaultPropertyAttribute – 클래스의 기본 속성을 식별합니다. 클래스의 기본 속성은 표에서 클래스를 처음 선택할 때 포커스를 가집니다. 이 특성을 AppSettings 클래스에 적용합니다.
이제 이 특성 중 일부를 AppSettings 클래스에 적용하여 PropertyGrid에 속성이 표시되는 방법을 변경합니다.
' Visual Basic

<DefaultPropertyAttribute("SaveOnClose")> _
Public Class AppSettings
    Private _saveOnClose As Boolean = True
    Private _greetingText As String = "응용 프로그램을 시작합니다."
    Private _maxRepeatRate As Integer = 10
    Private _itemsInMRU As Integer = 4

    Private _settingsChanged As Boolean = False
    Private _appVersion As String = "1.0"

    <CategoryAttribute("문서 설정"), _
     DefaultValueAttribute(True)> _
    Public Property SaveOnClose() As Boolean
        Get
            Return _saveOnClose
        End Get
        Set(ByVal Value As Boolean)
            SaveOnClose = Value
        End Set
    End Property

    <CategoryAttribute("전역 설정"), _
    ReadOnlyAttribute(True), _
    DefaultValueAttribute("응용 프로그램을 시작합니다.")> _
    Public Property GreetingText() As String
        Get
            Return _greetingText
        End Get
        Set(ByVal Value As String)
            _greetingText = Value
        End Set
    End Property

    <CategoryAttribute("전역 설정"), _
    DefaultValueAttribute(4)> _
    Public Property ItemsInMRUList() As Integer
        Get
            Return _itemsInMRU
        End Get
        Set(ByVal Value As Integer)
            _itemsInMRU = Value
        End Set
    End Property

    <DescriptionAttribute("텍스트가 반복되는 속도(밀리초)"), _
    CategoryAttribute("전역 설정"), _
    DefaultValueAttribute(10)> _
    Public Property MaxRepeatRate() As Integer
        Get
            Return _maxRepeatRate
        End Get
        Set(ByVal Value As Integer)
            _maxRepeatRate = Value
        End Set
    End Property

    <BrowsableAttribute(False),
     DefaultValueAttribute(False)> _
    Public Property SettingsChanged() As Boolean
        Get
            Return _settingsChanged
        End Get
        Set(ByVal Value As Boolean)
            _settingsChanged = Value
        End Set
    End Property

    <CategoryAttribute("버전"), _
    DefaultValueAttribute("1.0"), _
    ReadOnlyAttribute(True)> _
    Public Property AppVersion() As String
        Get
            Return _appVersion
        End Get
        Set(ByVal Value As String)
            _appVersion = Value
        End Set
    End Property
End Class


//C#
[DefaultPropertyAttribute("SaveOnClose")]
public class AppSettings{
    private bool saveOnClose = true;
    private string greetingText = "응용 프로그램을 시작합니다.";
    private int maxRepeatRate = 10;
    private int itemsInMRU = 4;

    private bool settingsChanged = false;
    private string appVersion = "1.0";

    [CategoryAttribute("문서 설정"),
    DefaultValueAttribute(true)]
    public bool SaveOnClose
    {
        get { return saveOnClose; }
        set { saveOnClose = value;}
    }

    [CategoryAttribute("전역 설정"),
    ReadOnlyAttribute(true),
    DefaultValueAttribute("응용 프로그램을 시작합니다.")]
    public string GreetingText
    {
        get { return greetingText; }
        set { greetingText = value; }
    }

    [CategoryAttribute("전역 설정"),
    DefaultValueAttribute(4)]
    public int ItemsInMRUList
    {
        get { return itemsInMRU; }
        set { itemsInMRU = value; }
    }

    [DescriptionAttribute("텍스트가 반복되는 속도(밀리초)"),
    CategoryAttribute("전역 설정"),
    DefaultValueAttribute(10)]
    public int MaxRepeatRate
    {
        get { return maxRepeatRate; }
        set { maxRepeatRate = value; }
    }

    [BrowsableAttribute(false),
    DefaultValueAttribute(false)]
    public bool SettingsChanged
    {
        get { return settingsChanged; }
        set { settingsChanged = value; }
    }

    [CategoryAttribute("버전"),
    DefaultValueAttribute("1.0"),
    ReadOnlyAttribute(true)]
    public string AppVersion
    {
        get { return appVersion; }
        set { appVersion = value; }
    }
}
이 특성들을 AppSettings 클래스에 적용하여 응용 프로그램을 컴파일하고 실행합니다. 다음 스크린 샷에서는 그 모양을 보여줍니다.

그림 3. PropertyGrid 의 범주 및 기본값과 함께 표시되는 속성
이 버전의 옵션 창에서 작업한 후 다음이 표시될 수 있습니다.
창이 표시될 때 SaveOnClose 속성이 포커스를 가집니다.
MaxRepeatRate 속성을 선택하면 설명 도움말 창에 "텍스트가 반복되는 속도(밀리초)"가 표시됩니다.
SaveOnClose 속성은 "문서 설정" 범주 아래에 표시됩니다. 다른 속성들은 "전역 설정"과 "버전"이라는 다른 두 범주 아래에 표시됩니다.
SettingsChanged 속성은 더 이상 표시되지 않습니다.
AppVersion 속성은 읽기 전용입니다. 읽기 전용 속성은 희미한 텍스트로 표시됩니다.
SaveOnClose 속성에 true 이외의 다른 값이 있을 경우 굵은 텍스트로 표시됩니다. PropertyGrid에서는 굵은 텍스트를 사용하여 기본값이 아닌 값을 갖는 속성을 나타냅니다.
복잡한 속성 표시
지금까지는 옵션 창에 정수, 부울, 문자열 등과 같은 간단한 형식을 표시했습니다. 복잡한 형식은 어떻게 합니까 응용 프로그램에서 창 크기, 문서 글꼴, 도구 모음 색 등을 추적해야 할 경우에는 어떻게 합니까 .NET Framework에서 제공하는 일부 데이터 형식에는 PropertyGrid에서 사용할 수 있게 도와주는 특수한 표시 기능이 있습니다.
제공된 형식 지원
먼저 AppSettings 클래스를 업데이트하여 창 크기(Size 형식), 창 글꼴(Font 형식) 및 도구 모음 색(Color 형식)에 대한 새로운 속성을 추가합니다.
' Visual Basic

<DefaultPropertyAttribute("SaveOnClose")> _
Public Class AppSettings
    Private _saveOnClose As Boolean = True
    Private _greetingText As String = "응용 프로그램을 시작합니다."
    Private _maxRepeatRate As Integer = 10
    Private _itemsInMRU As Integer = 4

    Private _settingsChanged As Boolean = False
    Private _appVersion As String = "1.0"

    Private _windowSize As Size = New Size(100, 100)
    Private _windowFont As Font = New Font("굴림", 8, FontStyle.Regular)
    Private _toolbarColor As Color = SystemColors.Control

    <CategoryAttribute("문서 설정"), _
     DefaultValueAttribute(True)> _
    Public Property SaveOnClose() As Boolean
        Get
            Return _saveOnClose
        End Get
        Set(ByVal Value As Boolean)
            SaveOnClose = Value
        End Set
    End Property

    <CategoryAttribute("문서 설정")> _
    Public Property WindowSize() As Size
        Get
            Return _windowSize
        End Get
        Set(ByVal Value As Size)
            _windowSize = Value
        End Set
    End Property

    <CategoryAttribute("문서 설정")> _
    Public Property WindowFont() As Font
        Get
            Return _windowFont
        End Get
        Set(ByVal Value As Font)
            _windowFont = Value
        End Set
    End Property

    <CategoryAttribute("전역 설정")> _
    Public Property ToolbarColor() As Color
        Get
            Return _toolbarColor
        End Get
        Set(ByVal Value As Color)
            _toolbarColor = Value
        End Set
    End Property

    <CategoryAttribute("전역 설정"), _
    ReadOnlyAttribute(True), _
    DefaultValueAttribute("응용 프로그램을 시작합니다.")> _
    Public Property GreetingText() As String
        Get
            Return _greetingText
        End Get
        Set(ByVal Value As String)
            _greetingText = Value
        End Set
    End Property

    <CategoryAttribute("전역 설정"), _
    DefaultValueAttribute(4)> _
    Public Property ItemsInMRUList() As Integer
        Get
            Return _itemsInMRU
        End Get
        Set(ByVal Value As Integer)
            _itemsInMRU = Value
        End Set
    End Property

    <DescriptionAttribute("텍스트가 반복되는 속도(밀리초)"), _
    CategoryAttribute("전역 설정"), _
    DefaultValueAttribute(10)> _
    Public Property MaxRepeatRate() As Integer
        Get
            Return _maxRepeatRate
        End Get
        Set(ByVal Value As Integer)
            _maxRepeatRate = Value
        End Set
    End Property

    <BrowsableAttribute(False),
     DefaultValueAttribute(False)> _
    Public Property SettingsChanged() As Boolean
        Get
            Return _settingsChanged
        End Get
        Set(ByVal Value As Boolean)
            _settingsChanged = Value
        End Set
    End Property

    <CategoryAttribute("버전"), _
    DefaultValueAttribute("1.0"), _
    ReadOnlyAttribute(True)> _
    Public Property AppVersion() As String
        Get
            Return _appVersion
        End Get
        Set(ByVal Value As String)
            _appVersion = Value
        End Set
    End Property
End Class


//C#

[DefaultPropertyAttribute("SaveOnClose")]
public class AppSettings{
    private bool saveOnClose = true;
    private string greetingText = "응용 프로그램을 시작합니다.";
    private int maxRepeatRate = 10;
    private int itemsInMRU = 4;

    private bool settingsChanged = false;
    private string appVersion = "1.0";

    private Size windowSize = new Size(100,100);
    private Font windowFont = new Font("굴림", 8, FontStyle.Regular);
    private Color toolbarColor = SystemColors.Control;

    [CategoryAttribute("문서 설정"),
    DefaultValueAttribute(true)]
    public bool SaveOnClose
    {
        get { return saveOnClose; }
        set { saveOnClose = value;}
    }

    [CategoryAttribute("문서 설정")]
    public Size WindowSize
    {
        get { return windowSize; }
        set { windowSize = value;}

   }

    [CategoryAttribute("문서 설정")]
    public Font WindowFont
    {
        get {return windowFont; }
        set { windowFont = value;}

   }

    [CategoryAttribute("전역 설정")]
    public Color ToolbarColor
    {
        get { return toolbarColor; }
        set { toolbarColor = value; }

   }

    [CategoryAttribute("전역 설정"),
    ReadOnlyAttribute(true),
    DefaultValueAttribute("응용 프로그램을 시작합니다.")]
    public string GreetingText
    {
        get { return greetingText; }
        set { greetingText = value; }
    }

    [CategoryAttribute("전역 설정"),
    DefaultValueAttribute(4)]
    public int ItemsInMRUList
    {
        get { return itemsInMRU; }
        set { itemsInMRU = value; }
    }

    [DescriptionAttribute("텍스트가 반복되는 속도(밀리초)"),
    CategoryAttribute("전역 설정"),
    DefaultValueAttribute(10)]
    public int MaxRepeatRate
    {
        get { return maxRepeatRate; }
        set { maxRepeatRate = value; }
    }

    [BrowsableAttribute(false),
    DefaultValueAttribute(false)]
    public bool SettingsChanged
    {
        get { return settingsChanged; }
        set { settingsChanged = value; }
    }

    [CategoryAttribute("버전"),
    DefaultValueAttribute("1.0"),
    ReadOnlyAttribute(true)]
    public string AppVersion
    {
        get { return appVersion; }
        set { appVersion = value; }
    }
}
다음 스크린 샷에서는 새 속성이 PropertyGrid에 표시되는 모양을 보여줍니다.

그림 4. PropertyGrid 에 표시되는 .NET Framework 데이터 형식
WindowFont 속성에는 누르면 글꼴 선택 대화 상자가 표시되는 줄임표("...") 단추가 있습니다. 이 속성을 확장하여 더 많은 Font 속성을 표시할 수 있습니다. Font 속성 중 일부에는 글꼴에 대한 정보와 값의 드롭다운 목록이 제공됩니다. WindowSize 속성을 확장하여 더 많은 Size 형식 속성을 표시할 수 있습니다. 마지막으로 ToolbarColor 속성에는 선택한 색의 견본과 다른 색을 선택하기 위한 사용자 지정 드롭다운 목록이 있습니다. 모든 데이터 형식에 대해 .NET Framework는 PropertyGrid에서 보다 쉽게 편집할 수 있도록 추가 클래스를 제공합니다.
사용자 지정 형식 지원
이제 두 AppSettings 클래스에 DefaultFileName 및 SpellCheckOptions라는 두 클래스를 추가합니다. DefaultFileName 속성은 문자열을 가져오거나 설정하고 SpellCheckOptions 속성은 SpellingOptions 클래스의 인스턴스를 가져오거나 설정합니다.
SpellingOptions 클래스는 응용 프로그램의 맞춤법 검사 속성을 관리하는 새 클래스입니다. 개체의 속성을 관리하는 별도의 클래스를 만들 경우에 대한 정확한 규칙은 없으며, 전체적인 클래스 디자인을 기준으로 합니다. 폼의 소스 코드 아래쪽이나 새 파일에 SpellingOptions 클래스에 대한 정의를 추가합니다.
Visual Basic

<DescriptionAttribute("응용 프로그램의 맞춤법 검사 옵션이 표시되도록 확장합니다.")> _
Public Class SpellingOptions
    Private _spellCheckWhileTyping As Boolean = True
    Private _spellCheckCAPS As Boolean = False
    Private _suggestCorrections As Boolean = True

    <DefaultValueAttribute(True)> _
    Public Property SpellCheckWhileTyping() As Boolean
        Get
            Return _spellCheckWhileTyping
        End Get
        Set(ByVal Value As Boolean)
            _spellCheckWhileTyping = Value
        End Set
    End Property

    <DefaultValueAttribute(False)> _
    Public Property SpellCheckCAPS() As Boolean
        Get
            Return _spellCheckCAPS
        End Get
        Set(ByVal Value As Boolean)
            _spellCheckCAPS = Value
        End Set
    End Property

    <DefaultValueAttribute(True)> _
    Public Property SuggestCorrections() As Boolean
        Get
            Return _suggestCorrections
        End Get
        Set(ByVal Value As Boolean)
            _suggestCorrections = Value
        End Set
    End Property
End Class


//C#

[DescriptionAttribute("응용 프로그램의 맞춤법 검사 옵션이 표시되도록 확장합니다.")]
public class SpellingOptions{
    private bool spellCheckWhileTyping = true;
    private bool spellCheckCAPS = false;
    private bool suggestCorrections = true;

    [DefaultValueAttribute(true)]
    public bool SpellCheckWhileTyping
    {
        get { return spellCheckWhileTyping; }
        set { spellCheckWhileTyping = value; }
    }

    [DefaultValueAttribute(false)]
    public bool SpellCheckCAPS
    {
        get { return spellCheckCAPS; }
        set { spellCheckCAPS = value; }
    }
    [DefaultValueAttribute(true)]
    public bool SuggestCorrections
    {
        get { return suggestCorrections; }
        set { suggestCorrections = value; }
    }
}
옵션 창 응용 프로그램을 다시 컴파일하고 실행합니다. 다음 스크린 샷에서는 그 모양을 보여줍니다.

그림 5. PropertyGrid 에 표시되는 형식 변환기 없는 사용자 지정 데이터 형식
SpellcheckOptions 속성의 모양을 주의하십시오. .NET Framework 형식과 달리 이 사용자 지정 데이터 형식은 사용자 지정 문자열 표현을 확장하거나 표시하지 않습니다. .NET Framework 형식에서 사용자의 복잡한 형식을 편집할 때와 동일한 경험을 하려면 어떻게 합니까 .NET Framework 형식에서는 TypeConverter 및 UITypeEditor 클래스를 사용하여 PropertyGrid 편집을 대부분 지원하며, 사용자도 두 클래스를 사용할 수 있습니다.
확장 가능한 속성 지원 추가
PropertyGrid를 가져와서 SpellingOptions 속성을 확장하려면 TypeConverter를 만들어야 합니다. TypeConverter는 형식을 변환할 수 있는 방법을 제공합니다. PropertyGrid는 TypeConverter를 사용하여 개체 형식을 개체 값을 표 모양으로 표시하는 데 사용하는 String으로 변환합니다. 편집하는 동안 TypeConverter는 String에서 사용자 개체 형식으로 다시 변환합니다. .NET Framework에는 이 과정을 더 쉽게 해주는 ExpandableObjectConverter 클래스가 제공됩니다.
확장 가능한 개체 지원을 제공하려면
ExpandableObjectConverter에서 상속되는 클래스를 만듭니다.
' Visual Basic

Public Class SpellingOptionsConverter
    Inherits ExpandableObjectConverter
End Class


//C#

public class SpellingOptionsConverter:ExpandableObjectConverter
{  }
CanConvertTo 메서드를 재정의하고 destinationType 매개 변수가 이 형식 변환기(사용자 예제의 SpellingOptions 클래스)를 사용하는 클래스와 같은 형식일 경우 true를 반환합니다. 그렇지 않으면 기본 클래스CanConvertTo 메서드의 값을 반환합니다.
' Visual Basic

Public Overloads Overrides Function CanConvertTo( _
                              ByVal context As ITypeDescriptorContext, _
                              ByVal destinationType As Type) As Boolean
    If (destinationType Is GetType(SpellingOptions)) Then
        Return True
    End If
    Return MyBase.CanConvertTo(context, destinationType)
End Function
//C#

public override bool CanConvertTo(ITypeDescriptorContext context,
                                  System.Type destinationType)
{
    if (destinationType == typeof(SpellingOptions))
        return true;

    return base.CanConvertTo(context, destinationType);
}
ConvertTo 메서드를 재정의하고 destinationType 매개 변수가 String이고 값이 이 형식 변환기(사용자 예제의 SpellingOptions 클래스)를 사용하는 클래스와 같은 형식인지 확인합니다. 두 경우 중 하나라도 false이면 기본 클래스 ConvertTo 메서드의 값을 반환하고, 그렇지 않으면 값 개체의 문자열 표현을 반환합니다. 문자열 표현에서는 클래스의 각 속성을 고유 구분 기호로 구분해야 합니다. 전체 문자열이 PropertyGrid에 표시되기 때문에 읽는 데 방해가 되지 않는 구분 기호를 선택하는 것이 좋습니다. 대개 쉼표가 적당합니다.
' Visual Basic

Public Overloads Overrides Function ConvertTo( _
                              ByVal context As ITypeDescriptorContext, _
                              ByVal culture As CultureInfo, _
                              ByVal value As Object, _
                              ByVal destinationType As System.Type) _
                     As Object
    If (destinationType Is GetType(System.String) _
        AndAlso TypeOf value Is SpellingOptions) Then

        Dim so As SpellingOptions = CType(value, SpellingOptions)

        Return "입력하는 동안 검사: " & so.SpellCheckWhileTyping & _
               ", CAPS 검사: " & so.SpellCheckCAPS & _
               ", 단어 추천: " & so.SuggestCorrections
    End If
    Return MyBase.ConvertTo(context, culture, value, destinationType)
End Function
//C#

public override object ConvertTo(ITypeDescriptorContext context,
                               CultureInfo culture,
                               object value,
                               System.Type destinationType)
{
    if (destinationType == typeof(System.String) &&
         value is SpellingOptions){

        SpellingOptions so = (SpellingOptions)value;

        return "입력하는 동안 검사:" + so.SpellCheckWhileTyping +
               ", CAPS 검사: " + so.SpellCheckCAPS +
               ", 단어 추천: " + so.SuggestCorrections;
    }
    return base.ConvertTo(context, culture, value, destinationType);
}
(옵션) 형식 변환기가 문자열에서 변환할 수 있게 지정하면 표의 개체 문자열 표현을 편집할 수 있습니다. 이렇게 하려면 먼저 CanConvertFrom 메서드를 재정의하고 소스 Type 매개 변수가 String 형식일 경우 true를 반환하고, 그렇지 않으면 기본 클래스 CanConvertFrom 메서드의 값을 반환합니다.
' Visual Basic

Public Overloads Overrides Function CanConvertFrom( _
                           ByVal context As ITypeDescriptorContext, _
                           ByVal sourceType As System.Type) As Boolean
    If (sourceType Is GetType(String)) Then
        Return True
    End If
    Return MyBase.CanConvertFrom(context, sourceType)
End Function
//C#

public override bool CanConvertFrom(ITypeDescriptorContext context,
                              System.Type sourceType)
{
    if (sourceType == typeof(string))
        return true;

    return base.CanConvertFrom(context, sourceType);
}
개체의 기본 클래스를 편집할 수 있게 하려면 ConvertFrom 메서드를 재정의하고 값 매개 변수가 String인지 확인합니다. 값 매개 변수가 String이 아니면 기본 클래스 ConvertFrom 메서드의 값을 반환하고, 그렇지 않으면 값 매개 변수를 기반으로 클래스(사용자 예제의 SpellingOptions 클래스)의 새 인스턴스를 반환합니다. 값 매개 변수에서 클래스의 각 속성에 대한 값을 구문 분석해야 합니다. ConvertTo 메서드에서 만든 구분 문자열의 형식을 알고 있으면 구문 분석을 실행하는 데 도움이 됩니다.
' Visual Basic

Public Overloads Overrides Function ConvertFrom( _
                              ByVal context As ITypeDescriptorContext, _
                              ByVal culture As CultureInfo, _
                              ByVal value As Object) As Object

    If (TypeOf value Is String) Then
        Try
            Dim s As String = CStr(value)
            Dim colon As Integer = s.IndexOf(":")
            Dim comma As Integer = s.IndexOf(",")

            If (colon <> -1 AndAlso comma <> -1) Then
                Dim checkWhileTyping As String = s.Substring(colon + 1, _
                                                (comma - colon - 1))

                colon = s.IndexOf(":", comma + 1)
                comma = s.IndexOf(",", comma + 1)

                Dim checkCaps As String = s.Substring(colon + 1, _
                                                (comma - colon - 1))

                colon = s.IndexOf(":", comma + 1)

                Dim suggCorr As String = s.Substring(colon + 1)

                Dim so As SpellingOptions = New SpellingOptions()

                so.SpellCheckWhileTyping = Boolean.Parse(checkWhileTyping)
                so.SpellCheckCAPS = Boolean.Parse(checkCaps)
                so.SuggestCorrections = Boolean.Parse(suggCorr)

                Return so
            End If
        Catch
            Throw New ArgumentException( _
                "& CStr(value) & _을"
                                "SpellingOptions 형식으로" "변환할 수 없습니다")

        End Try
    End If
    Return MyBase.ConvertFrom(context, culture, value)
End Function
//C#

public override object ConvertFrom(ITypeDescriptorContext context,
                              CultureInfo culture, object value)
{
    if (value is string) {
        try {
            string s = (string) value;
            int colon = s.IndexOf(':');
            int comma = s.IndexOf(',');

            if (colon != -1 && comma != -1) {
                string checkWhileTyping = s.Substring(colon + 1 ,
                                                (comma - colon - 1));

                colon = s.IndexOf(':', comma + 1);
                comma = s.IndexOf(',', comma + 1);

                string checkCaps = s.Substring(colon + 1 ,
                                                (comma - colon -1));

                colon = s.IndexOf(':', comma + 1);

                string suggCorr = s.Substring(colon + 1);

                SpellingOptions so = new SpellingOptions();

                so.SpellCheckWhileTyping =Boolean.Parse(checkWhileTyping);
                so.SpellCheckCAPS = Boolean.Parse(checkCaps);
                so.SuggestCorrections = Boolean.Parse(suggCorr);
                return so;
            }
        }
        catch {
            throw new ArgumentException(
                "+ (string)value +를"
                                   "SpellingOptions 형식으로" "변환할 수 없습니다");
        }
    }
    return base.ConvertFrom(context, culture, value);
}
이제 형식 변환기 클래스가 만들어 졌으므로 이 형식 변환기 클래스를 사용할 대상 클래스를 식별해야 합니다.TypeConverterAttribute를 대상 클래스(사용자 예제의 SpellingOptions 클래스)에 적용하여 식별합니다.
' Visual Basic

' SpellingOptions 클래스에 적용된 TypeConverter 특성
<TypeConverter(GetType(SpellingOptionsConverter)), _
DescriptionAttribute("응용 프로그램에 대한 맞춤법 검사 옵션이 표시되도록 확장합니다.")> _
Public Class SpellingOptions
   ...
End Class


//C#

// SpellingOptions 클래스에 적용된 TypeConverter 특성.
 [TypeConverterAttribute(typeof(SpellingOptionsConverter)),
DescriptionAttribute("응용 프로그램에 대한 맞춤법 검사 옵션이 표시되도록 확장합니다.")]
public class SpellingOptions{ ... }
옵션 창 응용 프로그램을 다시 컴파일하고 실행합니다. 다음 스크린 샷에서는 옵션 창의 현재 모양을 보여줍니다.

그림 6. PropertyGrid에 표시되는 형식 변환기가 있는 사용자 지정 데이터 형식
참고 확장 가능한 개체만 지원하고 사용자 지정 문자열 표현은 지원하지 않으려면TypeConverterAttribute를 클래스에 적용할 수 있습니다. ExpandableObjectConverter를 형식 변환기 형식으로 지정합니다.
도메인 목록 및 간단한 드롭다운 속성 지원 추가
Enum 형식을 기반으로 열거를 반환하는 속성의 경우 PropertyGrid에서 드롭다운 목록에 열거 값을 자동으로 표시합니다. EnumConverter에서도 이 기능을 제공합니다. 사용자 속성의 경우 Enum을 기준으로 하지 않는 형식을 가진 사용자에게 유효한 값 목록을 제공할 수 있습니다. 이 목록을 선택 목록 또는 도메인 목록이라고도 합니다. 도메인 값이 런타임까지도 알려지지 않거나 값이 변경될 수 있는 경우가 이런 경우입니다.
옵션 창을 수정하여 사용자가 선택할 수 있는 기본 파일 이름의 도메인 목록을 제공합니다. DefaultFileName 속성을 AppSettings 클래스에 이미 추가했습니다. 다음 단계에서는 도메인 목록을 제공하기 위해 PropertyGrid에 속성의 드롭다운을 표시합니다.
간단한 드롭다운 속성 지원을 제공하려면
형식 변환기 클래스에서 상속되는 클래스를 만듭니다. DefaultFileName 속성이 String 형식이기 때문에StringConverter에서 상속할 수 있습니다. 사용자의 속성 형식에 대한 형식 변환기가 없으면 TypeConverter에서 상속할 수 있습니다. 그러나 이 경우에는 필요하지 않습니다.
' Visual Basic

Public Class FileNameConverter
    Inherits StringConverter
End Class


//C#

public class FileNameConverter: StringConverter
{  }
GetStandardValuesSupported 메서드를 재정의하고 true를 반환하여 이 개체가 목록에서 선택할 수 있는 표준 값 세트를 지원함을 나타냅니다.
' Visual Basic

Public Overloads Overrides Function GetStandardValuesSupported( _
                    ByVal context As ITypeDescriptorContext) As Boolean
    Return True
End Function


//C#

public override bool GetStandardValuesSupported(
                           ITypeDescriptorContext context)
{
    return true;
}
GetStandardValues 메서드를 재정의하고 표준 값으로 채워진 StandardValuesCollection을 반환합니다.StandardValuesCollection을 만드는 한 가지 방법은 생성자에 값 배열을 제공하는 것입니다. 옵션 창 응용 프로그램의 경우 제안된 기본 파일 이름으로 채워진 String 배열을 사용할 수 있습니다.
' Visual Basic

Public Overloads Overrides Function GetStandardValues( _
                     ByVal context As ITypeDescriptorContext) _
                  As StandardValuesCollection

    Return New StandardValuesCollection(New String() {"새 파일", _
                                                      "파일1", _
                                                      "문서1"})
End Function


//C#

public override StandardValuesCollection
                     GetStandardValues(ITypeDescriptorContext context)
{
    return new StandardValuesCollection(new string[]{"새 파일",
                                                     "파일1",
                                                     "문서1"});
}
(옵션) 사용자가 드롭다운 목록에 없는 값을 입력할 수 있게 하려면 GetStandardValuesExclusive 메서드를 재정의하고 false를 반환합니다. 그렇게 하면 기본적으로 드롭다운 목록 스타일이 콤보 상자 스타일로 바뀝니다.
' Visual Basic

Public Overloads Overrides Function GetStandardValuesExclusive( _
               ByVal context As ITypeDescriptorContext) As Boolean
    Return False
End Function


//C#

public override bool GetStandardValuesExclusive(
                           ITypeDescriptorContext context)
{
    return false;
}
이제 드롭다운 목록을 표시하기 위한 사용자 형식 변환기 클래스를 만들었으므로 이 형식 변환기 클래스를 사용할 대상을 식별해야 합니다. 이 경우에는 형식 변환기가 속성에 한정되기 때문에 대상이 DefaultFileName 속성입니다. TypeConverterAttribute를 대상 속성에 적용합니다.
Visual Basic

' DefaultFileName 속성에 적용된 TypeConverter 특성
<TypeConverter(GetType(FileNameConverter)), , _
 CategoryAttribute("문서 설정")> _
Public Property DefaultFileName() As String
    Get
        Return _defaultFileName
    End Get
    Set(ByVal Value As String)
        _defaultFileName = Value
    End Set
End Property


//C#

// DefaultFileName 속성에 적용된 TypeConverter 특성
[TypeConverter(typeof(FileNameConverter)),
 CategoryAttribute("문서 설정")]
public string DefaultFileName
{
    get{ return defaultFileName; }
    set{ defaultFileName = value; }
}
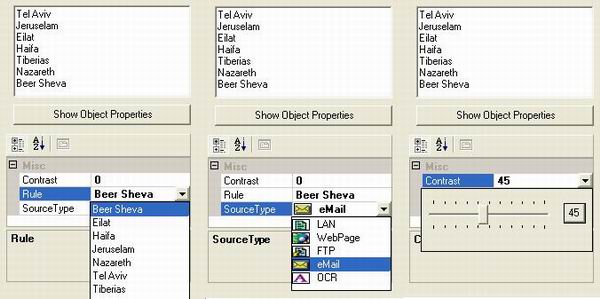
옵션 창 응용 프로그램을 다시 컴파일하고 실행합니다. 다음 스크린 샷에서는 옵션 창의 현재 모양을 보여줍니다. DefaultFileName 속성이 표시되는 모양에 주의합니다.

그림 7. PropertyGrid 에 드롭다운 도메인 목록 표시
속성에 대한 사용자 지정 UI 제공
앞에서 설명한 것처럼 .NET Framework 형식은 TypeConverter 및 UITypeEditor 클래스를 다른 클래스와 함께 사용하여 PropertyGrid 편집 지원을 제공합니다. 사용자 지정 형식 지원 절에서는 TypeConverter 사용을 살펴보았습니다.UITypeEditor 클래스를 사용하여 PropertyGrid를 사용자에 맞게 지정할 수도 있습니다.
Image 및 Color 클래스용으로 제공되는 것과 비슷한 작은 그래픽 표현을 PropertyGrid에 속성 값과 함께 제공할 수 있습니다. 사용자에 맞게 설정하기 위해 이렇게 하려면 UITypeEditor에서 상속하고, GetPaintValueSupported를 재정의한 다음 true를 반환합니다. 그런 다음 UITypeEditor.PaintValue 메서드를 재정의하고, 사용자 메서드에서PaintValueEventArgs.Graphics 매개 변수를 사용하여 그래픽을 그립니다. 마지막으로 UITypeEditor 클래스를 사용하는 속성 또는 클래스에 Editor 특성을 적용합니다.
다음 스크린 샷에서는 결과 모양을 보여줍니다.

그림 8. PropertyGrid 에 속성에 대한 사용자 지정 그래픽 표시
Control.Dock 속성에서 사용자 도킹 선택을 제공할 때 사용하는 것과 비슷한 사용자 드롭다운 목록 컨트롤을 제공할 수도 있습니다. 그렇게 하려면 UITypeEditor에서 상속하고, GetEditStyle을 재정의하고, DropDown과 같은UITypeEditorEditStyle 열거 값을 반환합니다. 사용자 지정 드롭다운 컨트롤은 Control 또는 Control 파생 클래스(예:UserControl)에서 상속해야 합니다. 그런 다음, UITypeEditor.EditValue 메서드를 재정의합니다.IServiceProvider.GetService 메서드를 호출하는 IServiceProvider 매개 변수를 사용하여IWindowsFormsEditorService 인스턴스를 가져옵니다. 마지막으로IWindowsFormsEditorService.DropDownControl 메서드를 호출하여 사용자 지정 드롭다운 목록 컨트롤을 표시합니다. UITypeEditor 클래스를 사용하는 속성 또는 클래스에 Editor 특성을 적용해야 합니다.
다음 스크린 샷에서는 결과 모양을 보여줍니다.

그림 9. PropertyGrid 에 속성에 대한 사용자 지정 드롭다운 컨트롤 표시
TypeEditor 및 UITypeEditor 클래스를 사용하는 것 외에 PropertyGrid를 사용자에 맞게 설정하여 추가 속성 탭을 표시할 수도 있습니다. 속성 탭은 PropertyTab 클래스에서 상속됩니다. Microsoft Visual C# .NET에서 속성 브라우저를 사용한 경우 사용자 지정 PropertyTab이 표시됩니다. Events 탭(번개 표시가 있는 단추)은 사용자 지정PropertyTab입니다. 다음 스크린 샷에서는 사용자 지정 PropertyTab이 아래에 표시되는 다른 예제를 보여줍니다. 이PropertyTab은 단추의 경계 지점을 편집하여 사용자 지정 단추 모양을 만들 수 있는 기능을 제공합니다.

그림 10. PropertyGrid 에 사용자 지정 탭 표시
UITypeEditor 클래스를 사용하여 PropertyGrid를 사용자에 맞게 설정하는 방법과 위의 사용자 지정 사용자 인터페이스에 대한 자세한 내용은 Shawn Burke의 기사 Make Your Components Really RAD with Visual Studio .NET Property Browser  를 참조하십시오.
결론
.NET Framework에서 제공하는 ProperyGrid 컨트롤에서는 사용자 인터페이스를 개선하기 위해 사용할 수 있는 풍부한 편집 경험을 제공합니다. PropertyGrid를 사용자에 맞게 설정하는 것이 얼마나 쉬운지 알게되면 응용 프로그램에서PropertyGrid를 사용할 것입니다. 또한, Visual Studio .NET 속성 브라우저는 PropertyGrid를 기반으로 하기 때문에 이 기술을 사용하여 보다 풍부한 디자인 타임 경험을 제공할 수 있습니다.
최종 수정일: 2002년 8월 1일


 WATTreeView.zip