Windows Forms FAQ
'Programming > C#' 카테고리의 다른 글
| PropertyGrid 컨트롤 최대 활용 (0) | 2011.10.26 |
|---|---|
| ContextMenuStrip Item 동적 제어 (0) | 2011.10.26 |
| [링크] WinForm Study (0) | 2011.10.25 |
| XML 특정 하위노드 및 자식노드를 좀 간단히 읽어보기 (0) | 2011.10.25 |
| [C#] xml 파싱 (0) | 2011.10.25 |

| PropertyGrid 컨트롤 최대 활용 (0) | 2011.10.26 |
|---|---|
| ContextMenuStrip Item 동적 제어 (0) | 2011.10.26 |
| [링크] WinForm Study (0) | 2011.10.25 |
| XML 특정 하위노드 및 자식노드를 좀 간단히 읽어보기 (0) | 2011.10.25 |
| [C#] xml 파싱 (0) | 2011.10.25 |
| ContextMenuStrip Item 동적 제어 (0) | 2011.10.26 |
|---|---|
| Windows Forms FAQ (0) | 2011.10.25 |
| XML 특정 하위노드 및 자식노드를 좀 간단히 읽어보기 (0) | 2011.10.25 |
| [C#] xml 파싱 (0) | 2011.10.25 |
| C#으로 xml 처리하기 (0) | 2011.10.25 |
[퍼온글] : http://goodhelper.egloos.com/1916101
가끔 프로그램을 유지보수 하다 보면 종종 XML 을 읽어야 할때가 있습니다.
C# 은 그래도 꽤 간편한 언어에 속하는 편이라서 XML 을 로드해서 처리하기가
매우 쉽고 간단하게 됩니다~
C#에서 XML 을 읽어 올때 주로 사용하되는게 XmlTextReader 와 XmlDocument 가 있습니다.
이번 포스트에서는 XmlDocument를 이용하여 XML을 로드하고 그중 자식노드 및 특정 자식 노드값을
읽어서 배치해 보겠습니다.
<?xml version="1.0" encoding="EUC-KR" standalone="yes" ?>
<main>
<main_node>
<class>1학년</class>
<class>2학년</class>
<class>3학년</class>
<class_name>
<code>예술반</code>
<code_name>미술</code_name>
<code_count>10명</code_count>
<class_teacher>
<teacher>홍길동 선생</teacher>
<teacher_sex>남자</teacher_sex>
</class_teacher>
<school>
<code>12345</code>
<code_name>예술학교</code_name>
</school>
</class_name>
</main_node>
</main>
위와 같은 XML을 불러 올때 고민스러운건 중복된 태그명이 존재한다는거와 자식노드들이 있다는 겁니다
물론 방법론적으론 자식노드 리스트를 작성하고 ChildNode 를 사용하여 for 문으로 돌려서 구할 수 있지만
아무래도 소스가 복잡해지고 무엇보다 파싱하기가 귀찮지요~~ ㅎ
다행히 csharp-examples.net 에 Jan Slama 란 분히 저같은 사람을 위해 간단히 파싱하는 법을 올려놨네요~ ^^;
using System;
using System.Collections.Generic;
using System.ComponentModel;
using System.Data;
using System.Drawing;
using System.Linq;
using System.Text;
using System.Windows.Forms;
using System.Xml;
using System.IO;
namespace xml_load {
public partial class Form1 : Form
{
public Form1()
{
InitializeComponent();
}
private void Form1_Load(object sender, EventArgs e)
{
string url = @"http://www.Xml주소/XML파일.xml"; //xml 을 불러올 주소 (로컬은 c:\\디렉토리명 이 되겠지요~)
try
{
XmlDocument xml = new XmlDocument ();
xml.Load(url);
XmlNodeList xnList = xml.SelectNodes( "/main/main_node/class_name" ); //접근할 노드
foreach (XmlNode xn in xnList)
{
string part1 = xn["code"].InnerText; //예술반 불러오기
string part2 = xn["code_name"].InnerText; //예술반 code_name 불러오기
string part3 = xn["class_teacher"]["teacher"].InnerText; //선생님 이름
string part4 = xn["school"]["code"].InnerText; //학교노드의 code 불러오기
string part5 = xn["school"]["code_name"].InnerText; //학교노드의 code_name 불러오기
richTextBox1.AppendText(part1 + " | " + part2 + " | " + part3 + " | " + part4 + " | " + part5);
}
}
catch (ArgumentException ex)
{
MessageBox.Show("XML 문제 발생\r\n" + ex);
}
}
}
}
[출처] [C#] XML 특정 하위노드 및 자식노드를 좀 간단히 읽어보기|작성자 한심이79
| Windows Forms FAQ (0) | 2011.10.25 |
|---|---|
| [링크] WinForm Study (0) | 2011.10.25 |
| [C#] xml 파싱 (0) | 2011.10.25 |
| C#으로 xml 처리하기 (0) | 2011.10.25 |
| 현재 Process의 한영 정보 얻기 (0) | 2011.10.10 |
xml Product_Key의 Name을 읽어서 ComboBox에 Items를 추가한다.
ComboBox의 List중에서 하나를 선택하면 Key의 값을 TextBox에 나타내 준다.
1. form1 디자인
ComboBox 이름 : cbname
TextBox 이름 : tbkey
2. xml 구조
<YourKey>
<Product_Key Name="1">
<Key>1</Key>
</Product_Key>
<Product_Key Name="2">
<Key>2</Key>
</Product_Key>
<Product_Key Name="3">
<Key>3</Key>
</Product_Key>
<Product_Key Name="4">
<Key>4</Key>
</Product_Key>
</YourKey>
3. form1 코드
using System;
using System.Collections.Generic;
using System.ComponentModel;
using System.Data;
using System.Drawing;
using System.Linq;
using System.Text;
using System.Windows.Forms;
using System.Xml;
using System.IO;
namespace xmlparsing
{
public partial class Form1 : Form
{
bool select = false;
public Form1()
{
InitializeComponent();
this.Load += new EventHandler(Form1_Load);
this.cbname.SelectedIndexChanged += new EventHandler(cbname_SelectedIndexChanged);
}
void Form1_Load(object sender, EventArgs e)
{
getList();
}
void cbname_SelectedIndexChanged(object sender, EventArgs e)
{
select = true;
getList();
}
private void getList()
{
string url = Environment.CurrentDirectory + "\\keys.xml";
try
{
XmlDocument xml = new XmlDocument();
xml.Load(url);
XmlElement keyList = xml.DocumentElement;
XmlNodeList xnList = xml.SelectNodes("/YourKey/Product_Key");
foreach (XmlNode node1 in xnList)
{
if (select)
{
string sKeyName = node1.Attributes["Name"].Value;
string sKey = node1["Key"].InnerText;
if (cbname.SelectedItem.ToString() == node1.Attributes["Name"].Value)
{
tbkey.Text = sKey;
}
}
else
{
string sKeyName = node1.Attributes["Name"].Value;
cbname.Items.Add(sKeyName);
}
}
}
catch (Exception)
{
throw;
}
}
}
}
------------------------------------------------------------------------------------------
자식 노드가 여러개인경우
1. form1 디자인
ComboBox 이름 : cbname
ListBox 이름 : lbname
2. xml 구조
<YourKey>
<Product_Key Name="1">
<Key>1</Key>
<Key>2</Key>
<Key>3</Key>
</Product_Key>
<Product_Key Name="2">
<Key>4</Key>
<Key>5</Key>
<Key>6</Key>
</Product_Key>
</YourKey>
3. form1 코드
using System;
using System.Collections.Generic;
using System.ComponentModel;
using System.Data;
using System.Drawing;
using System.Linq;
using System.Text;
using System.Windows.Forms;
using System.Xml;
using System.IO;
namespace xmlparsing
{
public partial class Form1 : Form
{
bool select = false;
public Form1()
{
InitializeComponent();
this.Load += new EventHandler(Form1_Load);
this.cbname.SelectedIndexChanged += new EventHandler(cbname_SelectedIndexChanged);
}
void Form1_Load(object sender, EventArgs e)
{
getList();
}
void cbname_SelectedIndexChanged(object sender, EventArgs e)
{
lbname.Items.Clear();
select = true;
getList();
}
private void getList()
{
//string url = @"c:\\keys.xml";
string url = Environment.CurrentDirectory + "\\keys.xml";
try
{
XmlDocument xml = new XmlDocument();
xml.Load(url);
XmlElement keyList = xml.DocumentElement;
XmlNodeList xnList = xml.SelectNodes("/YourKey/Product_Key");
foreach (XmlNode node1 in xnList)
{
if (select)
{
if (cbname.SelectedItem.ToString() == node1.Attributes["Name"].Value)
{
XmlNodeList nodeChilds = node1.ChildNodes;
for (int i = 0; i < nodeChilds.Count; i++)
{
XmlElement eChild = (XmlElement)nodeChilds[i];
string sKey = eChild.InnerText;
lbname.Items.Add(sKey);
}
}
}
else
{
string sKeyName = node1.Attributes["Name"].Value;
cbname.Items.Add(sKeyName);
}
}
}
catch (Exception)
{
throw;
}
}
}
}
[출처] [C#] xml 파싱|작성자 한심이79
| [링크] WinForm Study (0) | 2011.10.25 |
|---|---|
| XML 특정 하위노드 및 자식노드를 좀 간단히 읽어보기 (0) | 2011.10.25 |
| C#으로 xml 처리하기 (0) | 2011.10.25 |
| 현재 Process의 한영 정보 얻기 (0) | 2011.10.10 |
| C# 경로(Path) 요소 분리하기 (0) | 2011.09.16 |
File stream과 XmlDocument class를 이용하는 방법입니다.
파일을 모두 읽어서 메모리로 로드하고, 메모리의 데이터를 읽기, 쓰기, 수정, 삭제 등을 하고 다시 파일로 저장하는 방식입니다.
데이터가 그리 크지 않을 경우 적당해 보이고, 파일이 클 경우 메모리 압박이 예상 됩니다.
출처: http://www.codeguru.com/Csharp/Csharp/cs_data/xml/article.php/c9427/
Downloads: SourceCode.zip - Download source code - 3 Kb
Listing 1 shows a simple XML file for demonstration:
<?xml version="1.0"?>
<Books>
  <Book ID="001">
    <Author>Mark</Author>
    <Publisher>Sams</Publisher>
  </Book>

  <Book ID="002">
    <Author>Joe</Author>
    <Publisher>AWL</Publisher>
  </Book>
</Books>
To test the above XML file for errors, simply open it with your browser. If it has no errors, the file will be displayed as such.
The next step is to display all the data using a C# console application (see Listing 2).
Listing 2: DisplayCatalog.cs
XmlNodeList xmlnode = xmldoc.GetElementsByTagName("Book");
   Console.WriteLine("Here is the list of catalogs\n\n");

   for(int i=0;i<xmlnode.Count;i++)
   {
   XmlAttributeCollection xmlattrc = xmlnode[i].Attributes;

   //XML Attribute Name and Value returned
   //Example: <Book id = "001">

   Console.Write(xmlattrc[0].Name);
   Console.WriteLine(":\t"+xmlattrc[0].Value);

   //First Child of the XML file - Catalog.xml - returned
   //Example: <Author>Mark</Author>

   Console.Write(xmlnode[i].FirstChild.Name);
   Console.WriteLine(":\t"+xmlnode[i].FirstChild.InnerText);

   //Last Child of the XML file - Catalog.xml - returned
   //Example: <Publisher>Sams</Publisher>

   Console.Write(xmlnode[i].LastChild.Name);
   Console.WriteLine(":\t"+xmlnode[i].LastChild.InnerText);
   Console.WriteLine();
Listing 2 is just an extract from the DisplayCatalog() method of the C# application. It displays the data from the XML file. It uses theXMLNodeList class to retrieve the relevant XML node and then iterates it with the help of the for loop and the Count property of the class. Inside the loop, it creates an instance of the XMLAttributeCollection class and displays the appropriate values using the properties of the class.
Inside the constructor, the code creates an instance of the FileStream class and sets the required permissions (see Listing 3). It then loads the XML document with the help of the XMLDocument class and loads the required instance of the FileStream class with the Load() method of the XMLDocument class.
Listing 3: DisplayCatalog.cs
FileStream fs = new FileStream(path,FileMode.Open,FileAccess.Read,
                               FileShare.ReadWrite);
   xmldoc = new XmlDocument();
   xmldoc.Load(fs);
   DisplayCatalog();
The final output looks like the display in Figure 1.
Figure 1: Final Output from Listings 2 and 3
The above walkthrough showed how to display the contents of an XML file using a C# program. The next section demonstrates how to write data directly to the XML file using a C# console application.
Listing 4 appends a new catalog entry to the XML document using the various properties and methods of the XMLDocument class.
Listing 4: AddCatalog.cs
// New XML Element Created
XmlElement newcatalogentry = xmldoc.CreateElement("Book");

// New Attribute Created
XmlAttribute newcatalogattr = xmldoc.CreateAttribute("ID");

// Value given for the new attribute
newcatalogattr.Value = "005";

// Attach the attribute to the XML element
newcatalogentry.SetAttributeNode(newcatalogattr);

// First Element - Book - Created
XmlElement firstelement = xmldoc.CreateElement("Book");

// Value given for the first element
firstelement.InnerText = "Peter";

// Append the newly created element as a child element
newcatalogentry.AppendChild(firstelement);


// Second Element - Publisher - Created
XmlElement secondelement = xmldoc.CreateElement("Publisher");

// Value given for the second element
secondelement.InnerText = "Que Publishing";

// Append the newly created element as a child element
newcatalogentry.AppendChild(secondelement);

// New XML element inserted into the document
xmldoc.DocumentElement.InsertAfter(newcatalogentry,
                                   xmldoc.DocumentElement.LastChild);

// An instance of FileStream class created
// The first parameter is the path to the XML file - Catalog.xml

FileStream fsxml = new FileStream(path,FileMode.Truncate,
                                  FileAccess.Write,
                                  FileShare.ReadWrite);

// XML Document Saved


xmldoc.Save(fsxml);
[출처] C#으로 xml 처리하기|작성자 페달파워
| XML 특정 하위노드 및 자식노드를 좀 간단히 읽어보기 (0) | 2011.10.25 |
|---|---|
| [C#] xml 파싱 (0) | 2011.10.25 |
| 현재 Process의 한영 정보 얻기 (0) | 2011.10.10 |
| C# 경로(Path) 요소 분리하기 (0) | 2011.09.16 |
| C# XML 다루는 간단한 소스 (0) | 2011.09.16 |
HIMC ImmGetContext(HWND); -> IME 를 가져온다.
BOOL ImmGetOpenStatus(HIMC ); ->return 값이 1이면 한글 0이면 영문
< 예제 >
HIMC hIMC;
int hanFlag=-1;
hIMC = ImmGetContext(wnd->m_hWnd);
//
한영상태를 얻는다.
// hanFlag가 1이면 한글 0이면 영문
hanFlag=ImmGetOpenStatus(hIMC );
if(hanFlag)
{
m_imm.SetWindowText((LPCTSTR)"H");
}
else
{
m_imm.SetWindowText((LPCTSTR)"E");
}
| [C#] xml 파싱 (0) | 2011.10.25 |
|---|---|
| C#으로 xml 처리하기 (0) | 2011.10.25 |
| C# 경로(Path) 요소 분리하기 (0) | 2011.09.16 |
| C# XML 다루는 간단한 소스 (0) | 2011.09.16 |
| DLL 파일을 별도 폴더에서 관리하자 (0) | 2011.09.14 |
| C#으로 xml 처리하기 (0) | 2011.10.25 |
|---|---|
| 현재 Process의 한영 정보 얻기 (0) | 2011.10.10 |
| C# XML 다루는 간단한 소스 (0) | 2011.09.16 |
| DLL 파일을 별도 폴더에서 관리하자 (0) | 2011.09.14 |
| [펌] 입력 문자 검사 (0) | 2011.09.14 |
| 현재 Process의 한영 정보 얻기 (0) | 2011.10.10 |
|---|---|
| C# 경로(Path) 요소 분리하기 (0) | 2011.09.16 |
| DLL 파일을 별도 폴더에서 관리하자 (0) | 2011.09.14 |
| [펌] 입력 문자 검사 (0) | 2011.09.14 |
| C# 관련 정보 사이트[MKEXDEV.NET] (0) | 2011.09.13 |
요샌 프로그램 하나 만들려면 엄청난 dll들이 부가 되는데
이것들이 실행 파일과 혼재되어 정신 사납기 이를데 없다
이럴때 dll 파일만 따로 모아서 관리 할수 있으면 얼마나 좋을까??
자~ 해봅시다~

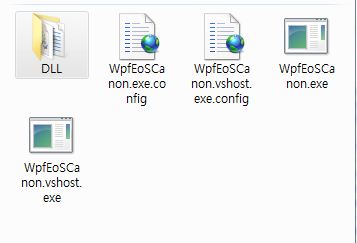
그림으로 보면 DLL폴더와 실행 화일이 따로 분리 된걸 볼 수 있다

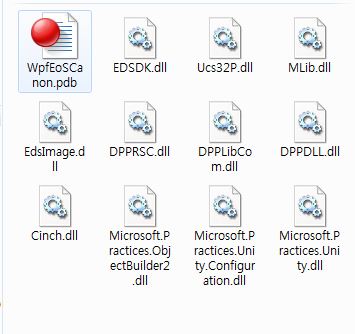
DLL 폴더내에 따로 모아진 dll 파일들과 pdb 파일들을 볼수 있다
이렇게 하기 위해서는 먼저 DLL 폴더를 만들고 랩작업을 할때 다음 처럼
경로를 지정해서 랩을 한다

이렇게 하면 당연히 하위 DLL 폴더에서 해당 dll을 찾아 프로그램이 실행된다
하지만 그림처럼 참조 추가된 Cinch 같은 dll도 DLL 폴더로 넣을라면 어떻게 해야 할까?

이런 경우에는 Project에 프로퍼티에서 그림 처럼 설정 해준다
이렇게 해주면 참조 추가된 dll들도 DLL 폴더로 컴파일 시 옮겨지게 된다
move "$(TargetDir)\*.dll" "$(TargetDir)\DLL"
move "$(TargetDir)\*.pdb" "$(TargetDir)\DLL"
옮겨지기는 했지만 실제 프로그램을 실행 시켜 보면 dll을 찾을수 없다는 에러가 발생된다
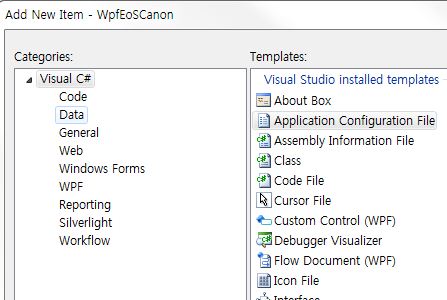
솔루션 창에서 아래 그림처러 새로운 아이템으로 appication configuration file을

app.config란 파일 이름으로 생성한다
그리고 그 파일 안에는
<?xml version="1.0" encoding="utf-8" ?>
<configuration>
<runtime>
<assemblyBinding xmlns="urn:schemas-microsoft-com:asm.v1">
<probing privatePath="DLL"/>
</assemblyBinding>
</runtime>
</configuration>
이렇게 써주고 실행하면 해당 dll들을 DLL폴더에서 찾아오게 된다
이로서 실행파일과 dll 파일을 깔끔하게 분리하여 산뜻하게 관리 할 수 있게 되었다
| C# 경로(Path) 요소 분리하기 (0) | 2011.09.16 |
|---|---|
| C# XML 다루는 간단한 소스 (0) | 2011.09.16 |
| [펌] 입력 문자 검사 (0) | 2011.09.14 |
| C# 관련 정보 사이트[MKEXDEV.NET] (0) | 2011.09.13 |
| Processing Global Mouse and Keyboard Hooks in C# (0) | 2011.05.13 |
|
입력 문자 검사
예제> 몇 가지 예를 살펴보면.. e.Handled = true; } && e.KeyChar != 8) { e.Handled = true; } Char.IsLetter(e.KeyChar) || Char.IsSymbol(e.KeyChar)) && e.KeyChar != 8) { e.Handled = true; }
수행한다. 입력을 불허해야 하는 상황이라면 KeyPressEventArgs 의 Handled 속성을 true 로 설정하여 TextBox의 KeyPress 이벤트를 취소 시킨다 (즉, TextBox 에 글이 적히지 않도록 한다)
키 자체의 단일 정수값을 이용해 입력 값을 검증할 수 있다. 아래 표는 각 키의 값을 나타내는 표이다
&& e.KeyChar != 8) { e.Handled = true; }
출처 : http://www.mkexdev.net/Article/Content.aspx?parentCategoryID=1&categoryID=23&ID=272 |
| C# XML 다루는 간단한 소스 (0) | 2011.09.16 |
|---|---|
| DLL 파일을 별도 폴더에서 관리하자 (0) | 2011.09.14 |
| C# 관련 정보 사이트[MKEXDEV.NET] (0) | 2011.09.13 |
| Processing Global Mouse and Keyboard Hooks in C# (0) | 2011.05.13 |
| Array -> String (0) | 2011.05.09 |