In this section, a reference table for all of the more popular bbcode tags, is provided. Some are considered to be standard and should be supported in just about any bbcode implementation. Other are less likely to be supported, but nonetheless popular (hence the reason they've been included here).
Unity’s Platform Dependent Compilation feature consists of some preprocessor directives that let you partition your scripts to compile and execute a section of code exclusively for one of the supported platforms.
You can run this code within the Unity Editor, so you can compile the code specifically for your target platform and test it in the Editor.
Platform #define directives
The platform #define directives that Unity supports for your scripts are as follows:
Define
Function
UNITY_EDITOR
#define directive to call Unity Editor scripts from your game code.
UNITY_EDITOR_WIN
#define directive for Editor code on Windows.
UNITY_EDITOR_OSX
#define directive for Editor code on Mac OS X.
UNITY_EDITOR_LINUX
#define directive for Editor code on Linux.
UNITY_STANDALONE_OSX
#define directive to compile or execute code specifically for Mac OS X (including Universal, PPC and Intel architectures).
UNITY_STANDALONE_WIN
#define directive for compiling/executing code specifically for Windows standalone applications.
UNITY_STANDALONE_LINUX
#define directive for compiling/executing code specifically for Linux standalone applications.
UNITY_STANDALONE
#define directive for compiling/executing code for any standalone platform (Mac OS X, Windows or Linux).
UNITY_WII
#define directive for compiling/executing code for the Wii console.
UNITY_IOS
#define directive for compiling/executing code for the iOS platform.
UNITY_IPHONE
Deprecated. Use UNITY_IOS instead.
UNITY_ANDROID
#define directive for the Android platform.
UNITY_PS4
#define directive for running PlayStation 4 code.
UNITY_XBOXONE
#define directive for executing Xbox One code.
UNITY_LUMIN
#define directive for the Magic Leap OS platform. You can also use PLATFORM_LUMIN.
UNITY_TIZEN
#define directive for the Tizen platform.
UNITY_TVOS
#define directive for the Apple TV platform.
UNITY_WSA
#define directive for Universal Windows Platform . Additionally, NETFX_CORE is defined when compiling C# files against .NET Core and using .NET scripting backend .
UNITY_WSA_10_0
#define directive for Universal Windows Platform. Additionally WINDOWS_UWP is defined when compiling C# files against .NET Core.
UNITY_WINRT
Same as UNITY_WSA.
UNITY_WINRT_10_0
Equivalent to UNITY_WSA_10_0
UNITY_WEBGL
#define directive for WebGL .
UNITY_FACEBOOK
#define directive for the Facebook platform (WebGL or Windows standalone).
UNITY_ANALYTICS
#define directive for calling Unity Analytics methods from your game code. Version 5.2 and above.
UNITY_ASSERTIONS
#define directive for assertions control process.
UNITY_64
#define directive for 64-bit platforms.
You can also compile code selectively. The options available depend on the version of the Editor that you are working on. Given a version number X.Y.Z (for example, 2.6.0), Unity exposes three global #define directives in the following formats: UNITY_X, UNITY_X_Y and UNITY_X_Y_Z.
Here is an example of #define directives exposed in Unity 5.0.1:
Define
Function
UNITY_5
#define directive for the release version of Unity 5, exposed in every 5.X.Y release.
UNITY_5_0
#define directive for the major version of Unity 5.0, exposed in every 5.0.Z release.
UNITY_5_0_1
#define directive for the minor version of Unity 5.0.1.
Starting from Unity 5.3.4, you can compile code selectively based on the earliest version of Unity required to compile or execute a given portion of code. Given the same version format as above (X.Y.Z), Unity exposes one global #define in the format UNITY_X_Y_OR_NEWER, that can be used for this purpose.
The supported #define directives are:
Define
Function
CSHARP_7_3_OR_NEWER
Defined when building scripts with support for C# 7.3 or newer.
ENABLE_MONO
Scripting backend #define for Mono.
ENABLE_IL2CPP
Scripting backend #define for IL2CPP .
NET_2_0
Defined when building scripts against .NET 2.0 API compatibility level on Mono and IL2CPP.
NET_2_0_SUBSET
Defined when building scripts against .NET 2.0 Subset API compatibility level on Mono and IL2CPP.
NET_LEGACY
Defined when building scripts against .NET 2.0 or .NET 2.0 Subset API compatibility level on Mono and IL2CPP.
NET_4_6
Defined when building scripts against .NET 4.x API compatibility level on Mono and IL2CPP.
NET_STANDARD_2_0
Defined when building scripts against .NET Standard 2.0 API compatibility level on Mono and IL2CPP.
ENABLE_WINMD_SUPPORT
Defined when Windows Runtime support is enabled on IL2CPP. See Windows Runtime Support for more details.
ENABLE_INPUT_SYSTEM
Defined when the Input System package is enabled in Player Settings .
ENABLE_LEGACY_INPUT_MANAGER
Defined when the legacy Input Manager is enabled in Player Settings.
You use the DEVELOPMENT_BUILD #define to identify whether your script is running in a player which was built with the “Development Build ” option enabled.
You can also compile code selectively depending on the scripting back-end.
Testing precompiled code
Below is an example of how to use the precompiled code. It prints a message that depends on the platform you have selected for your target build.
First of all, select the platform you want to test your code against by going to File > Build Settings. This displays the Build Settings window; select your target platform from here.
Build Settings window with PC, Mac & Linux selected as the target platforms
Select the platform you want to test your precompiled code against and click Switch Platform to tell Unity which platform you are targeting.
Create a script and copy/paste the following code:
// C#
using UnityEngine;
using System.Collections;

public class PlatformDefines : MonoBehaviour {
  void Start () {

    #if UNITY_EDITOR
      Debug.Log("Unity Editor");
    #endif

    #if UNITY_IOS
      Debug.Log("Iphone");
    #endif

    #if UNITY_STANDALONE_OSX
    Debug.Log("Stand Alone OSX");
    #endif

    #if UNITY_STANDALONE_WIN
      Debug.Log("Stand Alone Windows");
    #endif

  }
}
To test the code, click Play Mode. Confirm that the code works by checking for the relevant message in the Unity console, depending on which platform you selected - for example, if you choose iOS , the message “Iphone” is set to appear in the console.
In C# you can use a CONDITIONAL attribute which is a more clean, less error-prone way of stripping out functions. See ConditionalAttribute Class for more information. Note that common Unity callbacks (ex. Start(), Update(), LateUpdate(), FixedUpdate(), Awake()) are not affected by this attribute because they are called directly from the engine and, for performance reasons, it does not take them into account.
In addition to the basic #if compiler directive, you can also use a multiway test in C#:
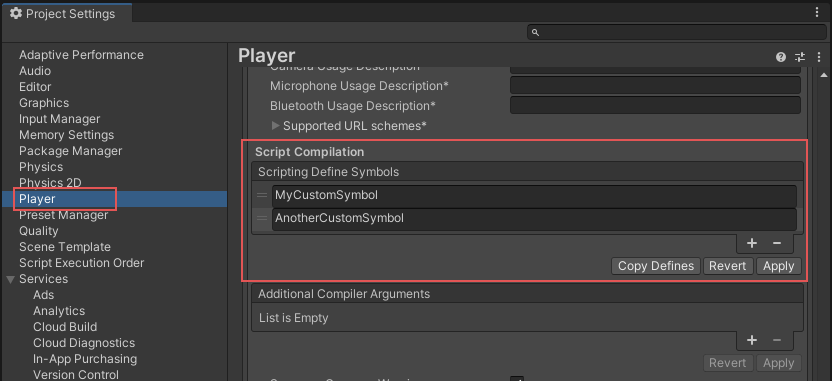
It is also possible to add to the built-in selection of #define directives by supplying your own. Open the Other Settings panel of the Player settings and navigate to the Scripting Define Symbols text box.
Enter the names of the symbols you want to define for that particular platform, separated by semicolons. These symbols can then be used as the conditions for #if directives, just like the built-in ones.
Global custom #defines
You can define your own preprocessor directives to control which code gets included when compiling. To do this you must add a text file with the extra directives to the Assets folder. The name of the file depends on the language you are using. The extension is .rsp:
C# (player and editor scripts)
<Project Path>/Assets/mcs.rsp
As an example, if you include the single line -define:UNITY_DEBUG in your mcs.rsp file, the #define directive UNITY_DEBUG exists as a global #define for C# scripts, except for Editor scripts.
Every time you make changes to .rsp files, you need to recompile in order for them to be effective. You can do this by updating or reimporting a single script (.js or .cs) file.
Note:__If you want to modify only global #define directives, use Scripting Define Symbols__ in Player settings, because this covers all the compilers. If you choose the .rsp files instead, you need to provide one file for every compiler Unity uses.
The use of .rsp files is described in the ‘Help’ section of the mcs application, which is included in the Editor installation folder. You can get more information by running mcs -help.
Note that the .rsp file needs to match the compiler being invoked. For example:
when targeting the .NET 3.5 Equivalent (deprecated) scripting runtime version, mcs is used with mcs.rsp, and
when targeting the .NET 4.x Eqivalent scripting runtime version compiler, csc is used with csc.rsp.
5. 5 최적화의 시작은 병목 파악부터 CPU • 너무 많은 DP CALL • 복잡한 스크립트나 물리 연산 Vertex Processing • 너무 많은 버텍스들 • 버텍스당 너무 많은 연산 (버텍스 셰이더) Fragment Processing • 너무 많은 픽셀, 오버 드로우(OverDraw) • 프래그먼트당 너무 많은 연산 (프래그먼트 셰이더/픽셀 셰이더) Band Width • 크고, 압축되지 않은 텍스쳐 • 고해상도 프레임 버퍼
7. 7 스크립트 최적화 (1) • 유니티의 핵심 기능은 모두 C++로 제작되어 있다 • 예) Transform.position 에서 Transform은 C# 속성, position은 C++ 영역 • 유니티 객체들을 변수에 저장해서, 캐싱해서 사용하는것이 좋다. • FindObject 계열 함수들은 매우 느리다. (미리 찾아서 캐싱) • Instanitate 와 Destory 함수를 이용한 프리팹의 생성/해제는 비용이 크다 • 활성화/비활성화를 활용 -> 오브젝트 풀링 • Update 함수보다는 CoRoutine을 활용한다. • 나눗셈 보다는 곱셈이 몇 십 배 빠르다.
8. 8 스크립트 최적화 (2) • 박싱과 언박싱은 부하가 큰 작업이다 • 나눗셈보다는 곱셈이 몇십배 빠르다 • magnitude 보다는 sqrMagnitude를 사용해서 비교한다. (제곱근 계산 x) • 삼각함수의 값은 상수로 저장하고, 사용하는 것이 좋다. • 문자열은 readonly 혹은 const 키워드를 사용하여, 가비지 컬렉션으로부터 벗어나도록 한다.
9. 9 만흉의 원인 : 가비지 컬렉터 가비지 컬렉터(GC)는 언제 일어날지 모른다. • Mono의 동적 메모리 관리 때문에, 메모리 해제를 위해 GC가 자동 호출 된다. • GC는 언제 일어날지 모른다. • GC가 일어나면, 게임이 멈추는 현상(랙)이 발생하게 된다. • 동적 메모리 해제가 가능한 일어나지 않도록 하는것이 GC 관리의 핵심 오브젝트 풀링 • 오브젝트(or 프리팹)의 동적 생성과 해제는 부하가 크다. • 오브젝트가 해제되면, 언젠가는 GC가 동작하여 정리 한다 = 랙이 발생 • 오브젝트를 풀을 만들어 미리 많이 만들어 두고, 활성화/비활성화로 사용한다. • 풀에서 가져와서 사용하고, 사용이 끝나면 비활성화 상태로 풀에 반환 • 오브젝트 풀링 사용은 선택이 아닌 필수!!
10. 10 GC에게 먹이 주지 않기 문자열 병합은 StringBuilder • 일반 String + String을 쓰면 임시 문자열이 생성됨 • StringBuilder.Append() 함수를 사용하여 병합 foreach 대신에 for문 사용 • 일반 array에 한해서… • Foreach는 한번 돌때마다 24byte의 쓰레기 메모리를 생성 • 10번만 돌아도 240byte의 GC 수거 메모리를 남김 태그 비교에는 compareTag() 사용 • If(go.tag == “enemy”) 대신에 go.compareTag(“enemy”) 사용 • 객체의 tag 프로퍼티를 호출하는것은 추가 메모리를 할당하고, 복사
11. 11 GC에게 먹이 주지 않기 (2) 데이터 타입에는 Class 대신 구조체 사용 • 구조체는 GC에 들어가지 않는다. Stack에 할당 즉시 해제할 때는 Dispose 수동 호출 • 오브젝트의 dispose를 수동으로 호출하여, 즉시 cleanup 임시 객체들을 만들어내는 API들을 조심 • Ex. GetComponents<T>, Mesh.Vertices, Camra.allCameras, etc…
12. 12 C++ <-> C# 오버 헤드 객체의 변경 사항을 캐싱 • 객체의 이동과 변형에 대한 처리를 캐싱하고, 매프레임에서 딱 한번만 처리한다. • Ex. Move() 컴포넌트 참조를 캐싱 • Getcomponent()는 한번만 호출하여, 객체를 캐싱해두고 사용 한다. 빈 콜백 함수는 제거 • Start()나 Update() 같은 콜백함수는 비어있어도, 성능에 영향을 끼친다.
15. 15 텍스쳐 • 텍스쳐 사이즈는 무조건 2의 제곱이어야 한다. • POT(Power of Two) • POT가 아닌경우 POT 텍스쳐로 변환되어 로딩 된다. • 900 x 900 -> 실제로는 1024 X 1024로 변환 • 텍스쳐 아틀라스를 활용 하라. • 텍스쳐 아틀라스로 최대한 묶음 • UI 만이 아니라, 같은 재질의 오브젝트들을 묶음
16. 16 텍스쳐 • 압축된 텍스쳐와 밉맵을 사용하자. (대역폭 최적화) • 32bit가 아닌 16bit 텍스쳐 사용도 상황에 맞게 고려
17. 텍스쳐 메모리 사용량 프로파일링 17 //로그를 서버에 남기면 프로파일링에 도움이 된다
18. 18 Mesh Import시에 언제나 “Optimize Mesh” 옵션 사용 • 변환 전/변환 후 버텍스 캐쉬를 최적화 해준다 언제나 Optimize Mesh Data 옵션을 사용한다 • Player Setting > Other Settings • 사용하지 않는 버텍스 정보들을 줄여 준다(tangents, Normal, color, etc…)
19. 19 오디오 • 모바일에서 스테레오는 의미 없다. • 모두 92kb, 모노로 인코딩 • 사운드 파일을 임포트하면 디폴트로 3D 사운드로 설정 • 2D 사운드로 변경 • 압축 사운드(mp3, ogg), 비압축 사운드(wav) 구별 • 비압축 사운드 : 순간적인 효과음, 이펙트 등 • 압축 사운드 : 배경 음악
20. 20 폰트 리소스 최적화 NDC2013 - ‘갤럭시S1’ 에서 풀프레임 퍼즐주주 만들기
26. 26 Culling 프러스텀(Frustum) 컬링 • 각 Layer 별로 컬링 거리를 설정하는 것이 가능하다!! • 멀리 보이는 중요한 오브젝트(ex. 성, 산맥...)은 거리를 멀게 설정하고, 중요도가 낮은 풀이나 나무등은 컬링 거리를 짧게 설정
27. 27 Culling 오클루젼(Occlusion) 컬링 • Window->Occlusion Culling 메뉴에서 설정 가능
28. 28 오브젝트 통합(Combine) • 드로우콜은 오즈젝트에 설정된 재질의 셰이더 패스당 하나씩 일어난다. • 렌더러에 사용된 재질의 수만큼 드로우 콜이 발생 Combine (통합) • 성질이 동일한 오브젝트들은 하나의 메쉬와 재질을 사용하도록 통합 • Script 패키지 – CombineChildren 컴포넌트 제공 • 하위 오브젝트를 모두 하나로 통합 • 통합하는 경우 텍스쳐는 하나로 합쳐서, Texture Atlas를 사용해야 된다.
29. 29 Batch Static Batch • Edit > Project Setting > Player 에서 설정 • 움직이지 않는 오브젝트들은 static으로 설정해서, 배칭이 되게 한다. • Static으로 설정된 게임 오브젝트에서 동일한 재질을 사용 할 경우, 자동으로 통합 • 통합되는 오브젝트를 모두 하나의 커다란 메쉬로 만들어서 따로 저장(메모리 사용량 증가) Dynamic Batch • 움직이는 물체를 대상으로 동일한 재질을 사용하는 경우, 자동으로 통합 • 동적 배칭은 계산량이 많으므로, 정점이 900개 미만인 오브젝트만 대상이 됨
30. 30 라이팅 라이트 맵을 사용하자 • 고정된 라이트와 오브젝트의 경우(배경) 라이트 맵을 최대한 활용 한다. • 아주 빠르게 실행된다 (Per-Pixel Light 보다 2~3배) • 더 좋은 결과를 얻을 수 있는 GI와 Light Mapper를 사용할 수 있다. 라이트 렌더 모드 • 라이팅 별로 Render Mode : Important / Not Important 설정 가능 • 게임에서 중요한 동적 라이팅만 Important로 설정 (Per-Pixel Light) • 그렇지 않은 라이트들은 Not Important로 설정
31. 31 Overdraw 화면의 한 픽셀에 두번 이상 그리게 되는 경우 (Fill rate) • DP Call의 문제만큼이나, Overdraw로 인한 프레임 저하도 중요한 문제 • 특히 2D 게임에서는 DP Call 보다 더욱 큰 문제가 된다. 기본적으로 앞에서 뒤로 그린다 • Depth testing으로 인해서 오버드로우를 방지 한다 • 하지만 알파 블렌딩이 있는 오브젝트의 경우에는 알파 소팅 문제가 발생 반투명 오브젝트의 개수의 제한을 건다 • 반투명 오브젝트는 뒤에서부터 앞으로 그려야 한다. -> Overdraw 증가 • 반투명 오브젝의 지나친 사용에는 주의해야 한다
32. 32 Overdraw (2) 유티니의 Render Mode를 통한 overdraw 확인 가능
33. 33 유니티 셰이더 기본 셰이더는 모바일용 셰이더 사용 • 기본 셰이더를 사용할 경우, 모바일용 셰이더를 사용. • Mobile > VertexLit은 가장 빠른 셰이더 복잡한 수학 연산 • pow, exp, log, cos, sin, tan 같은 수학 함수들은 고비용이다. • 픽셀별 그런 연산을 하나 이상 사용하지 않는 것이 좋다. • 텍스쳐 룩업테이블을 만들어서 사용하는 방법도 좋다. • 알파 테스트 연산(discard)는 느리다. • 기본적인 연산보다는 최적화 시키고 간략화시킨 공식들을 찾아서 사용할 수 있다
34. 34 유니티 셰이더 (2) 실수 연산 • float : 32bit - 버텍스 변환에 사용. 아주 느린 성능 (픽셸 셰이더에서 사용은 피함) • Half : 16bit – 텍스쳐 uv에 적합. 대략 2배 빠름 • fixed : 10bit – 컬러, 라이트 계산과 같은 고성능 연산에 적합. 대략 4배 빠름 라이트 맵을 사용하자 • 고정된 라이트와 오브젝트의 경우(배경) 라이트 맵을 최대한 활용 한다. • 아주 빠르게 실행된다 (Per-Pixel Light 보다 2~3배) • 더 좋은 결과를 얻을 수 있는 GI와 Light Mapper를 사용할 수 있다.
36. 36 Fixed Update 주기 조절 • FixedUpdate()는 Update와 별도로 주기적으로 불리며, 주로 물리 엔진 처리 • 디폴트는 0.02초. 즉 1초에 50번이나 호출됨 • TimeManager에서 수정 가능 • 게임에 따라, 0.2초 정도(혹은 이상)로 수정해도 문제 없음
37. 37 물리 엔진 설정 Static Object • 움직이지 않는 배경 물체는, static으로 설정 충돌체의 이동 • 리지드 바디가 없는 고정 충돌체를 움직이면, CPU 부하 발생 • 이럴 경우 리지드 바디를 추가하고, IsKinematic 옵션 사용 Maximum Allowed timestep 조정 • 시스템에 부하가 걸려, 지정되 시간보다 오래 걸릴 경우, 물리 계산을 건너뛰는 설정
38. 38 물리 엔진 설정 (2) Solver Iteration Count 조정 • 물리 관련 계산을 얼마나 정교하게 할지를 지정. (높을수록 정교) • Edit > Project Setting > Physics Sleep 조절 • 리지드 바디의 속력이 설정된 값보다 작을 경우, 휴면상태에 들어감 • Physics.Sleep() 함수를 이용하면, 강제 휴면 상태를 만들 수 있음
39. 39 물리 엔진 스크립트 래그돌 사용 최소화 • 랙돌은 물리 시뮬레이션 루프의 영역이 아니기 때문에, 꼭 필요할때만 활성화 한다 태그 대신 레이어 • 물리 처리에서 레이어가 훨씬 유리. 성능과 메모리에서 장점을 가진다 메쉬 콜라이더는 절대 사용하지 않는다. 레이캐스트와 Sphere Check 같은 충돌 감지 요소를 최소화
40. 40 Tilemap Collision Mesh 2D 게임에서 타일맵의 Collison Mesh를 최적화하라 • Tilemap을 디폴트로 사용해서, 각 타일별로 충돌 메쉬가 있는 경우, 물리 부하가 커진다 • 연결된 Tilemap을 하나의 Collision Mesh로 물리 연산을 최적화 하라
41. 참고 자료 • Unity 3D 최적화 http://www.uzoo.in/?mid=master_codesnippet&order_type=desc&document_srl=539&listStyle=viewer • 유니티3D 게임 리소스 최적화? 3가지만 기억해라 HTTP://TECHHOLIC.CO.KR/ARCHIVES/17907 • Optimizing Graphics Performance on Unity : 유니티에서 그래픽 성능 최적화 하기 http://smilemugi.net/wordpress/archives/227 • "14일만에 0에서 60프레임 만들기" Unity3D를 사용하여 우리의 게임을 최적화시키면서 배웠던 것들 • 유니티가 당신에게 알려주지 않는 것들 http://www.slideshare.net/MrDustinLee/ss-27739454?related=3 • NDC2013 - ‘갤럭시S1’ 에서 풀프레임 퍼즐주주 만들기 http://www.slideshare.net/olambdao/unity3d-2d-20130424?related=1 • Unite 2013 optimizing unity games for mobile platforms http://www.slideshare.net/hnam7/unite-2013-optimizing-unity-games-for-mobile-platforms-37933478 • Optimizing unity games (Google IO 2014) • Unity Internals: Memory and Performance
*. Prefab 을 public GameObject variable 로 연결하면 1개가 살아있다... - Resource 로 옮기고 Resource.Load 후 Instantiate 해준다음 Resource.UnloadUnusedAsset으로 로드했던 prefab을 해제시키자.
* Texture
- WWW 혹은 다른곳에서 load 한 texture 들은 사용하지 않을때 DestroyImmediate 로 꼭 해제시켜줘야 한다. DestroyImmediate 해주면 바로 memory 에서 해제된다.
*. GameObject Destroy 는 memory 를 바로 해제시키지 않는다. - Resource.UnloadUnusedAssets 를 해야 memory 에서 해제된다. - GameObject 를 DestroyImmediate 해도 포함되있는 Texture, material, 등은 memory에서 해제되지 않는다.
*. Load 한 Texture 들을 Member 로 가지고 있으면 GameObject Destroy 시 memory 해제 안된다. - Texture 는 개별 DestroyImmediate 하여 바로바로 해제하자.


 $AlphaNumericSort.cs