블로그 이미지
Every unexpected event is a path to learning for you.

카테고리

분류 전체보기 (2738)
Unity3D (817)
Programming (475)
Server (33)
Unreal (4)
Gamebryo (56)
Tip & Tech (228)
협업 (58)
3DS Max (3)
Game (12)
Utility (136)
Etc (96)
Link (32)
Portfolio (19)
Subject (90)
iOS,OSX (53)
Android (14)
Linux (5)
잉여 프로젝트 (2)
게임이야기 (3)
Memories (20)
Interest (38)
Thinking (38)
한글 (30)
PaperCraft (5)
Animation (408)
Wallpaper (2)
재테크 (18)
Exercise (3)
나만의 맛집 (3)
냥이 (10)
육아 (16)
Total
Today
Yesterday
04-30 00:00


SourceTree에서 History 항목의 한글 깨짐 현상을 수정하는 방법에 대해 알아봅니다.


1. SourceTree 한글 설정.


SourceTree의 일반 메뉴에 대해 한글 설정은 옵션에서 할 수 있습니다.


도구 -> 옵션으로 이동 후 Repo Settings 그룹 박스 내에 있는 언어와 기본 텍스트 인코딩을 변경해주면 됩니다.


위와 같이 설정 후 SourceTree를 재시작해 주시면 됩니다.


2. History의 커밋 메시지 한글화.


위와 같이 설정해도 History내부의 한글은 여전히 깨져있는 상태입니다.


이 현상은 각 워크 스페이스마다의 설정을 변경해 주어야 합니다.


워크스페이스 우측 상단에 보이는 설정을 클릭합니다.


이후 저장소 설정 화면이 나타날텐데 "설정 파일 편집..."을 선택한 뒤 텍스트 편집기로 config파일을 엽니다.


기본 config 파일은 아마 다음과 같을겁니다.


[core]
	repositoryformatversion = 0
	filemode = false
	bare = false
	logallrefupdates = true
	ignorecase = true
[remote "origin"]
	url = https://github.com/....git
	fetch = +refs/heads/*:refs/remotes/origin/*
[branch "master"]
	remote = origin
	merge = refs/heads/master


이 설정을 다음과 같이 수정해 줍시다.


[i18n]
    logOutputEncoding = euc-kr
    commitEncoding = UTF-8
[core]
	repositoryformatversion = 0
	filemode = false
	bare = false
	logallrefupdates = true
	ignorecase = true
[remote "origin"]
	url = https://github.com/....git
	fetch = +refs/heads/*:refs/remotes/origin/*
[branch "master"]
	remote = origin
	merge = refs/heads/master


이후 config파일을 저장 한 뒤 저장소 설정의 확인 버튼을 클릭합니다.


정상적으로 한글이 노출되는 것을 확인할 수 있습니다.


출처: https://smoh.tistory.com/346 [Simple is Beautiful.]


[Sourcetree] History 한글 깨짐 현상 수정

SourceTree에서 History 항목의 한글 깨짐 현상을 수정하는 방법에 대해 알아봅니다. 1. SourceTree 한글 설정. SourceTree의 일반 메뉴에 대해 한글 설정은 옵션에서 할 수 있습니다. 도구 -> 옵션으로 이동

smoh.tistory.com


반응형
Posted by blueasa
, |

증상

유니티 안드로이드 빌드 시 아래와 같은 에러

/Users/jim/Desktop/workspace/project/project/Temp/gradleOut/launcher/build/intermediates/merged_manifests/release/AndroidManifest.xml:52: AAPT: error: unexpected element found in


해당 파일의 52번째 줄에는 <quries>라는 신택스가 있는데 인식을 못하는 것 같다.


원인

stackoverflow.com/questions/62969917/how-do-i-fix-unexpected-element-queries-found-in-manifest


How Do I Fix "unexpected element found in "?

All of a sudden, I am getting this build error in my Android project: unexpected element found in How do I fix it?

stackoverflow.com


유니티의 gradle 버전이 3.4.0 인데 버전이 낮아서 그렇다고 한다.


해결

Gradle 버전 3.4.0 -> 3.4.3으로 변경한다.

위의 Grade의 com.android.tools.build:gradle:3.4.0'라고 적혀있는 부분을 com.android.tools.build:gradle:3.4.3'으로 바꿔주고 유니티 빌드를 다시 해보자.


위 파일의 경로는 아래와 같다.

/Applications/Unity/Hub/Editor/2019.4.15f1/PlaybackEngines/AndroidPlayer/Tools/GradleTemplates/baseProjectTemplate.gradle


출처: https://ajh322.tistory.com/294 [IT 잡동사니]


유니티 안드로이드 빌드 에러 - unexpected element found in

증상 유니티 안드로이드 빌드 시 아래와 같은 에러 /Users/jim/Desktop/workspace/project/project/Temp/gradleOut/launcher/build/intermediates/merged_manifests/release/AndroidManifest.xml:52: AAPT: error:..

ajh322.tistory.com


[참조] devgod.tistory.com/33


[Unity/Android] unexpected element found in 에러 해결

기존 프로젝트에 광고관련 SDK와 추가 스토어 대응을 하려고 플러그인을 이것저것 넣다보니 위와 같은 에러가 발생했다. 해당 에러는 구글에서 핫픽스가 나와있는 에러이며, 안드로이드 11에 관

devgod.tistory.com

[추가]

- 유니티 엔진 자체 Gradle 파일 위치는 기본 설치 시 아래와 같다.

[Unity 2018] C:\Program Files\Unity\Hub\Editor\2018.4.32f1\Editor\Data\PlaybackEngines\AndroidPlayer\Tools\GradleTemplates\mainTemplate.gradle

[Unity 2019] C:\Program Files\Unity\Hub\Editor\2019.4.22f1\Editor\Data\PlaybackEngines\AndroidPlayer\Tools\GradleTemplates\baseProjectTemplate.gradle


- Custom Gradle을 수정하려면 아래 파일에서 수정하자.

[Unity 2018]

1) Player Settings-Publishing Settings-Build-Custom Gradle Template 체크

2) ..\MyProject\Assets\Plugins\Android\mainTemplate.gradle 수정


[Unity 2019]

1) Project Settings-Player-Publishing Settings-Build-Custom Base Gradle Template 체크

2) ..\MyProject\Assets\Plugins\Android\baseProjectTemplate.gradle 수정

반응형
Posted by blueasa
, |

​With Apple’s incoming changes to the requirements for use of IDFA and needing to request users permission via App Tracking Transparency popup which is incoming at some point in early 2021. Apps need to start to prepare to the incoming changes.

​So how do you add a IDFA App Tracking Transparency popup from a Unity app?

At the moment there is no build in Unity method that will trigger the notification, There is however a preview package!

​As a note App Tracking Transparency is only required on IOS 14 devices, Altough this won’t causing issues on any lower OS version it won’t trigger the popup. If you don’t have access to a IOS 14 device you can test this with the XCode Emulators.​

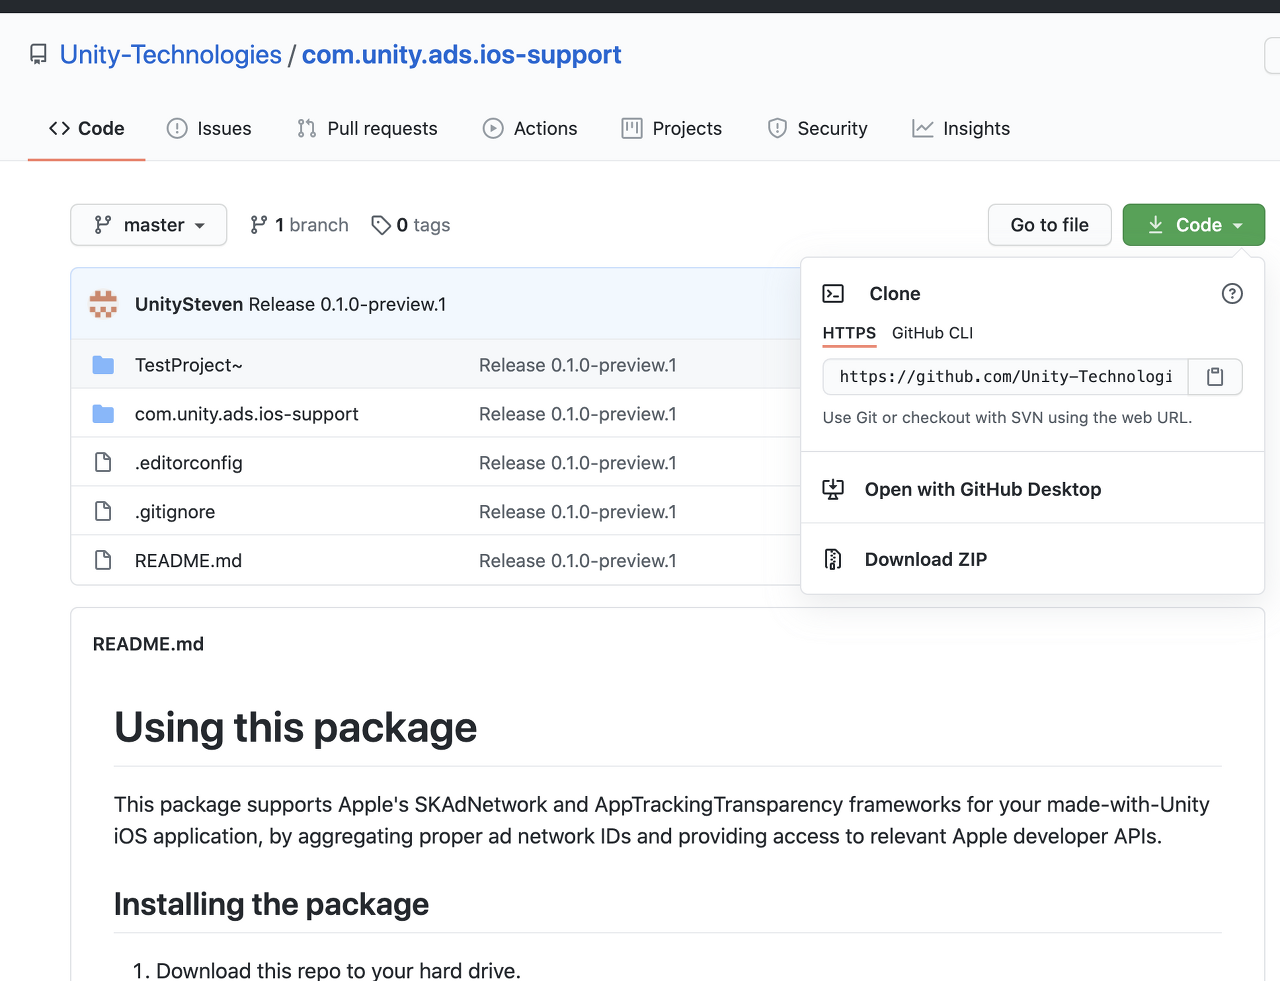
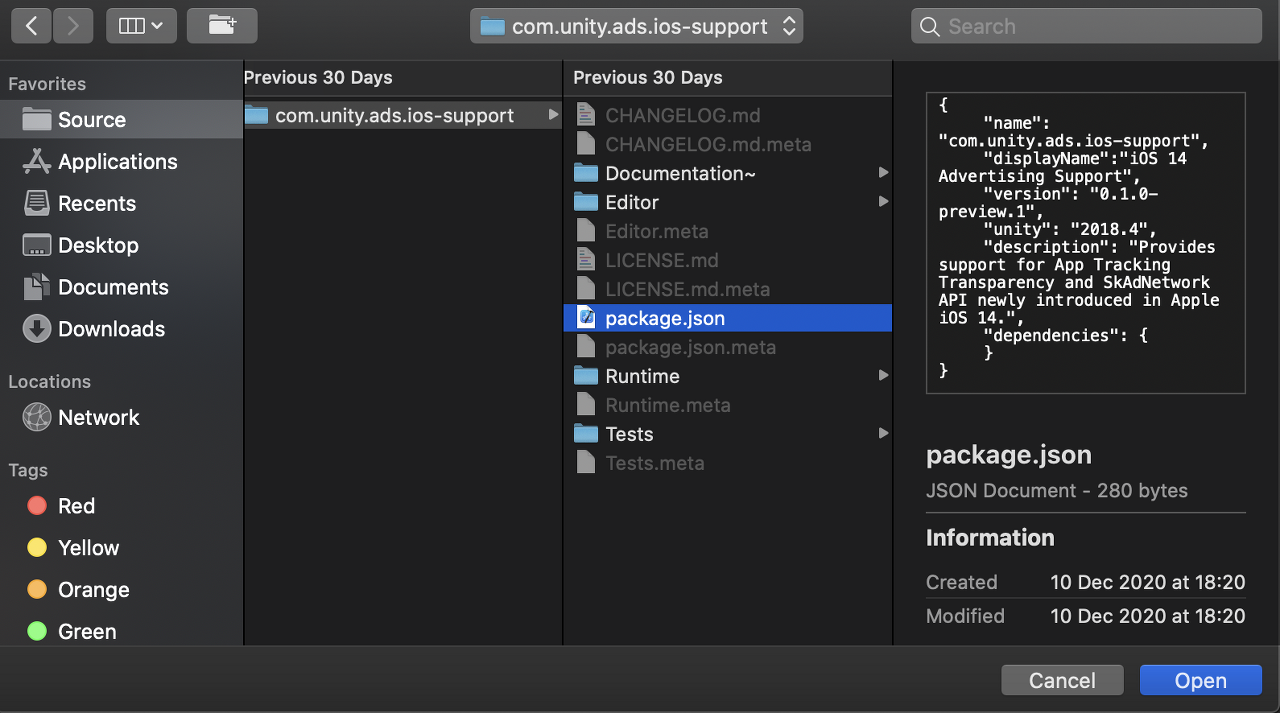
1. Download Unity IOS Support Package

​Download the com.unity.ads.ios.support library from Github. This is current in preview and won’t be found directly from the package manager.

Unzip this into a folder outside your Asset Folder.

​Note it is best to make sure these files are checking into source control we will be using a relative path from Unity package manager.​

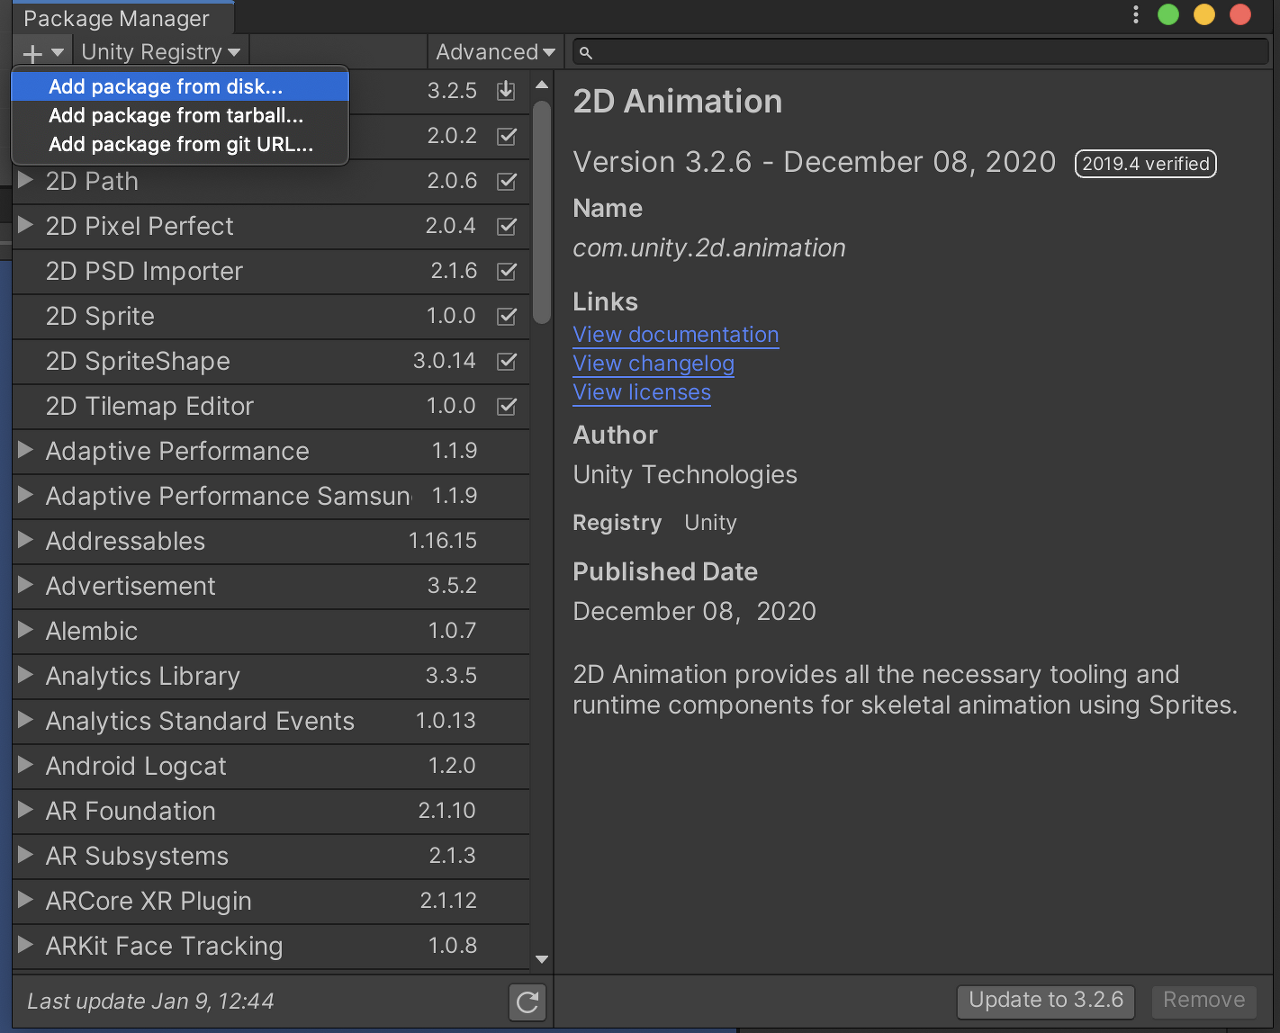
2. Add to Package Manager

​Now in you’re unity project go Windows->Package Manger.

​​

Then press the plus button and add from disk and navigate to the package.json file within the com.unity.ads.ios.support that we just unzipped.

​​

Unity will then import the package, Because we have imported the file from within the base Unity Project file the file has been direct to a relative path, if you however place this file outside this folder you will need to edit the Packages/manifest.json file to make it relative.

​​

​​

3. Triggering App Tracking Transparency Request

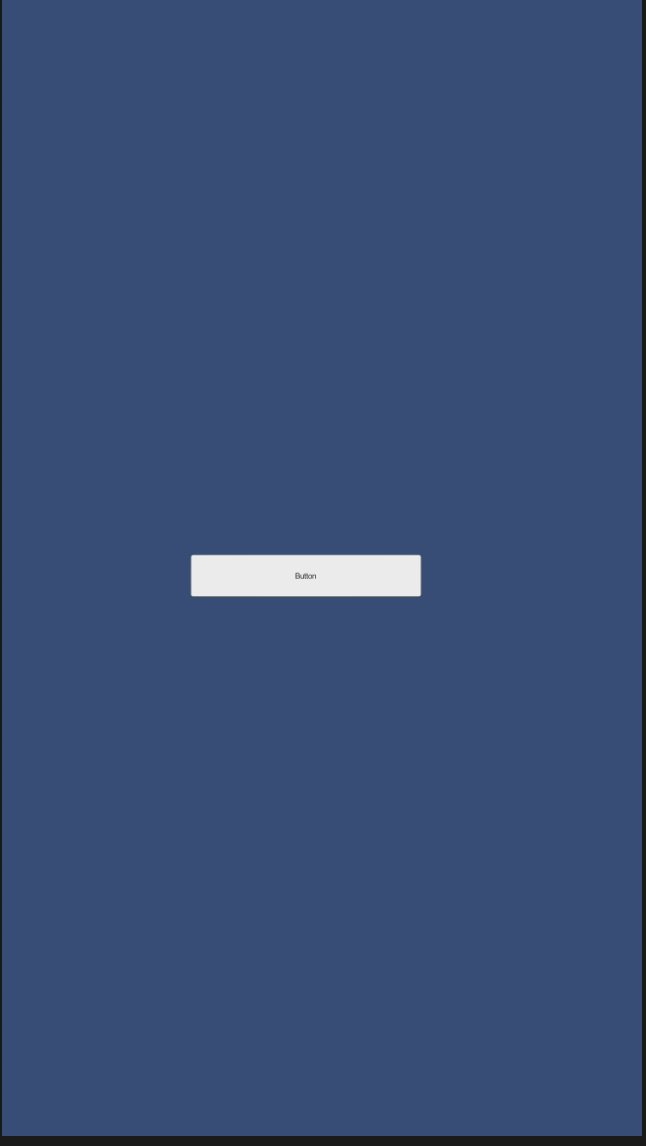
​As most SDK recommend We will need to trigger this before we initialize any SDK’s that we wish to pass the IDFA into. We also can only trigger this one pre install with users being able to edit there preference within the IOS Settings menu.​​Here we are using a really simple system where we trigger the notification when a user press a button.

Breaking down

​We first state we are using the IosSupport Library. We also inclosing this with a UNITY_IOS pre-compile which means we will only compile this code if we are running on IOS

#if UNITY_IOS using Unity.Advertisement.IosSupport; #endif

Next the actual triggering, again inclosing this with the UNITY_IOS pre-compile. We first check call ATTrackingStatusBinding.GetAuthorizationTrackingStatus() which will tell if the user has already set there preference, then ATTrackingStatusBinding.RequestAuthorizationTracking() Which will trigger the popup.

#if UNITY_IOS if(ATTrackingStatusBinding.GetAuthorizationTrackingStatus() == ATTrackingStatusBinding.AuthorizationTrackingStatus.NOT_DETERMINED) { ATTrackingStatusBinding.RequestAuthorizationTracking(); } #endif

4. Post build steps

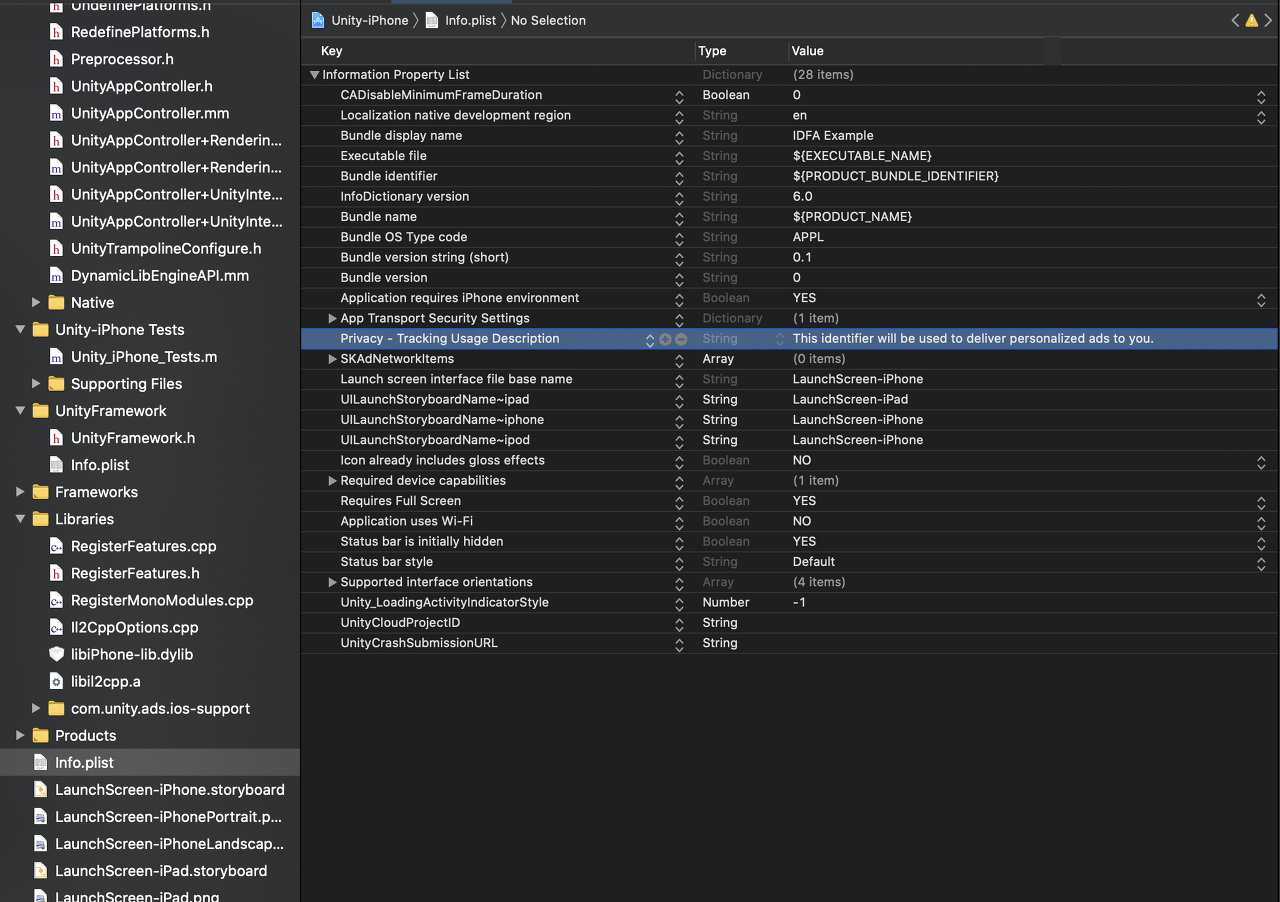
​Like any other permission request Apple requires a description on why you are requesting these permission. For this we need to add the NSUserTrackingUsageDescription key to our PList. Instead of having to do this each time we create a build we are going to create a post build step that automatically adds it to the XCode Project

​You can see more about Unity post build steps here

using UnityEditor;
using UnityEditor.Callbacks;
#if UNITY_IOS
using UnityEditor.iOS.Xcode;
#endif
using System.IO;
 
public class PostBuildStep
{
/// <summary>
/// Description for IDFA request notification
/// [sets NSUserTrackingUsageDescription]
/// </summary>
const string TrackingDescription =
"This identifier will be used to deliver personalized ads to you. ";
 
[PostProcessBuild(0)]
public static void OnPostprocessBuild(BuildTarget buildTarget, string pathToXcode)
{
if (buildTarget == BuildTarget.iOS)
{
AddPListValues(pathToXcode);
}
}
 
static void AddPListValues(string pathToXcode)
{
// Get Plist from Xcode project
string plistPath = pathToXcode + "/Info.plist";
 
// Read in Plist
PlistDocument plistObj = new PlistDocument();
plistObj.ReadFromString(File.ReadAllText(plistPath));
 
// set values from the root obj
PlistElementDict plistRoot = plistObj.root;
 
// Set value in plist
plistRoot.SetString("NSUserTrackingUsageDescription", TrackingDescription);
 
// save
File.WriteAllText(plistPath, plistObj.WriteToString());
}
 
}

view rawPostBuild.cs hosted with ❤ by GitHub

​Here we just read in the PlistFile from the Xcode project we just created, then add in a new string values​plistRoot.SetString(“NSUserTrackingUsageDescription”, TrackingDescription);​Which sets the our popup text.​​

4. Testing it out

​Build the App to Xcode as normal and open it up in Xcode. If you open up the Info.Plist you will see the description we just added in from the post build step

​​​​

Now we can just build and play on our device. Then just press the button and you should see the IDFA Popup!

​​​​​

​​​​

​You will notice that if you press the button again it won’t re-trigger this is by the apple requirements so we will need to uninstall and pre-install to test it again.​

​This is the basic implementation ahead of the requirement of App Tracking Transparency for IOS, for a production version it may be best to pre-warn users about the popup, explaining why you are wanting to use the IDFA. This will likely improve the number of user who opt-in​

If any problems feel free to drop me a line on Twitter @Gamereat.


[출처] alanyeats.com/post/unityapptrackingtransparencypopup/


App Tracking Transparency in Unity (IDFA Popup) | Alan Yeats | Pocket Sized Hands Co-Founder | VR / AR Developer

​ With Apple’s incoming changes to the requirements for use of IDFA and needing to request users permission via App Tracking Transparency popup which is incoming at some point in early 2021. Apps need to start to prepare to the incoming changes. ​ So

alanyeats.com


반응형
Posted by blueasa
, |