블로그 이미지
Every unexpected event is a path to learning for you.

카테고리

분류 전체보기 (2731)
Unity3D (814)
Script (91)
Extensions (14)
Effect (3)
NGUI (77)
UGUI (8)
Physics (2)
Shader (36)
Math (1)
Design Pattern (2)
Xml (1)
Tips (200)
Link (22)
World (1)
AssetBundle (25)
Mecanim (2)
Plugins (68)
Trouble Shooting (68)
Encrypt (7)
LightMap (4)
Shadow (4)
Editor (8)
Crash Report (3)
Utility (9)
UnityVS (2)
Facebook SDK (2)
iTween (3)
Font (10)
Ad (14)
Photon (2)
IAP (1)
Google (8)
Android (45)
iOS (41)
Programming (474)
Server (33)
Unreal (4)
Gamebryo (56)
Tip & Tech (228)
협업 (57)
3DS Max (3)
Game (12)
Utility (136)
Etc (96)
Link (32)
Portfolio (19)
Subject (90)
iOS,OSX (51)
Android (14)
Linux (5)
잉여 프로젝트 (2)
게임이야기 (3)
Memories (20)
Interest (38)
Thinking (38)
한글 (30)
PaperCraft (5)
Animation (408)
Wallpaper (2)
재테크 (18)
Exercise (3)
나만의 맛집 (3)
냥이 (10)
육아 (16)
Total
Today
Yesterday
03-29 07:22

파티클 이펙트를 런타임 중에 방향을 반전 시키는 간단한 스크립트.


생성 될 때 방향을 반전시키기 위해서 ParticleSystem.startSpeed 를 반전 시키고,

이미 생성 된 파티클은 ParticleSystem.Particle.velocity 를 반전 시켜 줌.


using UnityEngine;
using System.Collections;

public class InvertParticleEffect : MonoBehaviour
{
    ParticleSystem m_System;
    ParticleSystem.Particle[] m_Particles;


    void InitializeIfNeeded()
    {
        if (m_System == null)
            m_System = GetComponent();

        if (m_Particles == null || m_Particles.Length < m_System.maxParticles)
            m_Particles = new ParticleSystem.Particle[m_System.maxParticles];
    }

    public void Invert()
    {
        InitializeIfNeeded();

        // 생성될 때, 파티클 Speed 방향 반전
        var vel = m_System.startSpeed *= -1f;

        // GetParticles is allocation free because we reuse the m_Particles buffer between updates
        int numParticlesAlive = m_System.GetParticles(m_Particles);

        // Change only the particles that are alive
        for (int i = 0; i < numParticlesAlive; i++)
        {
            // 이미 생성된 파티클은 velocity 반전해서 반대로 가도록..
            m_Particles[i].velocity *= -1f;
        }

        // Apply the particle changes to the particle system
        m_System.SetParticles(m_Particles, numParticlesAlive);
    }

}

[참조] https://docs.unity3d.com/ScriptReference/ParticleSystem.GetParticles.html


반응형
Posted by blueasa
, |

Parallax scrolling

For the moment, we have created a static scene with a player and some enemies. It’s a bit boring. Time to enhance our background and scene.

An effect that you find in every single 2D game for 15 years is “parallax scrolling”.

To make it short, the idea is to move the background layers at different speeds (i.e., the farther the layer is, the slower it moves). If done correctly, this gives an illusion of depth. It’s a cool, nice and easy-to-do effect.

Moreover, many shmups use a scrolling in one — or more — axis (except the original one, Space Invaders).

Let’s implement that in Unity.

Theory: defining the scrolling in our game

Adding a scrolling axis need a bit of thinking on how we will make the game with this new aspect.

It’s good to think before coding. :)

What do we want to move?

We have a decision to take here :

  1. First choice: The player and the camera move. The rest is fixed.
  2. Second choice: The player and the camera are static. The level is a treadmill.

The first choice is a no-brainer if you have a Perspective camera. The parallax is obvious: background elements have a higher depth. Thus, they are behind and seems to move slower.

But in a standard 2D game in Unity, we use an Orthographic camera. We don’t have depth at render.

About the camera: remember the “Projection” property of your camera game object. It’s set to Orthographic in our game.

Perspective means that the camera is a classic 3D camera, with depth management. Orthographic is a camera that renders everything at the same depth. It’s particularly useful for a GUI or a 2D game.

In order to add the parallax scrolling effect to our game, the solution is to mix both choices. We will have two scrollings:

  • The player is moving forward along with the camera.
  • Background elements are moving at different speeds (in addition to the camera movement).

Note: you may ask: “Why don’t we just set the camera as a child of the player object?”. Indeed, in Unity, if you set an object (camera or not) as a sub-child of a game object, this object will maintain its relative position to its parent. So if the camera is a child of the player and is centered on him, it will stay that way and will follow him exactly. It could be a solution, but this would not fit with our gameplay.

In a shmup, the camera restricts the player movement. If the camera moves along with the player for both horizontal and vertical axis, then the player is free to go where he wants. We DO want to keep the player inside a restricted area.

We would also recommend to always keep the camera independent in a 2D game. Even in a platformer, the camera isn’t strictly linked to the player: it follows him under some restrictions. Super Mario World has probably one the best camera possible for a platformer. You may have a look at how it is done.

Spawning enemies

Adding a scrolling to our game has consequences, especially concerning enemies. Currently, they are just moving and shooting as soon as the game starts. However, we want them to wait and be invincible until they spawn.

How do we spawn enemies? It depends on the game, definitely. You could define events that spawn enemies when they are triggered, spawn points, pre-determined positions, etc.

Here is what we will do: We position the Poulpies on the scene directly (by dragging the Prefab onto the scene). By default, they are static and invincibles until the camera reaches and activates them.

Camera usage

The nice idea here is that you can use the Unity editor to set the enemies. You read right: without doing anything, you already have a level editor.

Once again, it’s a choice, not science. ;)

Note: on a bigger project, you may need a dedicated level editor such as “Tiled” or a custom one you made. Your levels can be text files (plain text, XML, JSON, etc.) that you read in Unity for example.

Planes

First, we must define what our planes are and for each, if it’s a loop or not. A looping background will repeat over and over again during the level execution. E.g., it’s particularly useful for things like the sky.

Add a new layer to the scene for the background elements.

We are going to have:

Layer  Loop  
Background with the skyYes
Background (1st row of flying platforms)No
Middleground (2nd row of flying platforms)No
Foreground with players and enemiesNo

Planes

We could add as many layers of background objects as we want.

Careful with that axe, Eugene: if you add layers ahead of the foreground layer, be careful with the visibility. Many games do not use this technique because it reduces the clearness of the game, especially in a shmup where the gameplay elements need to be clearly visible.

Practice: Diving into the code

Okay, we saw how implementing a parallax scrolling affects our game.

Did you know? “Scrolling shooters” is another name used for the shmups.

But enough thoughts, time to practice!

Unity has some parallax scrolling scripts in its standard packages (take a look at the 2D platformer demo on the Asset Store). You can of course use them, but we found it would be interesting to build one from scratch the first time.

Standard packages: these are practicals, but be careful to not abuse of them. Using standard packages can block your thoughts and will not make your game stand out of the crowd. They give a Unity feel to your gameplay.

Remember all the flash game clones?

Simple scrolling

We will start with the easy part: scrolling backgrounds without looping.

Remember the “MoveScript” we used before? The basis is the same: a speed and a direction applied over time.

Create a new “ScrollingScript” script:

using UnityEngine;

/// <summary>
/// Parallax scrolling script that should be assigned to a layer
/// </summary>
public class ScrollingScript : MonoBehaviour
{
  /// <summary>
  /// Scrolling speed
  /// </summary>
  public Vector2 speed = new Vector2(2, 2);

  /// <summary>
  /// Moving direction
  /// </summary>
  public Vector2 direction = new Vector2(-1, 0);

  /// <summary>
  /// Movement should be applied to camera
  /// </summary>
  public bool isLinkedToCamera = false;

  void Update()
  {
    // Movement
    Vector3 movement = new Vector3(
      speed.x * direction.x,
      speed.y * direction.y,
      0);

    movement *= Time.deltaTime;
    transform.Translate(movement);

    // Move the camera
    if (isLinkedToCamera)
    {
      Camera.main.transform.Translate(movement);
    }
  }
}

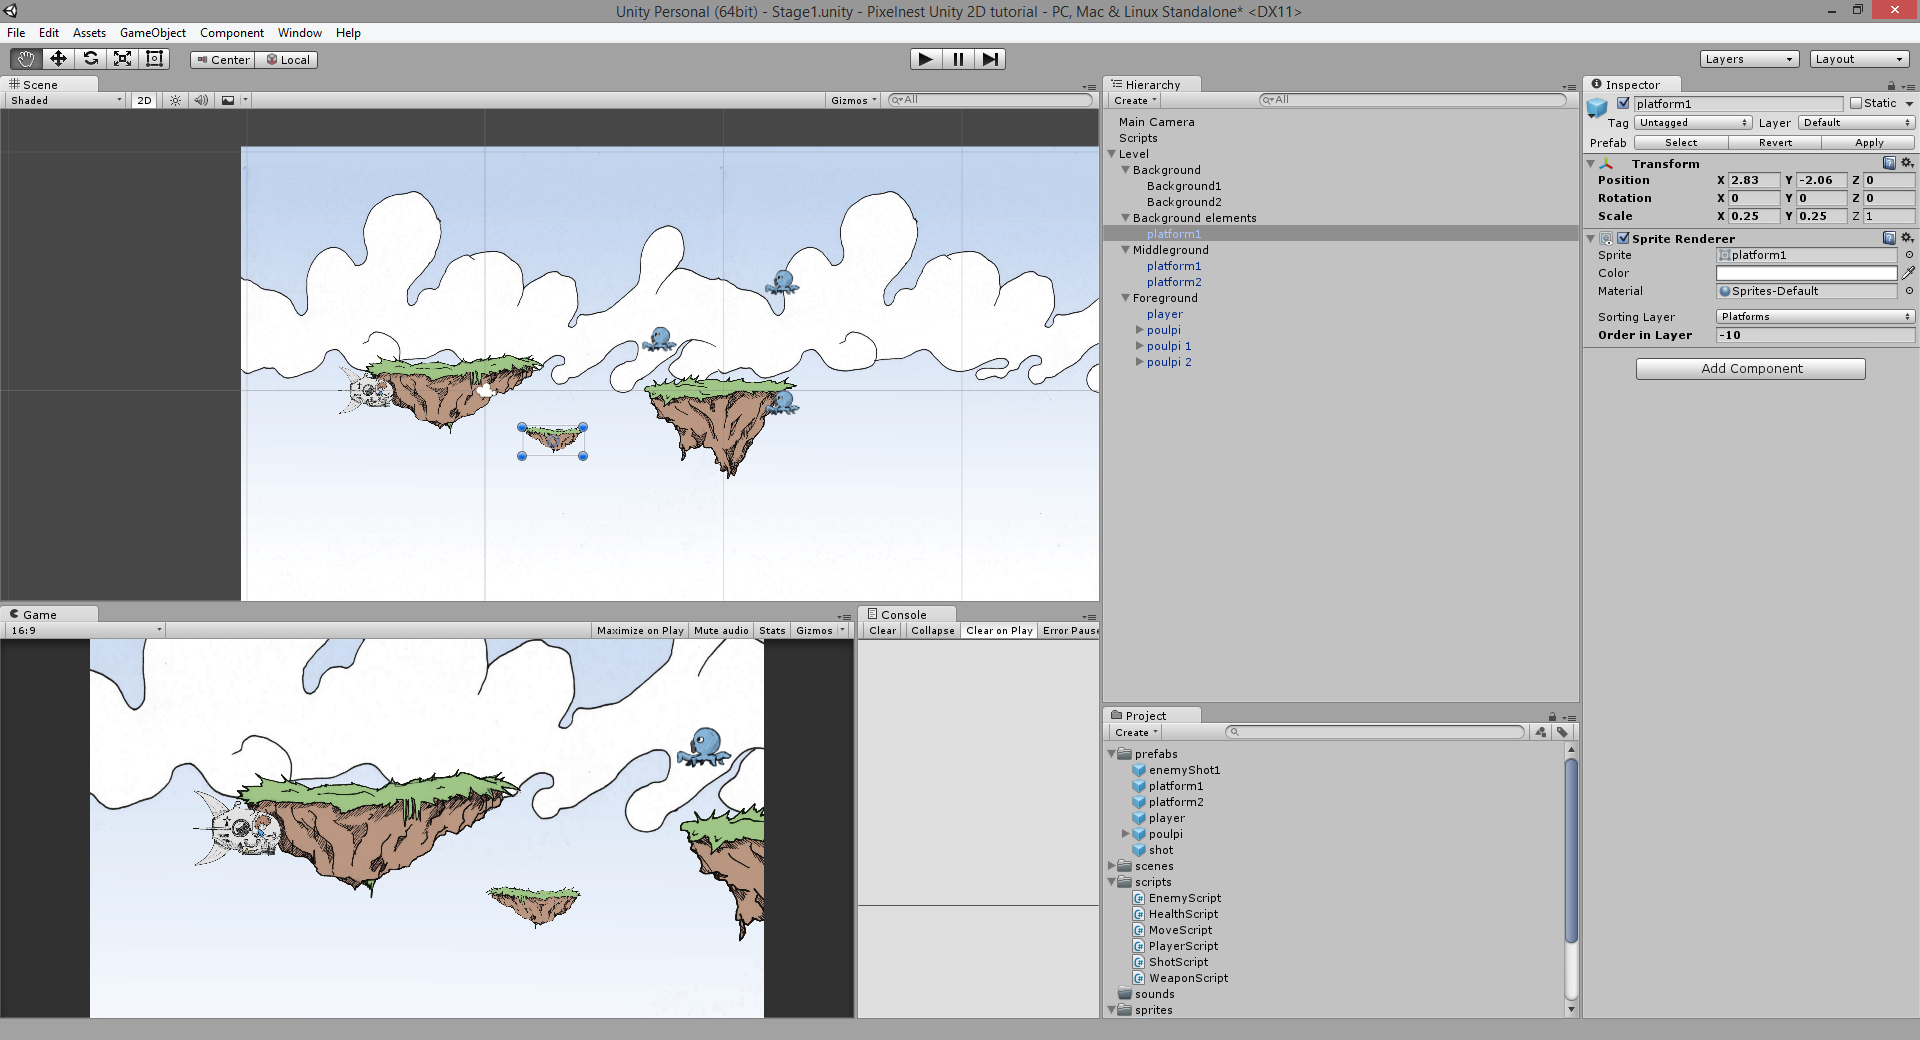
Attach the script to these game objects with these values:

LayerSpeedDirectionLinked to Camera
Background(1, 1)(-1, 0, 0)No
Background elements(1.5, 1.5)(-1, 0, 0)No
Middleground(2.5, 2.5)(-1, 0, 0)No
Foreground(1, 1)(1, 0, 0)Yes

For a convincing result, add elements to the scene:

  • Add a third background part after the two previous ones.
  • Add some small platforms in the layer ` Background elements`.
  • Add platforms in the layer Middleground.
  • Add enemies on the right of the layer Foreground, far from the camera.
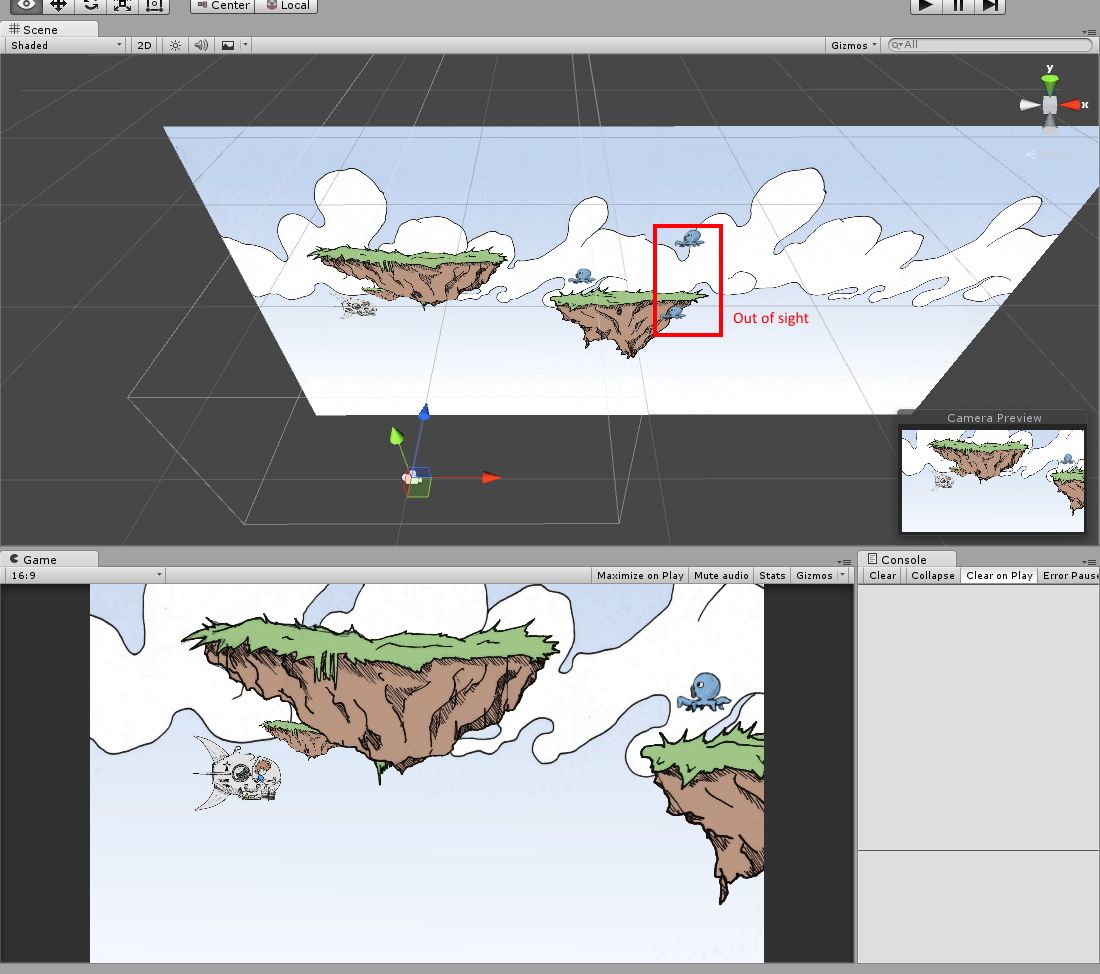
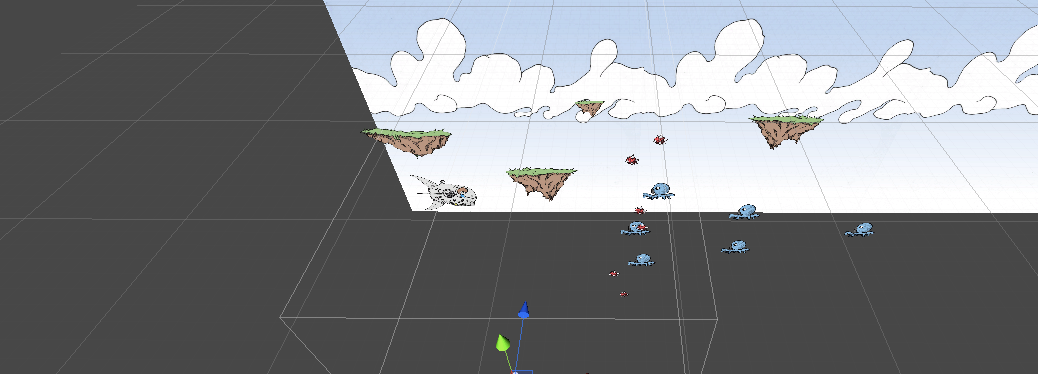
The result:

Scrolling effect

Not bad! But we can see that enemies move and shoot when they are out of the camera, even before they spawn!

Moreover, they are never recycled when they pass the player (zoom out in the “Scene” view, and look at the left of the scene: the Poulpies are still moving).

Note: experiment with the values. :)

We’ll fix these problems later. First, we need to manage the infinite background (the sky).

Infinite background scrolling

In order to get an infinite background, we only need to watch the child which is at the left of the infinite layer.

When this object goes beyond the camera left edge, we move it to the right of the layer. Indefinitely.

Infinite scrolling theory

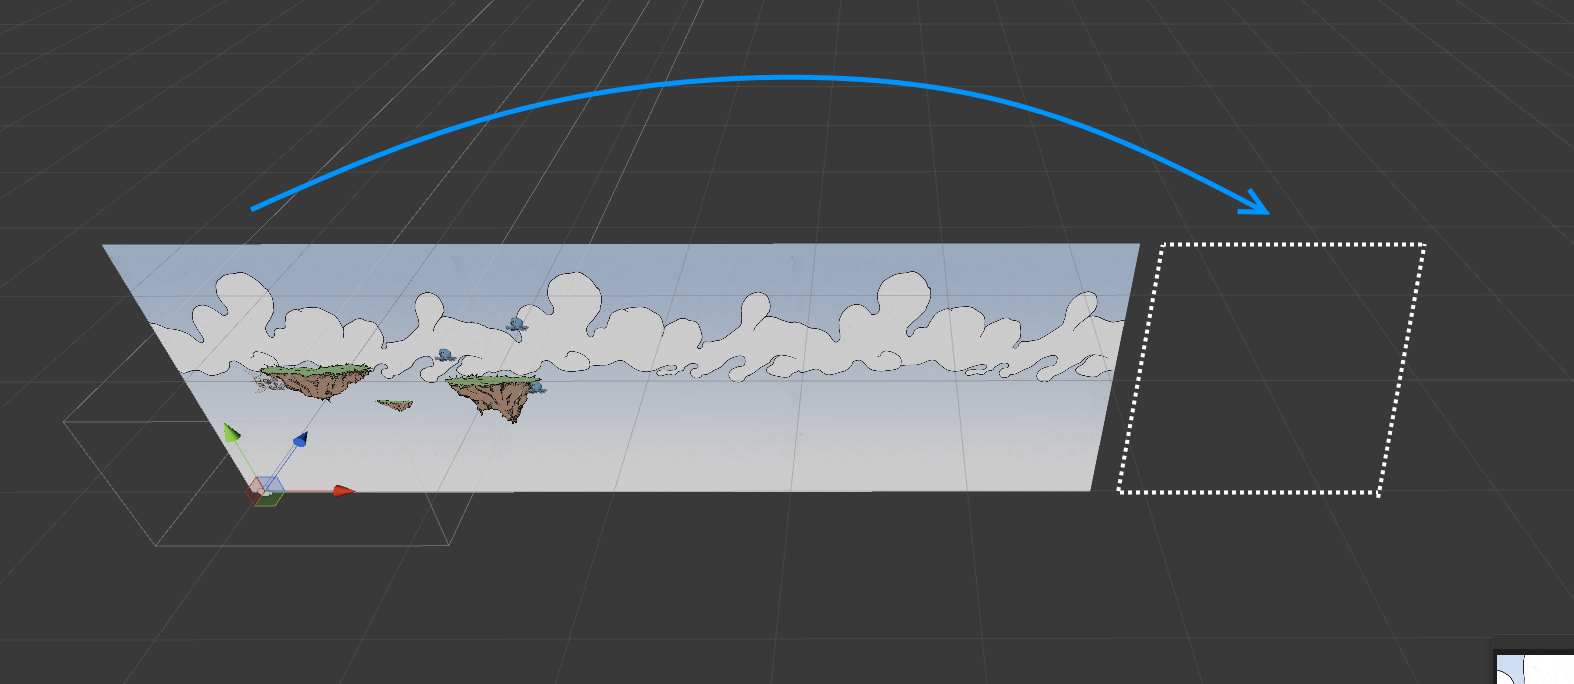
For a layer filled with images, notice that you need a minimum size to cover the camera field, so we never see what’s behind. Here it’s 3 parts for the sky, but it’s completely arbitrary.

Find the correct balance between resource consumption and flexibility for your game.

In our case, the idea is that we will get all the children on the layer and check their renderer.

A note about using the renderer component: This method won’t work with invisible objects (e.g., the ones handling scripts). However, a use case when you need to do this on invisible objects is unlikely.

We will use an handy method to check whether an object’s renderer is visible by the camera. We’ve found it on the community wiki. It’s neither a class nor a script, but a C# class extension.

Extension: the C# language allows you to extend a class with extensions, without needing the base source code of the class.

Create a static method starting with a first parameter which looks like this: this Type currentInstance. The Type class will now have a new method available everywhere your own class is available.

Inside the extension method, you can refer to the current instance calling the method by using the currentInstance parameter instead of this.

The “RendererExtensions” script

Create a new C# file named “RendererExtensions.cs” and fill it with:

using UnityEngine;

public static class RendererExtensions
{
  public static bool IsVisibleFrom(this Renderer renderer, Camera camera)
  {
    Plane[] planes = GeometryUtility.CalculateFrustumPlanes(camera);
    return GeometryUtility.TestPlanesAABB(planes, renderer.bounds);
  }
}

Simple, isn’t it?

Namespaces: you might have already noted that Unity doesn’t add a namespace around a MonoBehaviour script when you create it from the “Project” view. And yet Unity does handle namespaces…

In this tutorial, we are not using namespaces at all. However, in your real project, you might consider to use them. If not, prefix your classes and behaviors to avoid a collision with a third-party library (like NGUI).

The real reason behind not using namespaces was that during the Unity 4 days (this tutorial was originally written for Unity 4.3), a namespace would prevent the use of default parameters. It’s not a problem anymore, so: use namespace!

We will call this method on the leftmost object of the infinite layer.

Full “ScrollingScript”

Observe the full “ScrollingScript” (explanations below):

using System.Collections.Generic;
using System.Linq;
using UnityEngine;

/// <summary>
/// Parallax scrolling script that should be assigned to a layer
/// </summary>
public class ScrollingScript : MonoBehaviour
{
    /// <summary>
    /// Scrolling speed
    /// </summary>
    public Vector2 speed = new Vector2(10, 10);

    /// <summary>
    /// Moving direction
    /// </summary>
    public Vector2 direction = new Vector2(-1, 0);

    /// <summary>
    /// Movement should be applied to camera
    /// </summary>
    public bool isLinkedToCamera = false;

    /// <summary>
    /// 1 - Background is infinite
    /// </summary>
    public bool isLooping = false;

    /// <summary>
    /// 2 - List of children with a renderer.
    /// </summary>
    private List<SpriteRenderer> backgroundPart;

    // 3 - Get all the children
    void Start()
    {
        // For infinite background only
        if (isLooping)
        {
            // Get all the children of the layer with a renderer
            backgroundPart = new List<SpriteRenderer>();

            for (int i = 0; i < transform.childCount; i++)
            {
                Transform child = transform.GetChild(i);
                SpriteRenderer r = child.GetComponent<SpriteRenderer>();

                // Add only the visible children
                if (r != null)
                {
                    backgroundPart.Add(r);
                }
            }

            // Sort by position.
            // Note: Get the children from left to right.
            // We would need to add a few conditions to handle
            // all the possible scrolling directions.
            backgroundPart = backgroundPart.OrderBy(
              t => t.transform.position.x
            ).ToList();
        }
    }

    void Update()
    {
        // Movement
        Vector3 movement = new Vector3(
          speed.x * direction.x,
          speed.y * direction.y,
          0);

        movement *= Time.deltaTime;
        transform.Translate(movement);

        // Move the camera
        if (isLinkedToCamera)
        {
            Camera.main.transform.Translate(movement);
        }

        // 4 - Loop
        if (isLooping)
        {
            // Get the first object.
            // The list is ordered from left (x position) to right.
            SpriteRenderer firstChild = backgroundPart.FirstOrDefault();

            if (firstChild != null)
            {
                // Check if the child is already (partly) before the camera.
                // We test the position first because the IsVisibleFrom
                // method is a bit heavier to execute.
                if (firstChild.transform.position.x < Camera.main.transform.position.x)
                {
                    // If the child is already on the left of the camera,
                    // we test if it's completely outside and needs to be
                    // recycled.
                    if (firstChild.IsVisibleFrom(Camera.main) == false)
                    {
                        // Get the last child position.
                        SpriteRenderer lastChild = backgroundPart.LastOrDefault();

                        Vector3 lastPosition = lastChild.transform.position;
                        Vector3 lastSize = (lastChild.bounds.max - lastChild.bounds.min);

                        // Set the position of the recyled one to be AFTER
                        // the last child.
                        // Note: Only work for horizontal scrolling currently.
                        firstChild.transform.position = new Vector3(lastPosition.x + lastSize.x, firstChild.transform.position.y, firstChild.transform.position.z);

                        // Set the recycled child to the last position
                        // of the backgroundPart list.
                        backgroundPart.Remove(firstChild);
                        backgroundPart.Add(firstChild);
                    }
                }
            }
        }
    }
}

(The numbers in the comments refer to the explanations below)

Explanations

  1. We need a public variable to turn on the “looping” mode in the “Inspector” view.
  2. We also have to use a private variable to store the layer children.
  3. In the Start() method, we set the backgroundPart list with the children that have a renderer. Thanks to a bit of LINQ, we order them by their X position and put the leftmost at the first position of the array.
  4. In the Update() method, if the isLooping flag is set to true, we retrieve the first child stored in the backgroundPart list. We test if it’s completely outside the camera field. When it’s the case, we change its position to be after the last (rightmost) child. Finally, we put it at the last position of backgroundPartlist.

Indeed, the backgroundPart is the exact representation of what is happening in the scene.


Remember to enable the “Is Looping” property of the “ScrollingScript” for the 0 - Background in the “Inspector” pane. Otherwise, it will (predictably enough) not work.

Infinite scrolling

(Click on the image to see the animation)

Yes! We finally have a functional “parallax scrolling” implementation.

Note: why don’t we use the OnBecameVisible() and OnBecameInvisible() methods? Because they are broken.

The basic idea of these methods is to execute a fragment of code when the object is rendered (or vice-versa). They work like the Start() or Stop() methods (if you need one, simply add the method in the MonoBehaviour and Unity will use it).

The problem is that these methods are also called when rendered by the “Scene” view of the Unity editor. This means that we will not get the same behavior in the Unity editor and in a build (whatever the platform is). This is dangerous and absurd. We highly recommend to avoid these methods.

Bonus: Enhancing existing scripts

Let’s update our previous scripts.

Enemy v2 with spawn

We said earlier that enemies should be disabled until they are visible by the camera.

They should also be removed once they are completely off the screen.

We need to update “EnemyScript”, so it will:

  1. Disable the movement, the collider and the auto-fire (when initialized).
  2. Check when the renderer is inside the camera sight.
  3. Activate itself.
  4. Destroy the game object when it’s outside the camera.

(The numbers refer to the comments in the code)

using UnityEngine;

/// <summary>
/// Enemy generic behavior
/// </summary>
public class EnemyScript : MonoBehaviour
{
    private bool hasSpawn;
    private MoveScript moveScript;
    private WeaponScript[] weapons;
    private Collider2D coliderComponent;
    private SpriteRenderer rendererComponent;

    void Awake()
    {
        // Retrieve the weapon only once
        weapons = GetComponentsInChildren<WeaponScript>();

        // Retrieve scripts to disable when not spawn
        moveScript = GetComponent<MoveScript>();

        coliderComponent = GetComponent<Collider2D>();

        rendererComponent = GetComponent<SpriteRenderer>();
    }

    // 1 - Disable everything
    void Start()
    {
        hasSpawn = false;

        // Disable everything
        // -- collider
        coliderComponent.enabled = false;
        // -- Moving
        moveScript.enabled = false;
        // -- Shooting
        foreach (WeaponScript weapon in weapons)
        {
            weapon.enabled = false;
        }
    }

    void Update()
    {
        // 2 - Check if the enemy has spawned.
        if (hasSpawn == false)
        {
            if (rendererComponent.IsVisibleFrom(Camera.main))
            {
                Spawn();
            }
        }
        else
        {
            // Auto-fire
            foreach (WeaponScript weapon in weapons)
            {
                if (weapon != null && weapon.enabled && weapon.CanAttack)
                {
                    weapon.Attack(true);
                }
            }

            // 4 - Out of the camera ? Destroy the game object.
            if (rendererComponent.IsVisibleFrom(Camera.main) == false)
            {
                Destroy(gameObject);
            }
        }
    }

    // 3 - Activate itself.
    private void Spawn()
    {
        hasSpawn = true;

        // Enable everything
        // -- Collider
        coliderComponent.enabled = true;
        // -- Moving
        moveScript.enabled = true;
        // -- Shooting
        foreach (WeaponScript weapon in weapons)
        {
            weapon.enabled = true;
        }
    }
}

Start the game. Yes, there’s a bug.

Disabling the “MoveScript” as a negative effect: The player never reaches the enemies as they’re all moving with the Foreground layer scrolling:

camera_moving_along_gif

Remember: we’ve added a “ScrollingScript” to this layer in order to move the camera along with the player.

But there is a simple solution: move the “ScrollingScript” from the Foregroundlayer to the player!

Why not after all? The only thing that is moving in this layer is him, and the script is not specific to a kind of object.

Push the “Play” button and observe: It works.

  1. Enemies are disabled until they spawn (i.e., until the camera reaches their positions).
  2. Then they disappear when they are outside the camera.

Enemy spawn

(Click on the image to see what happens)

Keeping the player in the camera bounds

You might have noticed that the player is not (yet) restricted to the camera area. “Play” the game, push the “Left Arrow” and watch him leaves the camera.

We have to fix that.

Open the “PlayerScript”, and add this at the end of the “Update()” method:

  void Update()
  {
    // ...

    // 6 - Make sure we are not outside the camera bounds
    var dist = (transform.position - Camera.main.transform.position).z;

    var leftBorder = Camera.main.ViewportToWorldPoint(
      new Vector3(0, 0, dist)
    ).x;

    var rightBorder = Camera.main.ViewportToWorldPoint(
      new Vector3(1, 0, dist)
    ).x;

    var topBorder = Camera.main.ViewportToWorldPoint(
      new Vector3(0, 0, dist)
    ).y;

    var bottomBorder = Camera.main.ViewportToWorldPoint(
      new Vector3(0, 1, dist)
    ).y;

    transform.position = new Vector3(
      Mathf.Clamp(transform.position.x, leftBorder, rightBorder),
      Mathf.Clamp(transform.position.y, topBorder, bottomBorder),
      transform.position.z
    );

    // End of the update method
  }

Nothing complicated, just verbose.

We get the camera edges and we make sure the player position (the center of the sprite) is inside the area borders.

Tweak the code to better understand what is happening.

Next step

We have a scrolling shooter!

We have just learned how to add a scrolling mechanism to our game, as well as a parallax effect for the background layers. However, the current code only works for right to left scrolling. But with your new knowledge, you should be able to enhance it and make it work for all scrolling directions (bonus: We did it as someone was stuck on the subject, click to see the code and an animation).

Still, the game really needs some tweaks to be playable. For example:

  • Reducing the sprite sizes.
  • Adjusting the speeds.
  • Adding more enemies.
  • Making it fun.

We will address these points in our upcoming chapter about gameplay tweaking (not released yet, unfortunately). For the moment, you can experiment. ;)

In the next chapter, we will focus our attention on how to make the game a bit more… flashy. With particles!


[출처] http://pixelnest.io/tutorials/2d-game-unity/parallax-scrolling/

반응형
Posted by blueasa
, |

Apologies for the delay, I hit a brick wall dealing with WWW - as this is my first time I use this class, I didn't know that I had to provide the FULL path to a file for it to load it successfully.

The code is taken from here, with some modifications.

Just attach this to some gameObject, and have your music files in your Asset folder (at edit-time) or the game folder (when you build).

It's in C#, if you have trouble translating to JS let me know.

  1. using UnityEngine;
  2. using System.Collections;
  3. using System.Collections.Generic;
  4. using System.IO;
  5. using System.Linq;
  6. public class MusicPlayer : MonoBehaviour
  7. {
  8. public enum SeekDirection { Forward, Backward }
  9. public AudioSource source;
  10. public List<AudioClip> clips = new List<AudioClip>();
  11. [SerializeField] [HideInInspector] private int currentIndex = 0;
  12. private FileInfo[] soundFiles;
  13. private List<string> validExtensions = new List<string> { ".ogg", ".wav" }; // Don't forget the "." i.e. "ogg" won't work - cause Path.GetExtension(filePath) will return .ext, not just ext.
  14. private string absolutePath = "./"; // relative path to where the app is running - change this to "./music" in your case
  15. void Start()
  16. {
  17. //being able to test in unity
  18. if (Application.isEditor) absolutePath = "Assets/";
  19. if (source == null) source = gameObject.AddComponent<AudioSource>();
  20. ReloadSounds();
  21. }
  22. void OnGUI()
  23. {
  24. if (GUILayout.Button("Previous")) {
  25. Seek(SeekDirection.Backward);
  26. PlayCurrent();
  27. }
  28. if (GUILayout.Button("Play current")) {
  29. PlayCurrent();
  30. }
  31. if (GUILayout.Button("Next")) {
  32. Seek(SeekDirection.Forward);
  33. PlayCurrent();
  34. }
  35. if (GUILayout.Button("Reload")) {
  36. ReloadSounds();
  37. }
  38. }
  39. void Seek(SeekDirection d)
  40. {
  41. if (d == SeekDirection.Forward)
  42. currentIndex = (currentIndex + 1) % clips.Count;
  43. else {
  44. currentIndex--;
  45. if (currentIndex < 0) currentIndex = clips.Count - 1;
  46. }
  47. }
  48. void PlayCurrent()
  49. {
  50. source.clip = clips[currentIndex];
  51. source.Play();
  52. }
  53. void ReloadSounds()
  54. {
  55. clips.Clear();
  56. // get all valid files
  57. var info = new DirectoryInfo(absolutePath);
  58. soundFiles = info.GetFiles()
  59. .Where(f => IsValidFileType(f.Name))
  60. .ToArray();
  61. // and load them
  62. foreach (var s in soundFiles)
  63. StartCoroutine(LoadFile(s.FullName));
  64. }
  65. bool IsValidFileType(string fileName)
  66. {
  67. return validExtensions.Contains(Path.GetExtension(fileName));
  68. // Alternatively, you could go fileName.SubString(fileName.LastIndexOf('.') + 1); that way you don't need the '.' when you add your extensions
  69. }
  70. IEnumerator LoadFile(string path)
  71. {
  72. WWW www = new WWW("file://" + path);
  73. print("loading " + path);
  74. AudioClip clip = www.GetAudioClip(false);
  75. while(!clip.isReadyToPlay)
  76. yield return www;
  77. print("done loading");
  78. clip.name = Path.GetFileName(path);
  79. clips.Add(clip);
  80. }
  81. }

Couple of notes:

  1. You might ask, why use create a DirectoryInfo and then call GetFiles on that, instead of just directly go Directory.GetFiles(path)? Well, the latter one will return the paths of the files in pathrelative to path and NOT the full path (which is what you'll need to pass into WWW). i.e. if you do Directory.GetFiles("Assets"); it will return, (for example) a string array of { "Assets/soundFile1.wav", "Assets/soundFile2.ogg", etc } - these paths are relative to "Assets" while the full path would be "E:\Dropbox\UnityStuff\MyProject...\soundFile.wav"

  2. MP3s won't work in a PC build (haven't tried wav, but it should work) see this for more info. If you want MP3s, you have to go for something more complex, like MP3Sharp,NAudio and others.

  3. If you want to search recursively, change your GetFiles() call to GetFiles("*.*", SearchOption.AllDirectories)

EDIT:

JS, as per your request

  1. import UnityEngine;
  2. import System.Collections.Generic;
  3. import System.IO;
  4. import System.Linq;
  5. public enum SeekDirection { Forward, Backward }
  6. public var source : AudioSource;
  7. public var clips : List.<AudioClip> = new List.<AudioClip>();
  8. @HideInInspector @SerializeField private var currentIndex : int = 0;
  9. private var soundFiles : FileInfo[];
  10. private var validExtensions : List.<String> = new List.<String> ([ ".ogg", ".wav" ]);
  11. private var absolutePath : String = "./"; // relative path to where the app is running
  12. function Start()
  13. {
  14. //being able to test in unity
  15. if (Application.isEditor)
  16. absolutePath = "Assets/";
  17. if (source == null)
  18. source = gameObject.AddComponent.<AudioSource>();
  19. ReloadSounds();
  20. }
  21. function OnGUI()
  22. {
  23. if (GUILayout.Button("Previous")) {
  24. Seek(SeekDirection.Backward);
  25. PlayCurrent();
  26. }
  27. if (GUILayout.Button("Play current")) {
  28. PlayCurrent();
  29. }
  30. if (GUILayout.Button("Next")) {
  31. Seek(SeekDirection.Forward);
  32. PlayCurrent();
  33. }
  34. if (GUILayout.Button("Reload")) {
  35. ReloadSounds();
  36. }
  37. }
  38. function Seek(d : SeekDirection)
  39. {
  40. if (d == SeekDirection.Forward)
  41. currentIndex = (currentIndex + 1) % clips.Count;
  42. else {
  43. currentIndex--;
  44. if (currentIndex < 0) currentIndex = clips.Count - 1;
  45. }
  46. }
  47. function PlayCurrent()
  48. {
  49. source.clip = clips[currentIndex];
  50. source.Play();
  51. }
  52. function ReloadSounds()
  53. {
  54. clips.Clear();
  55. // get all valid files
  56. var info = new DirectoryInfo(absolutePath);
  57. soundFiles = info.GetFiles()
  58. .Where(function (f) { return IsValidFileType(f.Name); } )
  59. .ToArray();
  60. // and load them
  61. for(var s in soundFiles)
  62. StartCoroutine(LoadFile(s.FullName));
  63. }
  64. function IsValidFileType(fileName : String) : boolean
  65. {
  66. return validExtensions.Contains(Path.GetExtension(fileName));
  67. }
  68. function LoadFile(path : String)
  69. {
  70. var www = new WWW("file://" + path);
  71. print("loading " + path);
  72. var clip = www.GetAudioClip(false);
  73. while(!clip.isReadyToPlay)
  74. yield www;
  75. print("done loading");
  76. clip.name = Path.GetFileName(path);
  77. clips.Add(clip);
  78. }


[출처] http://answers.unity3d.com/questions/652919/music-player-get-songs-from-directory.html

반응형
Posted by blueasa
, |
App initially starts:
  • OnApplicationFocus(true) is called
App is soft closed:
  • OnApplicationFocus(false) is called
  • OnApplicationPause(true) is called
App is brought forward after soft closing:
  • OnApplicationPause(false) is called
  • OnApplicationFocus(true) is called
Hope that helps


[출처] http://pjsmemo.tistory.com/34

반응형
Posted by blueasa
, |

- Unity 5.3 기준 처음보는 Custom Coroutine 이 추가돼 있길래 남겨 놓음

  = WaitWhile()

  = WaitUntil()


Among all the shiny new features, there is a tiny one line in the Unity 5.3 release notes for a feature that I found useful and I think you will too. Custom coroutines, namely the new CustomYieldInstruction class, mean that you can now add your own coroutine yield operations in a very simple way. So let’s take a look at a real world example.

A real world example – A bugfix

I was recently investigating a bug in the UI Dropdown component, a Unity 5.2 feature. When Time.timescale was set to 0, the Dropdown component would only work once, then it would not reappear until timescale was set back to a non-zero value.

After a bit of debugging, we found out that the problem is in the Show function.

2

m_Dropdown is not null and is preventing the Dropdown from being shown.

Once shown, the m_Dropdown component is minimised and then destroyed. Well, it should be destroyed, but when the timescale is 0, this is not happening.

Take a look at the destroy function and see if you can spot the problem.

1

The title of this article may have given it away, but WaitForSeconds is the answer. WaitForSeconds uses scaled time. This means that if you tell WaitForSeconds to wait for 1 second and the timescale is 0.5, then you actually wait for 2 seconds (1 / 0.5 = 2). So using WaitForSeconds with a timescale of 0 means that you wait indefinitely (until the timescale is not 0). The Dropdown was never being destroyed after its first use, because we would get held up by the WaitForSeconds yield instruction.

The solution

We need to wait using unscaled time; the most elegant approach here is to add a new yield operation, a WaitForSecondsRealtime class. Clearly, if our own developers do not realise WaitForSeconds uses scaled time, then we need to address this. WaitForSecondsRealtime  should help reinforce this message. We also need to update the docs for WaitForSeconds (we never mention scaled time!).

This is how I discovered the CustomYieldInstruction, recently added for creating new yield operations.

Adding a new yield operation is very simple, here is the solution to our problem.

3

Any custom yield operation needs to override the keepWaiting property and once we want the yield operation to continue, we just pass back false.

Here is how our fix now looks:

4

In our example, we grab the real time and just test against it each check. It doesn’t get much simpler than that – oh wait, it does, because we now also have the WaitUntil and WaitWhile yield instructions. With these, we can provide a delegate to be called for our yield instruction test.

Here is an alternative way to solve our problem, assuming we wanted a 5 second delay.

5

So, a simple feature, but with a lot of potential. I guess the lesson learned here is: Remember to read the release notes, you never know what useful features you might find! If you like the custom coroutines, you should take a look at UnityEvents, another favourite feature of mine that you may have missed.


[출처] http://blogs.unity3d.com/kr/2015/12/01/custom-coroutines/


[참조] http://tsubakit1.hateblo.jp/entry/2015/12/09/000000

반응형
Posted by blueasa
, |

ios는 상관없지만.. android의 경우 시간을 사용자 임의로 변경할 수 있기 때문에, 시간과 관련하여 컨텐츠의 변경이 필요할 경우 정확한 시간의 정보가 필요함.


이럴때, 미국 국립표준 연구소의 시간을 받아와서 사용하는 방법이 있다.


출처는 - http://stackoverflow.com/questions/6435099/how-to-get-datetime-from-the-internet 요기

실제 수정해서 사용한 코드는 다음과 같음.

TcpClient tcpClient = new TcpClient("time.nist.gov", 13);

StreamReader sr = new StreamReader(tcpClient.GetStream());


// 형태 57486 16-04-08 08:53:18 50 0 0 737.0 UTC(NIST) * 

string readData = sr.ReadToEnd();

// 형태 16-04-08 08:57:07

string _time = readData.Substring(readData.IndexOf(" ") + 1, 17);


// 대한민국은 UTC 기준 +9시간.

Datetime currentTime = Convert.ToDateTime(_time).AddHours(9);


// Debug.Log("현재 시간 : " + currentTime.ToString("yyyy-MM-dd HH:mm:ss"));


출처 : http://redccoma.tistory.com/128

반응형

'Unity3D > Script' 카테고리의 다른 글

[펌] OnApplicationFocus 와 OnApplicationPause 차이  (0) 2016.09.22
[펌] CUSTOM COROUTINES(Unity 5.3)  (0) 2016.07.21
[펌] 4. Coroutine 구현에 대해서 공부  (0) 2016.05.11
[펌] Root Motion in Legacy Animation  (0) 2016.03.28
BigNumber  (0) 2016.02.04
Posted by blueasa
, |

이전에 Coroutine을 사용했을때는 그냥 사용했는데.. 어디에 제대로 사용하는 것이 맞는것일까? 고민도 하구..
unityStudy 사이트에 너무 잘 설명해 놓은 글이 있어서 차라리 그 글을 한번 정독하면 큰 도움이 될것입니다
.

URL : 
[스크립팅] 코루틴(Coroutine) 기본 개념  활용 
두번째 해당 사이트는 영문입니다. : http://unitygems.com/coroutines/

아래는 백과사전 및 위 사이트에 대한 부분을 이해하기 위해 정리했습니다.


1.    동시 실행(협동) 루틴이라 불리 우는 Coroutine 정의

A.     호출 루틴과 피호출 루팅이 대등 관계를 유지하는 처리 절차.
부차적 프로그램의 수행이 완전히 끝나기 전에 제어가 호출 루틴으로 돌아가는 것이 동시 실행 과정이다. 그리고 제어가 부차적 프로그램으로 돌아 왔을 때는 중단된 부분부터 다시 수행이 계속 된다. 주종 관계를 갖지 않고 서로 호출하는 둘 이상의 모듈들.서브루틴의 제어 전달 개념과 유사한것. 각 호출에서 초기화되는 서브루틴과는 달리, 호출 시 관련된 모든 정보를 보존하는 능력을 갖는다. 그리고 다음에 다시 시작할 때에는 이전에 실행했던 다음부터 실행 할 수 있는 논리를 갖는다.

B.     프로그램에서 순서는 일반적으로 불려지는 쪽이 부르는 쪽에 속하고 있는 것이 대부분이지만 어느 쪽도 종속 관계가 아니라 대등한 관계로 서로 호출하는 것이다.
예를 들면, 게임 프로그램에서 각 플레이어 루틴은 서로 Coroutine 된다. 복수 프로세스 간에서 한정된 형태의 통신을 행하는 프로그램을 순차 제어로 실현한 것으로 볼 수 있다.

C.     C언어 등에서 일반적으로 사용하는 함수는 시작할 때 진입하는 지점이 하나 존재하고 함수가 모두 실행되거나,  return 구문에 의해서 종료되는 지점을 설정 할 수 있다.
이러한 함수를 서브 루틴(subroutine)이라 부르는데, 코루틴은 이를 더 일반화한 개념으로 진입하는 지점까지 여러 개를 가질 수 있는 함수를 의미. (서브 루틴도 코루틴의 한 종류)

D.     Coroutine 은 프로그램 상에서 보면 멀티 쓰레드와 비슷한 개념이다.
별도의 스택과 지역변수들을 가진 실행 중, 각자의 메모리 영역과 실행 명령 포인터를 가지고 있어
,
재개(Resume)와 양보(yield)가 가능한 구조로 되어 있다
.
중지(yield)하면 실제 프로그램(함수)는 종료되지 않고 위치를 대기시킨 후 값이 만들어지는 시점부터 다시 시작(resume) 할수 있다는 말이다.


2.    왜 필요한 것인가?

유니티에서 코루틴과 상호 작용하는 주체는 엔진이다
.
코루틴을 사용 할 때는 C#의 언어적인 기능을 익혀서 모든 것을 해결한다는 개념보다 스크립트에서 엔진이 가지는 기능을 활용하는 또 한가지의 관점으로 접근해야 한다
.
스크립트에서 StartCoroutine 함수를 통해 코루틴을 구동하면 코루틴은 첫 번째 데이터를 엔진에 전달하고 이 데이터를 분석한 엔진은 내부 루푸를 돌면서 필요한 때가 되면 다음 데이터를 전달하도록 코루틴을 다시 호출해 준다. 이때 엔진에 전달할 데이터가 정말 중요한데, 데이터들은 코루틴이 유니티 엔진에게 보내는 일종의 명령으로 생각하면 좋다
.


3.    자주 등장하는 조연 배우들…

A.     Yield 
Coroutine 
은 Yield 를 사용하여 중간에 제어권을 다른 함수에 넘겨주는 역할을 한다.
yield 를 사용하여 일정시간 대기 할 수 있는 함수도 있다
.
yield return new WaitForSecond(3.0f); 
3초  대기 후에 리턴을 해주는 순서다.  여기서 기본적인 추가 특징으로 update 함수상에서는 yield 문의 직접적인 사용이 금지가 됩니다.

B.     IEnumerator
(msdn) 
제네릭이 아닌 컬렉션을 단순하게 반복할 수 있도록 지원하는 인터페이스
우리말로 열거자 라고 하는데 , 데이터의 목록을 하나씩 넘겨 줄 때 사용되는 인터페이스 이다.
코루틴은 호출한 함수와 서로 상호작용하면서 진행하도록 설계되어 있습니다
.
코루틴은 자신을 호출한 함수에 데이터를 하나 넘겨주고 쉰다
.
받은 측에서는 데이터를 받고 나서 처리한 후에 코루틴에게 다음 데이터를 달라고 깨운다
.
쉬고 있던 코루틴은 일어나서 다시 데이터를 전달하고 .. 이를 계속 반복하는 구조로 동작한다
.
이런 작업에 적절한 인터페이스가 IEnumerator이며, C# 에서 코루틴을 사용할 때는 이를 사용한다
.
일반적으로 호출한 함수에게 데이터를 전달 할때, return 구문을 사용하게 되면 데이터를 전달하고 함수는 종료 된다.

C.     StartCoroutine 함수
IEnumerator 반환형을 받아 yield 이 만날 때 함수를 일시 정지하고, 다른 스크립트나 함수에게 활동을 넘긴다. 다시 말해 코루틴 함수를 구동하는 함수다.


4.    엔진이 제공하는 데이터들과 이를 수행하는 명령들.

A.     Yield return null : 다음 프레임까지 대기

B.     Yield return new WaitForSeconds(flat) : 지정된 초(float) 만큼 대기

C.     Yield return new WaitForFixedUpdate() : 다음 물리 프레임까지 대기

D.     Yield return new WaitForEndOfFrame() : 모든 렌더링 작업이 끝날 때 까지 대기

E.     Yield return StartCoroutine(string) : 다른 코루틴이 끝날 때 까지 대기

F.      Yield return new WWW(string) : 웹 통신 작업이 끝날 때까지 대기

G.     Yield return new AsyncOperation : 비동기 작업이 끝날 때 까지 대기 (씬로딩)

•null - the coroutine executes the next time that it is eligible

•WaitForEndOfFrame - the coroutine executes on the frame, after all of the rendering and GUI is complete

•WaitForFixedUpdate - causes this coroutine to execute at the next physics step, after all physics is calculated

•WaitForSeconds - causes the coroutine not to execute for a given game time period

•WWW - waits for a web request to complete (resumes as if WaitForSeconds or null)

•Another coroutine - in which case the new coroutine will run to completion before the yielder is resumed


5.    Coroutine 의 장점

A.     성능
yield return new WaitForSecond(3.0f); 
이라는 명령을 수행하면, 코루틴은 유니티 엔진에게 WaitForSeconds(3.0f) 라는 데이터를 보내고 쉬기 시작합니다.
코루틴이 없이 일반적으로 이를 구현한다면, Update 문에서 Time.deltaTime 을 사용하여 매 프레임마다 시간을 더해서 10초가 지났는지 감지해야 하는데, 프레임의 평균 소요 시간이 0.01초 라고 한다면 아이러니하게 10초 동안 대기 하기 위해 스크립트는Update 함수를 1000번 호출해야 합니다
.
특히 모바일 기기에서 코루틴의 활용은 성능 향상에 큰 영향을 미친다
.

B.     가독성
코루틴을 사용하면 읽기 좋은 코드가 만들어 진다. 같은 결과물을 나타내는 두개의 코드로 비교하면

//update 상에서 코루틴을 사용하지 않고 직접 구현시

public class UpdateTimer : MonoBehaviour {
    float accumulator = 0.0f;
    bool wait1Finished = false;
    bool wait2Finished = false;
    float waitTime1 = 1.0f;
    float waitTime2 = 2.0f;

    void Start() {
        Debug.Log ("Action Start!");
    }
    void Update () {
        accumulator += Time.deltaTime;
        if(!wait1Finished && !wait2Finished) {
            if(accumulator >= waitTime1) {
                Debug.Log ("Action1 End");
                wait1Finished = true;
                accumulator = 0.0f;  
            }
        } else if(wait1Finished) {
            if(accumulator >= waitTime2) {
                Debug.Log ("Action2 End");
                wait2Finished = true;
                accumulator = 0.0f;  
            }
        }
    }
}

//Start 
함수를 IEnumerator 로 선언시. (엔진이 자동으로 코루틴으로 실행해줌.
public class CoRoutineTimer : MonoBehaviour {
    float waitTime1 = 1.0f;
    float waitTime2 = 2.0f;   

    IEnumerator Start () {
        Debug.Log ("Action Start");
        yield return new WaitForSeconds(waitTime1);
        Debug.Log ("Action1 End");
        yield return new WaitForSeconds(waitTime2);
        Debug.Log ("Action2 End");
    }     
}


6.    특징 및 활용

A.     가장 많이 사용되는 건 WaitForSeconds 명령

멀티 쓰레드 프로그래밍의 Thread.Sleep 함수 처럼 원하는 시간 만큼 잘수 있다. 하지만 더욱 좋은 점은 엔진과 동일한 싱글 쓰레드로 돌아가기 때문에, 멀티 쓰레드 프로그래밍의 어려운 부분인 자원 관리 및 컨텍스트 스위칭(Context Switching)과 같은 다양한 고려 사항의 필요가 없음.

B.     두번째로 많인 사용하는 부분은 비동기 작업

웹에서의 데이터 수신, 씬 로딩과 같이 오래 걸리는 작업은 엔진에게 넘기고, 자신은 진행상황을 점검하면서 UI 처리만 수행하는 형태로 사용합니다.
아래와 같이 WWW 클래스가 대표적인 비동기 작업인데, 웹에서 데이터를 다운로드 받기 위해 스크립트는 엔진에게 www 클래스를 만들어 데이터를 받아올 URL과 함께 넘기고 자신은 쉰다
.
이를 받은 엔진은 비동기 처리를 위한 쓰레드를 생성하고, 네이티브 라이브러리를 사용하여 웹에 접속한  후 데이터를 다운로드 하면서 스크립트로부터 넘겨 받은 www 객체에 직장 상사에게 보고하듯 현재 진행상황을 저장해 둔다.(이 때 클래스의 레퍼런스를 넘겼기 때문에 다른 스크립트에서 진행상황을 읽어 들이는 것이 가능함
.)
엔진에서 다운로드가 끝나면 www 객체에는 완료 상황보고와 함께 받은 데이터가 저장되며, 엔진은 스크립트를 깨운다. 스크립트에서는 바로 그 떄부터 그것을 가지고 사용한다
.

//코루틴이 쉬는 동안 엔진은 열심히 다운로드 받고, Update 함수는 이를 보면서 열심히 진행상황을 로그에 남기는 예제임
.
public class WebBasic : MonoBehaviour {
    public string url;
    WWW www;
    bool isDownloading = false;

    IEnumerator Start()
    {
        www = new WWW(url);
        isDownloading = true;
        yield return www;
        isDownloading = false;
        Debug.Log ("Download Completed!");
    }

    void Update()
    {
        if(isDownloading)
            Debug.Log (www.progress); 
    }
}

//update 에서 이런 처리 부담스러워…프로그래스 바를 넣는식으로 변경하는 방법으로
..
public class WebAdvanced : MonoBehaviour {
    public string url;
    WWW www;

    IEnumerator Start()
    {
       www = new WWW(url);
       StartCoroutine("CheckProgress");
       yield return www;
       Debug.Log ("Download Completed!");
    }

    IEnumerator CheckProgress()
    {
        Debug.Log (www.progress);
        while(!www.isDone)
        {
            yield return new WaitForSeconds(0.5f);
            Debug.Log (www.progress);
        }
    }
}

C.     마지막으로 코루틴을 사용하여 작업을 원하는 대로 순차적으로 수행 할수 있다.

C#과 같은 고급 언어(High Level Language) 에서 지원하는 리플렉션(Reflection) 기능과 코루틴 기능이 혼합된 활용성에 있어서 백미라고 할수 있다
.
이의 활용 예를 위해 RPG 게임등에서 흔히 보이는 패턴인 A 와 B 중 하나를 선택하게 하는 다이얼로그를 띄운 후 , 사용자의 결정에 따라 A 를 선택하면 ActionA 를 수행하고  B 를 선택하면 ActionB를 수행하는 구문을 프로그래밍 할 때 이를 코루틴으로 구현하기 위해, 먼저 모든 행동을 코루틴으로 정의해 준다
.
그리고 각 행동들의 순서를 제어하는 코루틴을 만들어주고, 코루틴 안에서 행동들이 순차적으로 실행되도록 yield return new StartCoroutine 구문으로 차례대로 지정해 준다
.
첫번째 코루틴의 결과에 따라 다음 행동이 A 가 될지 B 가 될지 결정되므로, 첫 번째 결과 값을 string 변수로 지정하고, 변수 값을 StartCoroutine 에 넣으면 실시간으로 결과에 따른 해당 코루틴이 실시간으로 실행 된다. 아래는 실 구현 예제 


public class DialogExample : MonoBehaviour {
    bool showDialog = false;
    string answer = "";

    IEnumerator Start()
    {
        yield return StartCoroutine("ShowDialog");
        yield return StartCoroutine(answer);
    }

    IEnumerator ShowDialog()
    {
        showDialog = true;
        do
        {
            yield return null;
        } while(answer == "");
        showDialog = false;
    }

    IEnumerator ActionA()
    {
        Debug.Log ("Action A");
        yield return new WaitForSeconds(1f);
    }

    IEnumerator ActionB()
    {
        Debug.Log ("Action B");
        yield return new WaitForSeconds(2f);
    }
    void OnGUI()
    {
        if(showDialog)
        {
            if(GUI.Button(new Rect(10f, 10f, 100f, 20f), "A"))
            {
                answer = "ActionA";   
            } else if(GUI.Button(new Rect(10f, 50f, 100f, 20f), "B")) {
                answer = "ActionB";
            }
        }
    }
}

//
결과 값의 유효성을 강화하고 싶다면 아래와 같이 enum 를 보조적으로 사용하는 것도 좋은 방법이 될수 있다.

using UnityEngine;
using System.Collections;

public class DialogExampleEnum : MonoBehaviour {
    enum DialogActions {
        ShowDialog,
        ActionA,
        ActionB
    };

    bool showDialog = false;
    DialogActions action = DialogActions.ShowDialog;
    IEnumerator Start()
    {
        yield return StartCoroutine(action.ToString());
        yield return StartCoroutine(action.ToString());
    }

    IEnumerator ShowDialog()
    {
        showDialog = true;
        do
        {
            yield return null;
        } while(action == DialogActions.ShowDialog);
        showDialog = false;
    }
    IEnumerator ActionA()
    {
        Debug.Log ("Action A");
        yield return new WaitForSeconds(1f);
    }
    IEnumerator ActionB()
    {
        Debug.Log ("Action B");
        yield return new WaitForSeconds(2f);
    }
    void OnGUI()
    {
        if(showDialog)
        {
            if(GUI.Button(new Rect(10f, 10f, 100f, 20f), "A"))
            {
                action = DialogActions.ActionA;         
            } else if(GUI.Button(new Rect(10f, 50f, 100f, 20f), "B")) {
                action = DialogActions.ActionB;
            }
        }
    }
}
이러한 특징을 잘 홀용하면 AI 를 위한 유한상태 기계(Finite State Machine) 을 구현할 때에도 별도의 클래스를 만들지 않고 쉽게 코딩이 가능해 진다
.

D.     Coroutine 는 for 루프 내에서는 사용할 수 없지만, while 문이나 foreach 문에서는 사용이 가능하다.
IEnumerator Foo()
{
 while(someCondition)
 { 
   // 여기서 시간이 오래 걸리는 처리를 수행한다
.
   // 다음 프레임 전에 일시 정지
.
 }
}


*Tip : 이전부터 Debug.Log 을 사용하는 것을 꺼려 했다. 실제 빌드 후에 자동으로 사라지는 것이 아니기 때문에,
이 함수를 별도로 따로 빼서 클래스를 생성해서, 그 클래스를 직접 사용하는 편이 가장 좋다
.
http://answers.unity3d.com/questions/126315/debuglog-in-build.html

public static void Log (String method)
  {
       Debug.Log (method);
    }


[출처] http://kimseunghyun76.tistory.com/304

반응형
Posted by blueasa
, |
 

在Unity3D的Legacy动画系统中应用Root Motion

标签: unity3d动画Root Motion
 5591人阅读 评论(2) 收藏 举报
 分类:
 

目录(?)[+]

最近仔细比较了Unity3D目前版本中的两套动画系统:Legacy和Mecanim。Mecanim系统功能较之Legacy要强大很多,但是使用AnimatorController着实不方便(尽管使用AnimatorOverrideController可以避免重复编辑状态机),是因为游戏逻辑层面往往要用一个状态机或者类似的机制来控制角色的状态,而角色层面的状态逻辑和动画层面是无法一一对应的,两套复杂的状态机要配合起来。。。想想就觉得蛋疼啊!难怪很多朋友现在还在使用Legacy动画系统。Legacy动画系统其实功能也很全面了,包括Layer、过渡混合、上下身混合之类的功能完全能够胜任,而且控制起来就直接的多了。唯独Root Motion这个我很需要特性没有支持,本文就探讨一下如何在Legacy动画系统之上附加Root Motion功能,其实很简单大笑

何谓Root Motion

在不使用Root Motion的情况下,类似走、跑这样的位移控制是这样的:
  1. 请美术在导出动画时把位移去掉;
  2. 在程序代码里控制角色移动的速度,在播放动画的同时,计算其位移。
这种做法其实挺不科学的,程序控制的角色,只能当做一个质点来处理,并且大多数时候都是匀速运动,而动画中的角色的移动往往很难跟这个匹配。所以需要比较良好的计算和比较好的美术技巧才能避免角色“滑步”的现象。在“跑”这种快速移动这,滑步还比较好处理,如果是慢速移动。。。。再厉害的美术也爱莫能助了。这种情况下,最好还是使用Root Motion:
  1. 美术在导出动画的时候是附带位移的;
  2. 程序把动画的每一帧的位移是从动画中读取出来,再应用到角色上的,这样就能达到动画和位移的完美匹配了。

在Legacy中添加Root Motion功能

了解了Root Motion的概念之后,在Unity3D引擎中我们很简单就可以实现此功能了。Unity3D有一个统一的对象层次结构设计,这点非常赞,我们可以很简单找到角色的根骨骼,然后把其中的Transform变换读取出来,请见以下示例代码:
[csharp] view plain copy
 在CODE上查看代码片派生到我的代码片
  1. //-- 计算当前帧的Root Motion  
  2.             Vector3 rootPos = m_rootBone.localPosition;  
  3.             m_rootMotion = rootPos - m_lastRootPos;  
  4.             m_lastRootPos = rootPos;  
  5.             rootPos.x = 0;  
  6.             rootPos.z = 0;  
  7.             m_rootMotion.y = 0;  
  8.             m_rootBone.localPosition = rootPos;  
请注意,我们在后续的代码中要把m_rootMotion附加的角色对象上,所以m_rootBone的postion被reset了。
在读取了此帧的Root Motion,在可以把它应用到当前对象之上了:
[csharp] view plain copy
 在CODE上查看代码片派生到我的代码片
  1. //-- Apply Root Motion  
  2.     Vector3 nextPos = this.transform.position + m_rootMotion;  
  3.         this.transform.position = nextPos;  
另外,一个细节需要处理一下,在动画循环的那一帧,需要特殊处理一下。好的,看一下完整的源代码吧:
[csharp] view plain copy
 在CODE上查看代码片派生到我的代码片
  1. using UnityEngine;  
  2. using System.Collections;  
  3.   
  4. public class ApplyRootMotion : MonoBehaviour   
  5. {  
  6.     public Transform m_flagObject;  // 用来测试位置的一个对象  
  7.   
  8.     //-- Root Motion 控制变量  
  9.     Transform m_rootBone;  
  10.     Vector3 m_lastRootPos;  
  11.     Vector3 m_rootMotion;  
  12.     int m_lastAnimTime;  
  13.   
  14.     void Start ()   
  15.     {  
  16.         //-- 从SkinnedMeshRenderer中读取Root Bone  
  17.         SkinnedMeshRenderer skinMesh = this.gameObject.GetComponentInChildren<SkinnedMeshRenderer>();  
  18.         m_rootBone = skinMesh.rootBone;  
  19.   
  20.         //-- 变量初始化  
  21.         m_rootMotion = Vector3.zero;  
  22.         m_lastRootPos = m_rootBone.localPosition;  
  23.         m_lastAnimTime = 0;  
  24.     }  
  25.       
  26.     void Update ()   
  27.     {  
  28.         //-- Apply Root Motion  
  29.         Vector3 nextPos = this.transform.position + m_rootMotion;  
  30.         this.transform.position = nextPos;  
  31.   
  32.         //-- 测试代码:更新测试物体的位置  
  33.         Vector3 flagPos = m_flagObject.position;  
  34.         flagPos.x = nextPos.x;  
  35.         flagPos.z = nextPos.z;  
  36.         m_flagObject.position = flagPos;  
  37.   
  38.         //-- 测试代码:更新摄像机  
  39.         Camera.main.transform.LookAt(this.transform);  
  40.     }  
  41.   
  42.     void LateUpdate()  
  43.     {  
  44.         AnimationState animState = this.animation["walking"];  
  45.   
  46.         if ((int)animState.normalizedTime > m_lastAnimTime)  
  47.         {  
  48.             //-- 动画循环处理  
  49.             m_lastRootPos = m_rootBone.localPosition;  
  50.             m_rootMotion = Vector3.zero;  
  51.         }  
  52.         else  
  53.         {  
  54.             //-- 计算当前帧的Root Motion  
  55.             Vector3 rootPos = m_rootBone.localPosition;  
  56.             m_rootMotion = rootPos - m_lastRootPos;  
  57.             m_lastRootPos = rootPos;  
  58.             rootPos.x = 0;  
  59.             rootPos.z = 0;  
  60.             m_rootMotion.y = 0;  
  61.             m_rootBone.localPosition = rootPos;  
  62.         }  
  63.         m_lastAnimTime = (int)animState.normalizedTime;  
  64.     }  
  65. }  

最后是截图。。。好吧,静态图片看不出效果,可以下载完整Demo(请使用Unity 4.6版本打开),角色移动非常平滑,毫无滑步。

请移步百度网盘:http://pan.baidu.com/s/1o6kJsIe 密码:osoc


반응형
Posted by blueasa
, |

BigNumber

Unity3D/Script / 2016. 2. 4. 16:49

[파일]


BigNumber.cs


[출처]

기억안남..;;

소스 제작자 분을 찾습니다~ -ㅁ-;

반응형
Posted by blueasa
, |

GameObject.active = true;

  • StartCoroutine : OK
  • Coroutine Method : OK
  • StopAllCoroutine : OK
  • Invoke : OK
  • InvokeRepeating : OK
  • CancelInvoke : OK


GameObject.active = false;

  • StartCoroutine : Error
  • Coroutine Method : Stop (active 상태에서 돌고 있는 상태였다면 정지된다.)
  • StopAllCoroutine : OK
  • Invoke : OK
  • InvokeRepeating : OK
  • CancelInvoke : OK

** 결론

  • StartCoroutine 으로 코루틴 메소드를 열심히 돌리다가 해당 GameObject 의 active 가 꺼지면 돌던 코루틴 메소드는 정지되고 다시 active 가 켜지더라도 재실행되지 않는다.....
  • 코루틴을 많이 사용하는 로직(Async 로 돌리는 함수들..(WWW, ... 같은...))에서는 꼭 염두해 두어야 한다..
  • OnDisable() {} 에서 관련 처리를 해 주는게 좋다.
  • Invoke 관련은 GameObject 의 active 유무랑 관계없이 돌아간다..


출처 : http://limchaeng.tistory.com/34

반응형

'Unity3D > Script' 카테고리의 다른 글

[펌] Root Motion in Legacy Animation  (0) 2016.03.28
BigNumber  (0) 2016.02.04
임의시간 받아서 시간 표현하기  (0) 2015.10.28
Control ParticleSystem RenderQueue  (0) 2015.09.24
[공유] UnityBoot 프로젝트  (0) 2015.08.30
Posted by blueasa
, |