
들어가면서
socket.io
웹 환경에서는 클라이언트인 브라우저와 서버 간에 푸쉬나 실시간 데이터를 처리하는데 여러 가지 방법을 활용했습니다. 그중에 Ajax를 이용한 polling, Long polling과 Streaming의 특징은 다음 그림과 같이 비교할 수 있습니다.
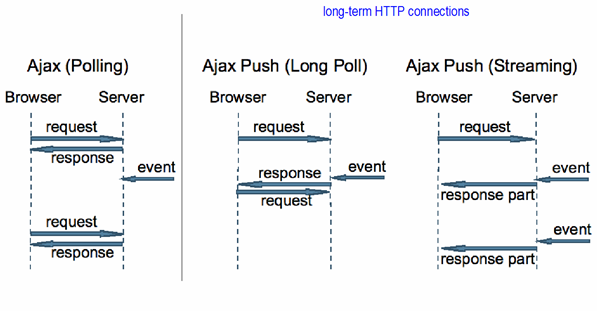
출처 : https://blogs.oracle.com/theaquarium/entry/slideshow_example_using_comet_dojo
위와 같은 방식을 활용하다가 나온 표준이 Websocket입니다. Websocket은 기존에 게임 개발자들이 활용하고 있던 TCP socket과 비슷하게 데이터를 주고 받을 수 있으며 Polling보다 자유롭게 데이터를 주고 받을 수 있게 되었습니다. Webocket에 대해 좀더 자세한 내용을 원하시면 여기 링크(https://ko.wikipedia.org/wiki/웹소켓) 를 참조 부탁드립니다. 하지만 이 좋은 Websocket의 단점은 지원하는 브라우저가 없을 수 있다는 점이 입니다. 이런 단점을 보완 하고자 브라우저와 상관 없이 웹에서 실시간으로 데이터를 처리 할수 있게 도와주는 것이 바로 socket.io입니다. socket.io(http://socket.io)는 Guillermo Rauch에의해 LearnBoost라는 회사가 개발했으며 MIT 라이선스의 오픈소스입니다.
socket.io는 WebSocket, FlashSocket, JSONP과 Long Polling을 하나로 묶어 브라우저에서 Websocket을 지원하지 않더라도 실시간 데이터처리를 돕습니다. 다양한 브라우저에서 데이터를 처리하기 위한 방법 뿐만 아니라 데이터를 주고 받기 위한 메세지 규약, 연결 유지를 위한 핑퐁 등과 같이 socket 연결을 위해 기본으로 구현해야할 부분까지 처리가 되어있기 때문에 서비스 개발자는 실시간 데이터 처리만 집중할 수 있습니다. socket.io의 프로토콜 정의는 링크 https://github.com/socketio/socket.io-protocol와 https://github.com/socketio/engine.io-protocol 참조 하시면 됩니다.
socket.io-Client
요 근래 게임에서도 실시간으로 데이터를 처리 하기 위해 Websocket을 많이 활용하는 추세 입니다. 왜냐하면 TCP socket보다 단순하게 구현할 수 있기 때문입니다. 실제로 Unity3d에서 WebGL로 빌드 할 때에도 데이터를 주고 받는 방법으로 Websocket을 이용하고 있습니다. socket보다 구현하기 쉬운 Websocket도 사실 데이터처리가 용의할 뿐 연결을 체결하거나 유지하는 등의 네트워크 레이어는 개발자가 직접 구현해야 합니다. 하지만 socket.io를 이용하면 연결과 기본적인 프로토콜이 구현되어 있기 때문에 개발자는 컨텐츠 데이터를 주고 받는데만 집중할 수 있습니다.
socket.io는 다양한 언어를 지원합니다. Javascript는 물론이고, Java, Swift와 CPP을 지원합니다. 지원하는 언어는 아래와 같습니다.
개발 하기까지
우리 회사에는 풋볼데이와 야구9단과 같은 웹 게임을 개발하면서 데이터를 push해주기 위해 socket.io를 이용했습니다. 기존의 socket.io구현체는 Node.js를 활용한 구현체 였지만 우리회사는 JAVA를 활용하여 대용량 트래픽 처리와 보안 인증을 추가한 플랫폼으로 구현했습니다. 해당 플랫폼을 사내 공용 플랫폼화 하여 웹 게임 뿐만 아니라 다른 서비스에도 적용하였고, 웹과 네이티브 앱간의 데이터 통신하는데 활용하고 있습니다.
기존의 socket.io 클라이언트 들은 다양한 네이티브 언어를 지원하고 있으나 게임개발에 많이 활용되고 있는 unity3d는 지원하지 않습니다. 우리는 우리의 플랫폼을 게임에도 활용하여 게임 개발자들에게 데이터 처리를 위해 네트워크를 개발하는 수고를 덜어주고 싶었습니다. 서버는 우리 회사의 플랫폼도 있고 오픈소스인 socket.io node.js용 서버도 있으니 클라이언트만 있다면 게임 개발자들도 쉽게 개발 할수 있을 것 같았습니다. 하지만 기존의 unity3d용 라이브러리들은 0.9버전이거나 유지 보수가 되지 않아서 우리가 직접 socket.io-Client Unity3D 라이브러리를 개발하게 되었습니다.
socket.io 사용법
실제로 Node.js + socket.io-Client Unity3D를 이용하여 구현된 샘플 코드를 살펴보면서 socket.io 사용법을 소개하겠습니다. 서버/클라이언트 코드로 구성되며 서버 코드는 socket.io 공식 홈페이지에서 발췌/변경하였습니다. socket.io 공식 홈페이지는 아래 링크를 확인해주세요.
socket.io 공식 홈페이지
추가로 Node.js로 직접 서버 코드를 실행해보고 싶으신 분들은 아래 링크를 참조하여서 서버 개발 환경 셋팅을 할 수 있습니다.
Node.js and Visual Studio Code End to End
예제를 구현하기 위한 소스는 아래 링크에서 찾아 보실 수 있습니다.
Connect to Server
첫번째 해야할 것은 역시나 컨넥션을 맺는 것입니다. 서버는 우선 HTTP 서버를 오픈해야합니다. 이는 socket.io 클라이언트가 최초엔 Polling 모드로 접속을 시도하도록 구현되어 있기 때문입니다.
var app = require('http').createServer(handler)
var fs = require('fs');
app.listen(4444);
function handler (req, res) {
fs.readFile(__dirname + '/index.html',
function (err, data) {
if (err) {
res.writeHead(500);
return res.end('Error loading index.html');
}
res.writeHead(200);
res.end(data);
});
}
var io = require('socket.io')(app);
io.on('connection', function (socket) {
console.log('Hello, socket.io~');
});
Socket.io가 시작되는 것은 'socket.io' 모듈을 가져올 때, 원샷에 처리가 됩니다. 이 때, 인자값으로 HTTP 서버의 인스턴스 (app 변수)를 추가해주면 HTTP 서버의 주소로 Socket.io가 Bind되면서 자동으로 Listen을 시작합니다. 이 때, 리턴하는 io 변수는 일종의 매니저 객체로써 이를 통해서 실제 세션에 해당하는 socket 객체를 획득할 수 있습니다. io.on() 메소드에서 'connection'이라는 이벤트를 핸들링하도록 구현했고, 클라이언트에서 컨넥션이 완료되었을 때, 콜백 함수를 통해서 socket을 획득할 수 있습니다. socket은 일종의 세션 객체라고 생각해도 무방합니다. socket을 통해서 앞으로 각종 패킷을 Send/Receive하게 됩니다.
using UnityEngine;
using socket.io;
namespace Sample {
public class Connection : MonoBehaviour {
void Start() {
var serverUrl = "http://localhost:4444";
var socket = Socket.Connect(serverUrl);
socket.On("connect", () => {
Debug.Log("Hello, socket.io~");
});
}
}
}
클라이언트는 socket.io.Socket 클래스의 Connect() 메소드를 호출합니다. 이 때 인자값으로 서버의 Url을 입력합니다. 접속이 성공하면, socket 변수를 리턴하고 서버와 동일하게 각종 패킷을 Send/Receive하게 됩니다. 예제 코드에서는 'connect' 이벤트를 캐치하여 웰컴 메세지를 출력하도록 구현해보았습니다.
Event 핸들링
socket.io는 Event 기반으로써 모든 통신의 처리는 'Event 등록 + Callback 함수 구현'의 형식으로 구현됩니다. Event를 Send하는 메소드는 Emit(), 그리고 Event를 Receive하는 메소드는 On()입니다. 아래 예제를 보면서 좀 더 자세히 살펴보겠습니다.
var io = require('socket.io')(app);
io.on('connection', function (socket) {
socket.emit('news', { hello: 'world' });
socket.on('my other event', function(data) {
console.log(data);
});
});
using UnityEngine;
using socket.io;
namespace Sample {
public class Events : MonoBehaviour {
void Start() {
var serverUrl = "http://localhost:4444";
var socket = Socket.Connect(serverUrl);
socket.On("news", (string data) => {
Debug.Log(data);
socket.Emit(
"my other event",
"{ \"my\": \"data\" }"
);
});
}
}
}
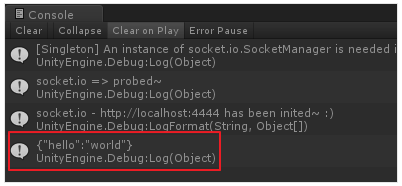
2개의 이벤트를 정의하여 서버와 클라이언트 간의 패킷 송수신을 구현했습니다. 서버는 'news' 이벤트를 Send하고 'my other event'를 Receive합니다. 클라이언트는 반대입니다.
실행 결과
- 서버
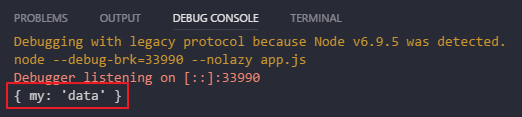
- 클라이언트
Emit() 메소드
Send를 담당하는 Emit() 메소드는 다음과 같은 형식을 같습니다.
public void Emit(string evtName, string data);
| evtName | data |
|---|
| 이벤트 이름 | 이벤트 데이터 (주로 Json 객체) |
On() 메소드
Receive를 담당하는 On() 메소드의 정의는 다음과 같습니다.
public void On(string evtName, Action<string> callback);
| evtName | callback |
|---|
| 이벤트 이름 | 이벤트 핸들러 함수 |
System Event
Emit()과 On() 메소드에서 선언한 이벤트 이름 중 일부 문자열은 시스템 예약어이므로 사용을 금지합니다. 서버 용 시스템 이벤트는 아래 링크에서 확인이 가능합니다.
[https://socket\.io/docs/server\-api/\]\(socket\.io Server API)
여기서는 클라이언트 용 시스템 이벤트만 정리해보겠습니다.
| 이벤트 이름 | 콜백 파라메터 | 비고 |
|---|
| connect | 없음 | 접속 완료 |
| connectTimeOut | 없음 | 시간 초과로 인한 접속 실패 |
| reconnectAttempt | 없음 | 재접속 시도 |
| reconnectFailed | 없음 | 재접속 실패 |
| reconnect | int (재접속 횟수) | 재접속 완료 |
| reconnecting | int (재접속 횟수) | 재접속 중 |
| connectError | Exception | 접속 실패 |
| reconnectError | Exception | 재접속 실패 |
콜백 파라메터를 기준으로 On() 메소드 호출 형식이 바뀌게 됩니다. 예를 들어 'reconnect' 이벤트를 핸들링하고 싶다면 다음과 같이 코드를 작성해야 합니다.
socket.On("reconnect", (int attempt) => {
    Debug.LogFormat("Reconnected after {0} trials, attempt);
});
Event Ack
이번엔 이벤트를 Send하고 이에 대한 응답을 Receive하는 방법을 알아보겠습니다.
var io = require('socket.io')(app);
io.on('connection', function (socket) {
socket.on('ferret', function (name, fn) {
fn('woot');
});
});
using UnityEngine;
using socket.io;
namespace Sample {
public class Acks : MonoBehaviour {
void Start() {
var serverUrl = "http://localhost:4444";
var socket = Socket.Connect(serverUrl);
socket.On("connect", () => {
socket.Emit(
"ferret", "\"toby\"",
(string ackData) => { Debug.Log(ackData); }
);
});
}
}
}
앞서 소개한 Event 핸들링 예제와 달라진 점은 클라이언트 코드에서 Emit() 메소드에 3번째 인자로 콜백을 추가한 것입니다. 이렇게 호출하게 되면 Ack 모드로 Emit() 메소드가 동작하게 됩니다. 위의 예제에서는 서버 코드에서 Ack 메시지로 'woot' 문자열을 리턴하였고, 클라이언트는 Ack 콜백에서 'woot' 문자열을 인자값으로 받게 됩니다.
Namespace
하나의 소켓을 논리적인 처리 단위로 구분할 수 있습니다. Multiplexing이라고도 불리는 이러한 패턴을 통해서 하나의 커넥션(소켓 인스턴스)에서 여러 개의 독립적인 코드를 개발할 수 있습니다.
var io = require('socket.io')(app);
var chat = io
.of('/chat')
.on('connection', function (socket) {
chat.emit('a message', { everyone: 'in', '/chat': 'will get' });
socket.emit('a message', { that: 'only', '/chat': 'will get' });
});
var news = io
.of('/news')
.on('connection', function (socket) {
socket.emit('item', { news: 'item' });
});
using UnityEngine;
using socket.io;
namespace Sample {
public class Namespace : MonoBehaviour {
void Start() {
var serverUrl = "http://localhost:4444";
var news = Socket.Connect(serverUrl + "/news");
news.On("connect", () => {
news.Emit("woot");
});
news.On("a message", (string data) => {
Debug.Log("news => " + data);
});
news.On("item", (string data) => {
Debug.Log(data);
});
var chat = Socket.Connect(serverUrl + "/chat");
chat.On("connect", () => {
chat.Emit("hi~");
});
chat.On("a message", (string data) => {
Debug.Log("chat => " + data);
});
}
}
}
서버는 of() 메소드를 통해서 네임스페이스를 선언합니다. 클라이언트는 단순히 Url에 주소를 추가하는 것으로 선언이 가능합니다. 위 예제에선 "http://localhost:4444/chat"과 "http://localhost:4444/news"와 같이 chat과 news 네임스페이스를 선언하였습니다. 그 외에 나머지는 일반적인 이벤트 핸들링과 동일합니다.
실행 결과
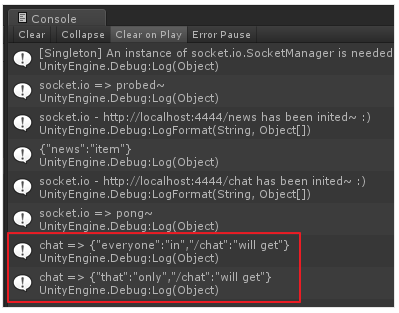
위 예제의 포인트는 클라이언트 코드에서 chat과 news이 모두 'a message' 이벤트를 등록하였지만 오직 chat 소켓만이 'a message' 이벤트를 핸들링하게 되는 점입니다. 네임스페이스로 구분하여 이벤트명을 중복하여 사용하는 것이 가능하다라는 것을 시사하며 이를 통해서 채널 혹은 컨텐츠 개발 스코프마다 각각 네임스페이스르 할당해서 작업한다면 하나의 소켓 컨넥션 안에서도 이벤트 이름의 충돌없이 코드 작성이 가능하게 됩니다.
결론
오랫동안 게임 개발에서는 Socket을 이용한 네트워크를 구현해 왔습니다. 하지만 socket을 이용하여 데이터를 주고 받기 위해서는 네트워크의 연결 유지와 데이터 전송을 위해 너무 많은 노력이 필요합니다. 게임 개발에 있어서 어려운 네트워크 구현을 빼고 컨텐츠 개발에 힘을 쓴다면 더 좋은 게임이 나올 것이라 생각됩니다. 더욱이 웹과 같은 다양한 플랫폼을 지원 하는 게임을 개발하는데 있어 네트워크 레이어마다 개발을 해야한다면 좀더 좋은 게임을 개발할 수 있는시간을 빼앗기게 됩니다. 그래서 우리는 게임 개발자들이 데이터 통신에 많은 시간을 투자하지 않고 게임을 개발 할수 있도록 socket.io를 위한 Unity3d를 MIT라이선스로 공개하기로 했습니다. socket.io-client-unity3d를 활용하여 좀더 컨텐츠 개발에 시간을 투자하고, 하나의 서버 플랫폼을 이용해 다양한 클라이언트 플랫폼을 지원 하는데 도움이 되었으면 좋겠습니다.
해당 라이브러리에 관심이 있으신분들은 https://github.com/nhnent/socket.io-client-unity3d에서 확인 하실 수 있습니다. 또한 참여하시고 싶으신 분들은 https://github.com/nhnent/socket.io-client-unity3d/blob/master/CONTRIBUTING.md를 참조하셔서 참여하여 주시면 감사하겠습니다.
[출처]
https://meetup.toast.com/posts/112
[추가]
socket.io v2.x에서 수정해야 될 내용
https://github.com/nhnent/socket.io-client-unity3d/commit/48b1fb6e743ff2228942a6e08f2eb9a73e1ff2a0
[추가2]
socket.io https 대응 (출처: shmhlove)
https://github.com/shmhlove/Asgardium_Client/tree/develop/Assets/Plugins/socket.io


