using System.IO;
using UnityEngine;
using UnityEditor;
using UnityEditor.iOS.Xcode;
using UnityEditor.Callbacks;
using System.Collections;

public class XCodeSettingsPostProcesser
{

    [PostProcessBuild]
    public static void OnPostprocessBuild(BuildTarget buildTarget, string pathToBuiltProject)
    {
        // Stop processing if targe is NOT iOS
        if (buildTarget != BuildTarget.iOS)
        {
            return;
        }

            /// Initialize PbxProject
            var projectPath = PBXProject.GetPBXProjectPath(pathToBuiltProject);
            PBXProject pbxProject = new PBXProject();
            pbxProject.ReadFromFile(projectPath);
            // Unity 2019 대응
#if UNITY_2019_3_OR_NEWER
            //string targetGuid = pbxProject.GetUnityFrameworkTargetGuid();
            string strMainTargetGuid = pbxProject.GetUnityMainTargetGuid();
            string strFrameworkTargetGuid = pbxProject.GetUnityFrameworkTargetGuid();
#else
            string targetGuid = pbxProject.TargetGuidByName("Unity-iPhone");
#endif

        // Add push notifications as a capability on the target
        pbxProject.AddCapability(targetGuid, UnityEditor.iOS.Xcode.Custom.PBXCapabilityType.PushNotifications);

        // Apply settings
        File.WriteAllText(projectPath, pbxProject.WriteToString());
    }
}
3-1) 주의사항
기존 PBXProject는 UnityEditor.iOS.Xcode.PBXProject인데, 추가 된 플러그인을 사용하기 위해 UnityEditor.iOS.Xcode.Custom.PBXProject로 변경필요.
I manage to get it working by a C# script, but since this build setting need an.entitlementfile in your xcode project, first you will need to create a text file called[projectName].entitlementanywhere in your project with this content:
After that you just define the entitlementsFile variable for the script in the inspector window and you should now have the push notification activated by default when you build for iOS.
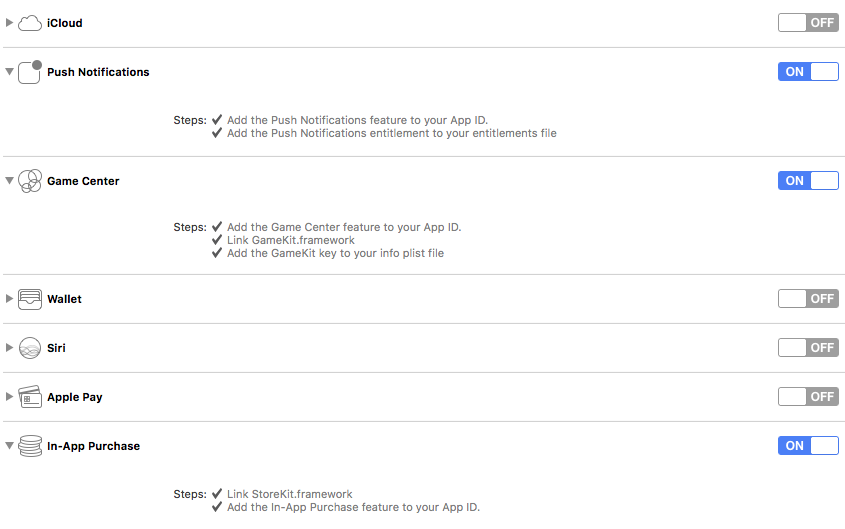
Unity에서 Firebase Cloud Messaging(FCM) 서비스 적용 후 빌드 시, 애플로부터 Missing Push Notification Entitlement 메시지를 받을 때가 있는데 어느 순간 부터 XCode에서 Capabilities-Push Notifications를 수동으로 ON 시켜줘야 된단다.
[참조]
7단계: 사용자 알림 프레임워크 추가
Xcode 프로젝트를 클릭한 후Editor area(편집 영역)에서General(일반)탭을 클릭합니다.
Linked Frameworks and Libraries(연결된 프레임워크 및 라이브러리)까지 아래로 스크롤한 다음+버튼을 클릭하여 프레임워크를 추가합니다.
나타나는 창에서UserNotifications.framework까지 스크롤하여 해당 항목을 클릭한 다음Add(추가)를 클릭합니다.
8단계: 푸시 알림 사용 설정
Xcode 프로젝트를 클릭한 후Editor area(편집 영역)에서Capabilities(기능)탭을 클릭합니다.
Push Notifications(푸시 알림)를 On(켜기)으로 전환합니다.
Background Modes(백그라운드 모드)까지 아래로 스크롤하고On(켜기)으로 전환합니다.
배포시 가장 큰 골치덩어리중 하나는 AndroidManifest.xml 파일 수정문제일 것이다. Android Plugin을 만들어서 넣자니 짜증나고... 그럴때 간단하게 AndroidManifest.xml 파일을 수정할 수 있는 방법을 공개한다.
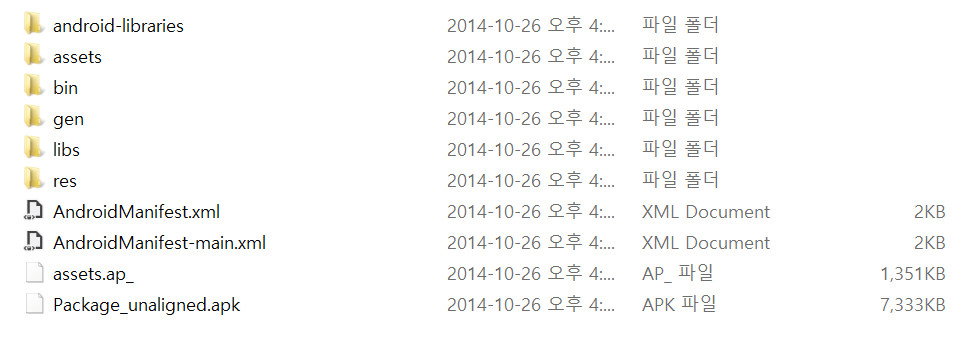
프로젝트 Root폴더에 보면 "Temp" 폴더가 생성되어 있을텐데 거길 가만히 보면 "StagingArea"라는 폴더가 보인다. 여기로 들어가면 다음과 같이 폴더가 구성되어 있다.
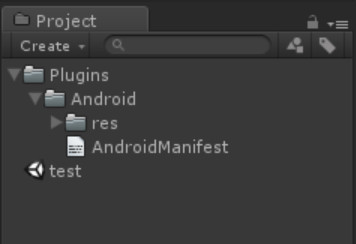
빌드에서 사용될 각종 Resource 파일들이 보일텐데 이중에 필요한건 AndroidManifest.xml 파일과 res 폴더 두개이다. 이 2개를 선택해서 CTRL+C 해서 복사하고 유니티로 돌아와서 "Plugins" 폴더를 만든다음 다시 "Android"폴더를 만들고 거기에 복사해 넣자.
이제 복사한 AndroidManifest.xml 파일을 열어서 마음대로 주무르면 됨. 끝!
Some years ago I was required to build a simple Cover Flow Layout (think, iTunes Carousel). Originally I build the project in a Windows Forms application for a client we were working with. Sometime later we then needed a similar system in a project we were doing in Unity3D.
This is just a simple recreation of that work.
Its very old, and it wasn’t originally done in GitHub so I’ve just commited the whole project in one commit.
There are some simple layouts included to demonstrate the flexibility of the system,
The classic Cover Flow layout (iTunes Album Artwork style)
A Carousel Layout (Z-Depth carousel)
A “Messy Paper” Layout - Cells shift from 1 messy pile to another
Further Features
Cell reuse is supported using a simple Cell Pool with UICollectionCells registering Prefabs as “nibs” to be reused.
Data “binding” can be expanded upon with the cell reuse.
All layouts have various settings to tweak positions, speeds, snapping, wrapping and the like. These can also be updated at runtime in the editor to see results in real time.
Demos
Here’s a few GIFs showing the layouts in action in the editor (GIFs are only at 30fps and appear to have bad artifacts in them, running in the editor is obviously at full FPS with no rendering issues).
Cover Flow Layout
Carousel Layout
Messy Paper Layout
Layouts can have multiple configurable elements, here’s an example of the Cover Flow properties being edited at runtime…
It forces to sample current state of animations. "Sample animations" means: put character in the position defined by animation states. Sampling always happens between Update and LateUpdate automatically, but in some cases you might want to sample animations yourself. My most common case: I want to put character in pose of first frame some specific animation on Start, so I would do something like this: