블로그 이미지
Every unexpected event is a path to learning for you. blueasa

카테고리

분류 전체보기 (2826)
Unity3D (876)
Script (92)
Extensions (16)
Effect (3)
NGUI (81)
UGUI (9)
Physics (2)
Shader (37)
Math (1)
Design Pattern (2)
Xml (1)
Tips (203)
Link (24)
World (1)
AssetBundle (25)
Mecanim (2)
Plugins (83)
Trouble Shooting (71)
Encrypt (7)
LightMap (4)
Shadow (4)
Editor (12)
Crash Report (3)
Utility (9)
UnityVS (2)
Facebook SDK (2)
iTween (3)
Font (18)
Ad (14)
Photon (2)
IAP (1)
Google (11)
URP (4)
Android (51)
iOS (46)
Programming (479)
Server (33)
Unreal (4)
Gamebryo (56)
Tip & Tech (236)
협업 (64)
3DS Max (3)
Game (12)
Utility (140)
Etc (98)
Link (32)
Portfolio (19)
Subject (90)
iOS,OSX (52)
Android (16)
Linux (5)
잉여 프로젝트 (2)
게임이야기 (3)
Memories (20)
Interest (38)
Thinking (38)
한글 (30)
PaperCraft (5)
Animation (408)
Wallpaper (2)
재테크 (19)
Exercise (3)
나만의 맛집 (3)
냥이 (10)
육아 (16)
Total
Today
Yesterday

Git : https://github.com/aws/aws-sdk-unity

http://aws.amazon.com/ko/mobile/sdk/

위 페이지에 들어가면 아래와 같이 Unity버전 AWS SDK를 다운로드 받을수있습니다.

다운로드를 받아서 ZIP파일을 풀면

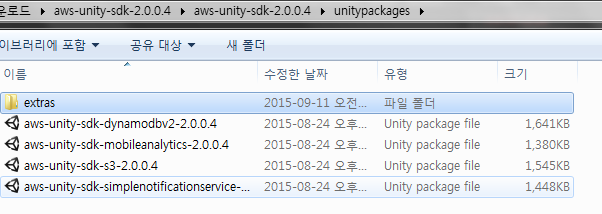
아래와 같이 서비스 별로 SDK가 분류되어있는 것을 확인할수있을텐데요.

우리는 여기서 extas에 있는 aws-unity-sdk-cognitosync-2.0.0.4.unitypackage를 실행시켜주어 import해주도록 하겠습니다.


Import가 완료되면 프로젝트 탐색창에서 AWSSDK\example\Congnito Sync에 있는 CognitoSyncManagerSample.unity을 실행하여 장면을 연뒤 Play를 눌러 샘플을 실행해보도록 합시다.

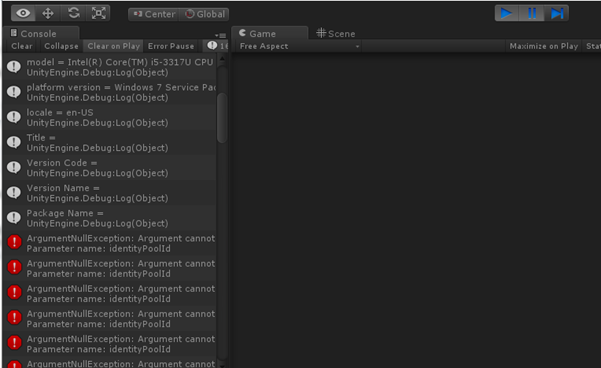
Play를 누르게 되면 위 그림과 같이 AgumentNullException이 발생하는데요.

Play를 중단시키고 Hierachy에서 CognitoSyncManagerSample오브젝트를 선택하면 나타나는 Component의 Identity Pool Id값을 채워주어야하는데요.

해당 PoolId값을 만들려면 우선적으로 aws에 샘플에서 사용할 identity pool을 생성하여야합니다.

https://console.aws.amazon.com/cognito/create/.

Aws에 가입되어있다면 위 링크를 통해 새로운 identity pool을 생성할수있습니다.

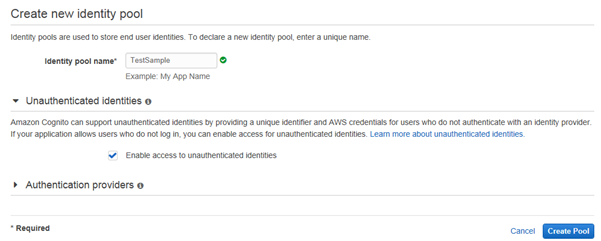
이름 같은 경우 원하는대로 작성해서 넣으시면 되고 해당 샘플을 테스트 해보려면 Unauthenticated identities에 있는 Enable access to unauthenticated identities을 체크해두어야합니다. (기본값은 체크가 해제되어있습니다.)

샘플의 추가적인 Facebook 연동을 테스트하려면 FacebookSDK도 설치되어있고 추가적인 세팅이 필요하니 이번 포스트에서는 다루지않도록 하겠습니다.


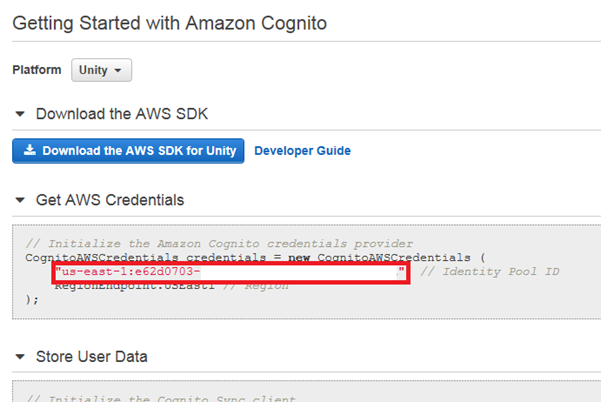
어쨌든 생성을 하고나면 위와 같은 페이지로 이동하는데요. 설정에서도 확인할수있지만 해당 페이지에서도 Identity Pool ID를 확인할수있습니다. 이를 복사한뒤에 Unity로 돌아와서 CognitoSyncManagerSample의 Identity Pool Id값을 채워주도록 합시다.


해당 값을 채운뒤 다시 Play를 누르게되면 에러가 뜨지 않고 아래와 같은 화면을 볼수있습니다.

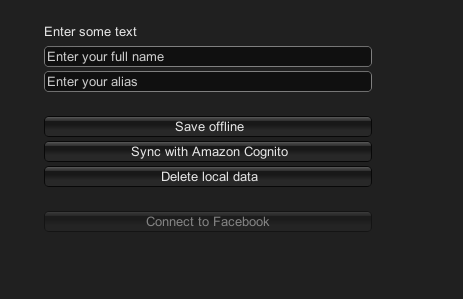
Full Name과 alias를 입력한뒤 Save offline을 누르면 단순히 기기내에 있는 cognito dataset에 저장을 합니다. 내부적으로는 아래와 같은 코드로 동작합니다.

playerInfo.Put("playerName"playerName);

playerInfo.Put("alias"alias);


playerInfo Dataset이라는 클래스로 선언이 되어있으며 이는 Put으로 특정 키와 값을 넣어줄수있습니다어플을 삭제하지않는 이상  값은 내부적으로 저장이 되도록 되어있습니다.


여기까지는 Unity에서 제공하는 PlayerPref 같은 기능을 하는것처럼 보입니다이번에는 Sync with Amazon Cognito버튼을 클릭해보도록 하겠습니다.
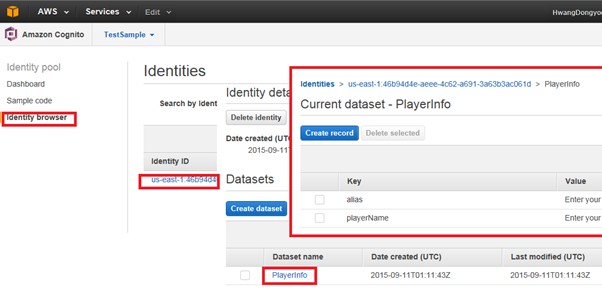
 

해당 버튼을 클릭하게 되면 내부적으로 비슷하게 Dataset Put해주는것까지는 Save offline 눌렀을때와 같지만 Put이후에 Dataset::Sychronize메서드를 호출해주어 AWS 있는 IdentityPool 저장해주도록 되어있습니다.


AWS Cognito Console 이동하여 Identity browser탭을 클릭하면 아래와 같이 cognito 통해 싱크된 사용자 데이터를 확인할수있습니다.


만약에 sychronize에서 문제가 생긴다면 Identity pool id 잘못되었거나 Unauthenticated identities에 있는 Enable access to unauthenticated identities을 체크를 하지않았는지 다시 한번 확인해보면 될것입니다.


출처 : http://lancekun.com/tc/200

반응형
Posted by blueasa
, |

해외에서 무료 푸시서비스로 개발자들에게 가장 추천받는 pushwoosh 서비스 연동 안내 방법(한글^^;)과 샘플코드입니다.

무료 푸시서비스를 검색하면 해외는 수십개가 나오는데 국내는 전무하네요... 암튼 앱개발자 분들 중

서버가 없거나 푸시서비스를 위하여 서버를 유지하기 어려운 경우에 사용하시면 좋습니다.


간단히 pushwoosh에 대해 말씀드리면 


- pushwoosh.com에서 제공하는 push 서비스로 사용이 무제한입니다.

 ( 단 다운로드 device가 1,000,000 이상인경우 부터는 유료버전을 사용해야 합니다.제가 만든 앱이 100만대 이상의 디바이스에 설치만 되면 ......쩝.. 그래서 전 그냥 완전 무제한이라 생각합니다. )

- 가입은 이메일 인증만 하면 됩니다.

- 이메일 계정당 5개의 앱을 관리 할 수 있습니다.

- 간단한 통계 정보를 보여줍니다.


기타 기능들은 많으나 여러 기능들을 사용하기 위해서는 유료버전을 사용하셔야 합니다. 그러나 해외에서 무료 푸시서버로 가장 추천을 많이 받는 서비스로 회사 또는 개인적으로 푸시서버를 유지하기 어려우신 분들은 한번 사용해보는 것도 나쁘지 않을 것 같습니다.


아래는 연동안내서와 네이티브 연동 코드 샘플입니다. 샘플코드는 applusform.com의 앱템플릿과 연동하는 코드도 몇 줄 있으나 대부분 네이티브코드인 관계로 개발자라면 쉽게 코드를 이해하실 꺼라 생각합니다.


http://www.applusform.com/down/Pushwoosh.pdf  [연동안내서]

http://www.applusform.com/down/Pushwoosh.zip  [연동안내서 + 샘플코드 (android, iOS)]


그럼 쉬운 앱개발 템플릿을 제공하는 ApplusForm 이었습니다~~ ^^;


[출처] http://www.androidpub.com/2552814

반응형

'Unity3D > Plugins' 카테고리의 다른 글

[펌] GPGS  (1) 2016.03.08
[펌] AWS Cognito + Unity3d  (0) 2016.02.14
[에셋] 유니티용 네트워크 엔진(넷드론)  (0) 2016.01.04
[에셋] Android Keyboard (with NGUI)  (0) 2015.12.23
[링크] Live2D 적용 및 튜토리얼  (0) 2015.12.17
Posted by blueasa
, |
안녕하세요. 오리진 스튜디오의 넷드론 엔진 개발자 입니다.
저는 과거 PC 온라인 게임을 몇번정도... 초기부터 상용화(MMORPG, TPS)를 시켜봤었습니다.

이러한 경험들을 바탕으로 모바일 환경(Unity Editor)을 위한 Real-Time Interaction을 구현 하였고, 완벽한 처리를 할수있는 구조의 네트워크 엔진을 개발하여 지난주 에셋스토어 검수를 통과하였습니다.

클라이언트: Unity Editor (Only C#)
서버: Linux + Eclipse (CentOS, Ubuntu, Gentoo ... , C/C++)

저희 포럼에 오시면 언제든지 넷드론 엔진에 대한 질문 및 토론이 가능합니다.
아직 위키에 올릴 기술문서들은 정리중이지만...
에셋스토어 패키지 안의 영문/한글 메뉴얼을 참고하시면 테스트 및 개발이 가능합니다.

저희 포럼의 다운로드 메뉴를 클릭하시어 무료 데모 버전 테스터를 실행해보세요.

채널/룸 에 대한 다중 처리, 주고 받는 최적화된 패킷 크기(NDP), Ping/Pong 속도 측정, 예외상황 처리, 모바일 테스트, 기타 등등... 많은 테스트를 진행할수 있으며 에셋스토어(NetDrone For Unity) 패키지 안 셈플들과 동일한 소스를 사용하였습니다.

* C#으로 제작된 클라이언트용 네트워크 엔진은 Poll을 사용하고 있으며 매우 빠른 반응 속도를 보여줍니다.
* C/C++로 제작된 서버용 네트워크 엔진은 Epoll을 사용하고 있으며 매우 안정적인 작동을 하게됩니다.
* 그외 게임 개발에 대한 고급 설계법 및 예제들을 포함하고 있어 많은 도움이 되실것이라 생각합니다.

에셋스토어: http://u3d.as/mzz


출처 : http://goo.gl/Xw3ZoH

반응형
Posted by blueasa
, |


[참조]

http://lab.gamecodi.com/board/zboard.php?id=GAMECODILAB_QnA_etc&page=1&sn1=&divpage=1&sn=off&ss=on&sc=on&select_arrange=headnum&desc=asc&no=3216


[링크]

 https://www.assetstore.unity3d.com/kr/#!/content/41707

반응형
Posted by blueasa
, |

[링크]


Unity3D :: Live2D 적용 및 튜토리얼 #1


Unity3D :: Live2D 적용 및 튜토리얼 #2


Unity3D :: Live2D 성능 이슈

반응형

'Unity3D > Plugins' 카테고리의 다른 글

[에셋] 유니티용 네트워크 엔진(넷드론)  (0) 2016.01.04
[에셋] Android Keyboard (with NGUI)  (0) 2015.12.23
Unity3D Debug console with color  (0) 2015.09.24
SVG Importer  (0) 2015.09.10
WebView 플러그인 Awesomium(HTML UI Engine)  (3) 2015.08.05
Posted by blueasa
, |

[Download]

Unity-3D-Debug-console-with-color.-master.zip


Link : https://github.com/kreso22/Unity-3D-Debug-console-with-color.

반응형
Posted by blueasa
, |

SVG Importer

Unity3D/Plugins / 2015. 9. 10. 14:18
[​IMG]
SVG Importer | Vector Graphics Plugin for Unity
http://www.svgimporter.com
Download on the Asset Store


Unity 4.6.0 and 5+ Compatible, fully cross-platform.

Easily drag and drop your SVG files directly in your scene. SVG importer fully mimics Unity native sprites so your team doesn't have to learn anything new. Extremely fast and simple workflow for rapid level design. Resolution independent graphics ready for retina displays and full support of the new Unity UI system.

SVG importer automatically converts SVG files into highly optimised meshes and does fully supports both linear and radial gradients.

Features
• Automatic colliders
• Frame by frame animation
• UI rendering & 9 slice
• Opaque rendering
• Transparent rendering
• Manual level of detail
• Depth compression
• Custom pivot point
• Drag & Drop
• Recolor artwork

What am I buying?
• Commercial license of SVG Importer
• Full source code access
• Complete project examples
• Software support
• Feature updates
• Video tutorials

SVG Importer fully Supports
• Simple & Complex shapes
• Holes
• Strokes
• Linear Gradients
• Radial Gradients
• Conical Gradients
• Symbols
• Clip Paths "experimental"

HTML 5 realtime demo:
http://svgimporter.com/demos/curves/

Documentation:

http://svgimporter.com/docs/SVG Importer - documentation.pdf

Release Trailer:

Unite Presenation:

Realtime Demo:

Short feature Preview:

Installation and Basics:


Animated Feature Gifs...


[​IMG][​IMG]
[​IMG][​IMG]

SVG Importer has been featured at:
Unite 2015 EUROPE


[​IMG]

Download on the Asset Store


출처 : http://forum.unity3d.com/threads/svg-importer-vector-graphics-unity-ui-supported-released.323618/

반응형
Posted by blueasa
, |

유니티에서 쓸 WebView를 찾아보다가 유료지만 괜찮아 보이길래 남겨 놓음.


수익이 $100k(대략 1억원) 이하면 Free 버전 써도 된다고 하니 나중에 한 번 건드려 봐야지..


[링크] http://www.awesomium.com/


[참조]

http://www.devkorea.co.kr/bbs/board.php?bo_table=m03_qna&wr_id=29578

http://labs.awesomium.com/unity3d-integration-tutorial-part-1/


반응형
Posted by blueasa
, |

Why doesn’t my particle system show in front of my sprites??

Particle System Sort LayerThis one had me befuddled for a little while. I could not figure out why my particle system was not showing up in front of my sprites for the life of me. I had the “Layer” set properly but I couldnot find a place to set the “Sorting Layer”. I came across some other folks who were saying you had to set the sorting layer manually in code so theparticle system would show up where it needed to (sorry, I can’t remember the references!). Okay, that seems easy enough, let’s see if we can figure that out. It looks like we can do that via the following code. The “sortingLayerName” is just a string of a sorting layer you have defined in Unity and the “sortingOrder” is an integer that specifies the z-order in that sorting layer. The higher the number, the closer the object “looks” to you.


1
2
particleSystem.renderer.sortingLayerName = sortingLayerName;
particleSystem.renderer.sortingOrder = sortingOrder;

So now let’s just make this into a script so we can easily apply it to all particle systems we create.

I put the following code into a file named “ParticleSystemFix.cs” and attached it to any particle systems I create.

1
2
3
4
5
6
7
8
9
10
11
12
13
14
15
16
using UnityEngine;
using System.Collections;
 
public class ParticleSystemFix : MonoBehaviour {
 
public string sortingLayerName;
public int sortingOrder;
 
/**
 */
void Start() {
    particleSystem.renderer.sortingLayerName = sortingLayerName;
    particleSystem.renderer.sortingOrder = sortingOrder;
    enabled = false;
  }
}

I’ll usually tell a script to disable itself once it is done initializing or if the code in the Update() function starts to be skipped because of a certain condition. I’m sure there has to be a slight performance advantage to doing this…every little bit helps.  Plus it lets me know if something is executing properly when I expect the script to become disabled.

Particle System Sort LayerNow, just attach this script to any particle system; there in the inspector, you can define a “sortingLayerName” and “sortingOrder” on the “ParticleSystemFix”.  I used a large number like 999 as my “sortingOrder” since I want my particle systems to appear on top of all my sprites.


Particle System Sort LayerMake sure that what you pass into the “sortingLayerName” is defined in Unity!

That is about it, as long as the “sortingLayerName” for your particle system is where it needs to be hierarchically, your particle system should appear on top of the sprites.


출처 : 

반응형
Posted by blueasa
, |

UnityToolbag

Unity3D/Plugins / 2015. 7. 20. 19:58


Link : https://github.com/nickgravelyn/UnityToolbag


UnityToolbag

This repo is a host for any little Unity scripts I write that are simple and easy for others to leverage. Each folder has its own README to explain the usage in more depth than here. All scripts are being written with Unity 5.0 and may or may not work in earlier versions.

Features

  • CacheBehaviour - A drop-in replacement for MonoBehaviour as a script base class that provides caching of all standard properties.
  • Dispatcher - Provides a mechanism for invoking code on the main thread from background threads.
  • DrawTitleSafeArea - Simple component you add to a camera to render the title safe area.
  • EditorTools - Misc tools for making it easier to build editor UI.
  • ExclusiveChildren - Helper script for managing objects in a hierarchy that represent mutually exclusive options (like a set of menu screens)
  • Future - Simple implementation of the future concept.
  • GameSaveSystem - A helper system for game saves to provide automatic backups and background thread processing along with better game save file paths.
  • ImmediateWindow - An editor window that allows executing manual C# snippets.
  • ScriptableObjectUtility - An editor class to help with creating ScriptableObject subclasses.
  • SimpleSpriteAnimation - A very basic system for a simpler frame based animation for Unity's 2D system.
  • SnapToSurface - Editor tools to assist in positioning objects.
  • SortingLayer - Tools for working with Unity's new sorting layers.
  • TimeScaleIndependentUpdate - Components to make it easier to continue animations whenTime.timeScale is set to 0 (i.e. paused).
  • UnityConstants - Tool for generating a C# script containing the names and values for tags, layers, sorting layers, and scenes.
  • UnityLock - Basic tool for locking objects in the scene to minimize accidental edits while working.

Usage

Simply clone the repository into the 'Assets' folder of a Unity project and you're good to go. If you're already using Git, you can use a submodule to check out into Assets without the Toolbag getting added to your repository.

Alternatively you can just cherry pick the features you want and copy only those folders into your project. Be careful, though, as some of the features may depend on others. See the individual feature README files to find out.

Any component types are exposed through the component menu under UnityToolbag:

ComponentMenu.png

Contributing

Feel free to contribute fixes, updates, or enhancements to the code via pull request. New tools or utilities are welcome provided they are useful to a variety of people. Please read the contribution guide for further details.

Shameless Plug

If you find any code in here to be useful and feel so inclined, you can help me out by picking up a copy of my company's first game Shipwreck. Absolutely not required (this code is free) but definitely appreciated. :)

반응형
Posted by blueasa
, |