

[Package] Unity Quick Search
Unity Quick Search
Search anything in Unity.
Search Providers
Using the shortcut Alt + ' or the Help -> Quick Search menu will bring out the Quick Search Tool. This extensible tool allows you to search over multiple area of Unity.
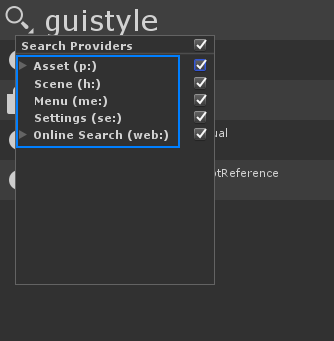
It is easy to add new search providers to the Quick Search Tool (see API section below), by default we ship with these SearchProviders:
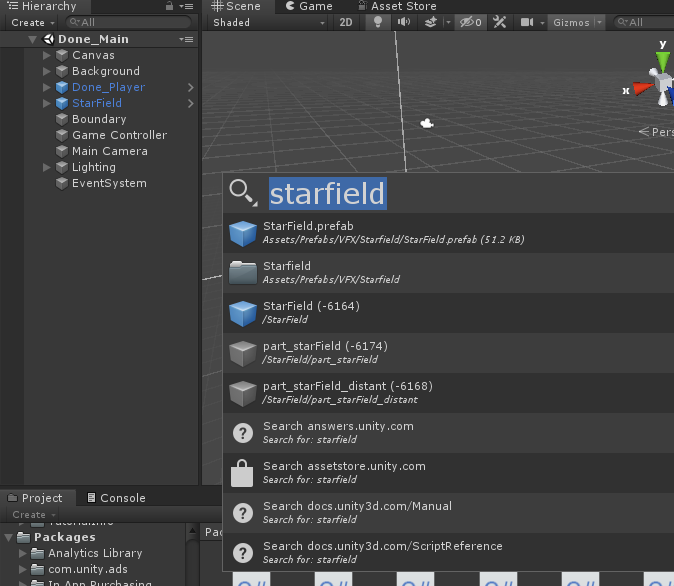
Assets
All assets in the current project are available for search. From an asset you can apply the following actions:
- Select the asset (in the Project browser)
- Open the asset (using an external editor if necessary)
- Show in Explorer (Finder)
Asset provider supports advance type filtering (Similar to Project Hierarchy):

Current Scene
All GameObjects in the current scene are available for search. Activating a scene item in the Quick Search tool will select the corresponding GameObject in the Scene.
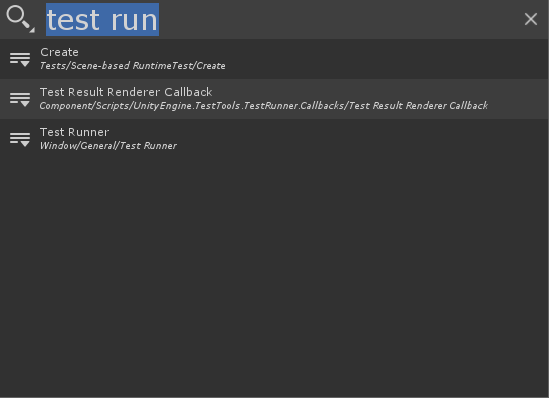
Menu
Each menu items in Unity is available for search. You can execute the menu item from the Quick Search Tool. This is especially useful to pop that elusive Test Runner or the Profiler!
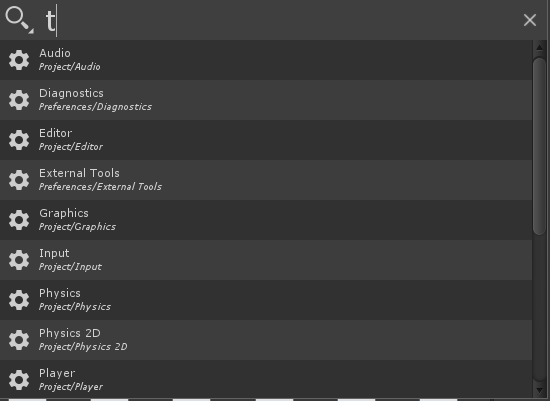
Settings
Each Project Settings or Preferences pages is available for search. The Quick Search Tool will open the Unified Settings Window at the required pages.
Online Search Providers
We have a SearchProvider that allows to search various Unity websites. Using this provider will open your default browser at a specific Unity page and perform a search and display some results. You can search the following websites and it is very easy to add new web search providers:
Keyboard Navigation
All the features of the Quick Search tool can be access using the keyboard:
- The Search box is always focused and you can type even with an element selected.
- Alt + Left Arrow : Toggle the Filter view
- Using Up Arrow, Down Arrow in the Filter view cycle between filters.
- Using spacebar toggle a filter

- Alt + Right Arrow brings the action menu

- Alt + Up Arrow or Alt + Down Arrow navigate through the search history:
Filters
There are 2 levels of filtering available in the Quick Search Tool:
Provider filters
Those filters define which providers are available for a search. This can help reduce the amount of items return by a search query especially if you know what type of item you are looking for.
Note that there are more specialized shortcuts to call the Quick Search Tool with a specific provider filter enabled:
- Alt + Shit + A : Assets only search
- Alt + Shit + M : Menu only search
- Alt + Shit + S : Scene only search
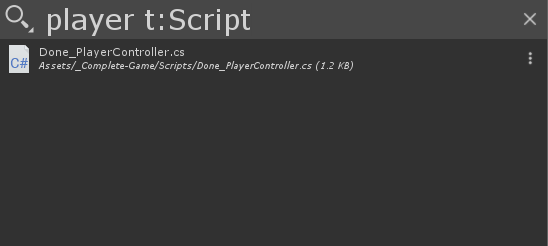
Provider text filters
From the Quick Search Box you can type a search provider search filter token that will restrain the search to specific providers. The search tokens are:
- Asset: p:
- Menu: me:
- Scene: h:
- Online Search: web:
Example of queries using text providers:
- p:Player : Search assets containing "Player"
- h:Main Camera : Search scene for GameObjects with "Main Camera" in their name
- me:Test Runner : Search menus item for Test Runner
- se:VFX : Search settings (project and preferences) for VFX

Provider specific filters
Some provider (i.e the Asset provider) supports specific filters:

As usual you can pass the same search tokens used by the project browser to a search query:
Last Search
When opening the Quick Search Tool using Alt + ` the state (and filters) of your previous search is preserved:
Drag and Drop
Asset items and Scene Items supports drag and drop from the QuickSearch window to anywhere that supports it (hierarchy view, game view, inspector, etc):
API
Creating new SearchProvider is fairly easy. It basically comes down to providing a function to fetch and search for items and to provide action handlers to activate any selected item.
SearchProvider
An SearchProvider manages search for specific type of items and manages thumbnails, description and subfilters. Its basic API is as follow:
public class SearchProvider
{
    public SearchProvider(string id, string displayName = null);

    // Create an Item bound to this provider.
    public SearchItem CreateItem(string id, string label = null, string description = null, Texture2D thumbnail = null);

    // Utility functions use to check if a search text matches a string.
    public static bool MatchSearchGroups(string searchContext, string content);
    public static bool MatchSearchGroups(string searchContext, string content, out int startIndex, out int endIndex);

    public NameId name;

    // Text filter key use to enable this Provider from the NameId search box
    public string filterId;
    // Functor used to fetch item description
    public DescriptionHandler fetchDescription;
    // Functor used to fetch thumbnail icon
    public PreviewHandler fetchThumbnail;
    // Functor used to execute a search query
    public GetItemsHandler fetchItems;
    // Functor use to check if an item is still valid
    public IsItemValidHandler isItemValid;
    // Sub filter specific to this provider
    public List<NameId> subCategories;
    // Called when QuickSearchWindow is opened allowing a provider to initialize search data.
    public Action onEnable;
    // Called when QuickSearchWindow is closed.
    public Action onDisable;
}
Note that since the UI of the NameId is done using a virtual scrolling algorithm some SearchItem fields (thumbail and description) are fetched on demand. This means the SearchProvider needs to be initialized with specific Handlers (fetchDescription, fetchThumbnail) if you want to populate those fields.
Registering an SearchProvider
Adding a new SearchProvider is just creating a function tagged with the [SearchItemProvider] attribute. This function must returns a new SearchProvider instance:
[SearchItemProvider]
internal static SearchProvider CreateProvider()
{
    return new SearchProvider(type, displayName)
    {
        filterId = "me:",
        fetchItems = (context, items, provider) =>
        {
            var itemNames = new List<string>();
            var shortcuts = new List<string>();
            GetMenuInfo(itemNames, shortcuts);

            items.AddRange(itemNames.Where(menuName =>
                    SearchProvider.MatchSearchGroups(context.searchText, menuName))
                .Select(menuName => provider.CreateItem(menuName, Path.GetFileName(menuName), menuName)));
        },

        fetchThumbnail = (item, context) => Icons.shortcut
    };
}
By default an SearchProvider must have a type (ex: asset, menu, scene...) that is unique among providers and a display Name (used in the Provider filter dialog).
Specifying a filterId is optional but it makes text based filtering easier (ex: p: my_asset).
Performing a search
The bulk of the provider work happens in the fetchItems functor. This is the function a provider creator must fulfill to do an actual search (and filtering). The fetchItems signature is:
// context: all the necessary search context (tokenized search, sub filters...)
// items: list of items to populate
// provider: the provider itself
public delegate void GetItemsHandler(SearchContext context, List<SearchItem> items, SearchProvider provider);
The SearchProvider must add new SearchItems to the items list.
An SearchItem is a simple struct:
public struct SearchItem
{
    // Unique id of this item among this provider items.
    public string id;
    // Display name of the item
    public string label;
    // If no description is provided, SearchProvider.fetchDescription will be called when the item is first displayed.
    public string description;
    // If no thumbnail are provider, SearchProvider.fetchThumbnail will be called when the item is first displayed.
    public Texture2D thumbnail;
}
Only the id is necessary to be filled.
When doing filtering according to SearchContext.searchText we recommend using the static function SearchProvider.MatchSearchGroup which makes partial search (and eventually fuzzy search) easy (see example above).
Asynchronous Search Results
If your search providers can take a long time to compute its results or rely on asynchronous search engine (ex: WebRequests) you can use the context.sendAsyncItems callback to populate search results asynchronously.
The SearchContext also contains a searchId that needs to be provided with the call to sendAsyncItems. This allows QuickSearch to know for which search those results are provided.
An example of using asynchronous search result would be:
new SearchProvider(type, displayName)
{
    filterId = "store:",
    fetchItems = (context, items, provider) =>
    {
        var currentSearchRequest = UnityWebRequest.Get(url + context.searchQuery);
        currentSearchRequest.SetRequestHeader("X-Unity-Session", InternalEditorUtility.GetAuthToken());
        var currentSearchRequestOp = currentSearchRequest.SendWebRequest();
        currentSearchRequestOp.completed += op => {

            var items = // GetItems from websearch

            // Notify the search about async items:
            // ensure to set the searchId you are providing result for!
            context.sendAsyncItems(context.searchId, items);
        };
    }
};
The QuickSearch package contains 2 examples with async results:
- com.unity.quicksearch/Editor/Providers/Examples/AssetStoreProvider.cs : which provide a way to query the asset store using WebRequest.
- com.unity.quicksearch/Editor/Providers/Examples/ESS.cs: which creates a thread to start the EntrianSource search indexer to provide full text search for assets in your project.
Registering an Action Handler
Actions can be register for a specific provider. These actions buttons will be drawn next to the SearchItem of the specified provider type:

Since registering an action handler is a different process than regisering a provider this means you can register new action handlers for existing providers (mind blown)!
Here is an example of how to register actions for the Asset provider:
[SearchActionsProvider]
internal static IEnumerable<SearchAction> ActionHandlers()
{
    return new[]
    {
        new SearchAction("asset", "select", Icons.@goto, "Select asset...")
        {
            handler = (item, context) =>
            {
                var asset = AssetDatabase.LoadAssetAtPath<Object>(item.id);
                if (asset != null)
                {
                    Selection.activeObject = asset;
                    EditorGUIUtility.PingObject(asset);
                    EditorWindow.FocusWindowIfItsOpen(Utils.GetProjectBrowserWindowType());
                }
            }
        },
        new SearchAction("asset", "open", SearchIcon.open, "Open asset... (Alt+Enter)")
        {
            handler = (item, context) =>
            {
                var asset = AssetDatabase.LoadAssetAtPath<Object>(item.id);
                if (asset != null) AssetDatabase.OpenAsset(asset);
            }
        },
        new SearchAction("asset", "reveal", SearchIcon.folder, "Show in Explorer")
        {
            handler = (item, context) =>
            {
                EditorUtility.RevealInFinder(item.id);
            }
        }
    };
}
Basically you create a function tagged with the [SearchActionsProvider] attribute. This function must returns an IEnumerable<SearchAction>.
An SearchAction describe and action and provide a handler to execute the action on a specific SearchItem
public class SearchAction
{
    public SearchAction(string providerType, string name, Texture2D icon = null, string tooltip = null);
    public ActionHandler handler;
    public EnabledHandler isEnabled;
}
providerType is the provider unique id for which you are registering the action.
ActionHandler is of the following signature:
// item: item that needs the action to be executed.
// context: search context of the SearchTool when the item is executed.
public delegate void ActionHandler(SearchItem item, SearchContext context);
An action can be setup with a isEnabled predicate that will decide if the action is available (i.e. enabled) for a specific item.
SearchService
The SearchService manages most of the persisted state of the Quick Search Tool and provider a global end point to access the filter.
The common usage of the SearchService forSearchProvider writer is to register a shortcut that will open the Quick Search Tool with a specific set of filter enabled:
[Shortcut("Window/Quick Search Tool/Assets", KeyCode.A, ShortcutModifiers.Alt | ShortcutModifiers.Shift)]
public static void PopQuickSearch()
{
    // Disable all filter
    SearchService.Filter.ResetFilter(false);

    // Enabled only the asset SearchProvider
    SearchService.Filter.SetFilter(true, "asset");

    // Disabled the packages sub filter
    SearchService.Filter.SetFilter(false, "asset", "a:packages");

    // Open the Quick Search Tool to allow a quick search of assets!
    SearchTool.ShowWindow();
}
[출처] https://docs.unity3d.com/Packages/com.unity.quicksearch@1.0/manual/index.html
Unity Quick Search | Package Manager UI website
Unity Quick Search Search anything in Unity. Search Providers Using the shortcut Alt + ' or the Help -> Quick Search menu will bring out the Quick Search Tool. This extensible tool allows you to search over multiple area of Unity. It is easy to add new sea
docs.unity3d.com
'Unity3D > Plugins' 카테고리의 다른 글
| [링크] Game Package Manager for Unity (by NHN) (0) | 2022.05.11 |
|---|---|
| [링크] Localization(AppName) (0) | 2022.04.05 |
| [링크] UniTask (0) | 2022.01.11 |
| [펌] Unity Timers (0) | 2021.10.20 |
| [펌] Unity Bezier Solution (0) | 2021.10.12 |


