


[Obfuscator] Rename : nameTranslation.txt
Unity 2021.3.37f1
Obfuscator 3.12.0
----
[추가] 2024-04-15
Android - Google Play Asset Delivery로 Build 시,
nameTranslation.txt 파일을 상대경로(파일명만)로 지정했을 때 제대로 생성하지 못하는 문제가 있어서 우회하도록 수정함.
BuildReport에서 주는 빌드파일 경로를 쓰지 않고, string.Format(@"{0}/..", Application.dataPath) 로 프로젝트 패스를 쓰도록 변경함.
해당 방식을 쓰기위해 Android 일 때만, Obfuscator의 OptionsManager.cs의 LoadAssetAtPath 함수를 아래와 같이 일부 수정했다.
using System.Collections.Generic;
using UnityEngine;
using UnityEditor;

namespace Beebyte.Obfuscator
{
    public class OptionsManager
    {
        ....

        private static Options LoadAssetAtPath(string path)
        {
            // [Android] nameTranslationFile Path 변경
            if (EditorUserBuildSettings.activeBuildTarget == BuildTarget.Android)
            {
                // Custom
                Options o = AssetDatabase.LoadAssetAtPath<Options>(path);
                if (o == null)
                {
                    return null;
                }

                // 옵션값 덮어쓰지 않도록 Clone해서 사용.
                var clone_o = Object.Instantiate(o);

                /// 현재 프로젝트 절대 경로(Application.dataPath/../)로 수정 반환
                // 파일명(Default:nameTranslation.txt)만 추출해서 저장
                string strnameTranslation = System.IO.Path.GetFileName(clone_o.nameTranslationFile);
                // 현재 프로젝트 Path 적용. 절대경로값 지정
                clone_o.nameTranslationFile = string.Format(@"{0}/../{1}", Application.dataPath, strnameTranslation);
                return clone_o;
            }
            // [iOS] 기존 방식
            else
            {
                // Original
                return AssetDatabase.LoadAssetAtPath<Options>(path);
            }
        }

        ....
    }
}
----
Obfuscator에 난독화 기능을 쓸 때,
난독화 전/후 Naming 매칭 리스트를 뽑아주는 옵션이 있다.(아래 스샷 참조)
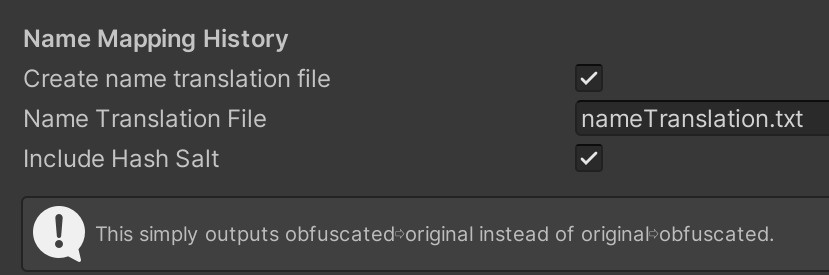
체크하면 기본 파일명이 nameTranslation.txt인데 빌드 할 때마다 덮어버리니 관리가 안돼서 빌드마다 별도로 만들어질 수 있도록 PostProcess로 파일명을 Rename 하도록 처리했다.
아래 소스를 프로젝트에 추가하면,
[Android] namteTranslation.txt 파일을 빌드 파일명에 매칭해서 자동으로 변경해준다.
ex) 빌드 파일명 : abc_v1.0.0.apk
변경되는 파일명 : abc_v1.0.0.apk_ namteTranslation.txt
[iOS] iOS는 빌드 시점에 파일명이 지정되는게 아니라서 별도의 조합으로 진행되도록 했다.
ex) abc_live_1.0.0(100)_20231206_183400_iOS_nameTranslation.txt
using System.IO;
using UnityEngine;
using UnityEditor;
using UnityEditor.Build;
using UnityEditor.Build.Reporting;
using UnityEditor.Callbacks;
using System;

/// <summary>
/// [PostProcess] Obfuscator : Rename nameTranslation.txt -> {BuildFileName.ext}_nameTranslation.txt
/// </summary>
public sealed class PostProcessBuild_Obfuscator_NameTransition_Renamer : IPreprocessBuildWithReport, IPostprocessBuildWithReport
{
    public int callbackOrder => 0;

    private static readonly string m_strNameTranslation_Src = "nameTranslation";    // Obfuscator 기본값
    private static readonly string m_strExt_txt = "txt";


    public void OnPreprocessBuild(BuildReport report)
    {
        // 1. ./BUILD_PATH/nameTranslation.txt 파일 유무 체크
        // 2. 있으면 - Delete(Clear)

        string strBuildPath = string.Empty;
        string strNameTranslation_txt_Src = string.Empty;

        switch (report.summary.platform)
        {
            case BuildTarget.Android:
                {
                    // 현재 프로젝트 Path 적용(절대경로 지정)
                    // [Obfuscator-OptionsManager.cs:line 140] 연관됨
                    strBuildPath = string.Format(@"{0}/..", Application.dataPath);
                    strNameTranslation_txt_Src = string.Format(@"{0}/{1}.{2}", strBuildPath, m_strNameTranslation_Src, m_strExt_txt);
                }
                break;

            case BuildTarget.iOS:
                {
                    strBuildPath = Path.GetDirectoryName(report.summary.outputPath);
                    strNameTranslation_txt_Src = string.Format(@"{0}/{1}.{2}", strBuildPath, m_strNameTranslation_Src, m_strExt_txt);
                }
                break;
        }

        if (true == File.Exists(strNameTranslation_txt_Src))
        {
            File.Delete(strNameTranslation_txt_Src);
            Debug.LogWarningFormat("[Delete] {0}", strNameTranslation_txt_Src);
        }
    }

    public void OnPostprocessBuild(BuildReport report)
    {
        Debug.LogWarningFormat("[OnPostprocessBuild][platform] {0} [pathToBuildProject] {1}", report.summary.platform, report.summary.outputPath);

        string strBuildPath = string.Empty;                 // 빌드 패스
        string strBuildFileName_with_Ext = string.Empty;    // 파일네임.확장자
        string strExt = string.Empty;                       // 확장자(.apk/.aab/.ipa)
        string strNameTranslation_txt_Src = string.Empty;   // [Src] nameTranslation.txt
        string strNameTranslation_txt_Dest = string.Empty;  // [Dest] nameTranslation.txt

        string strLunarConsole = "";
        if (true == LunarConsolePluginInternal.LunarConsoleConfig.consoleEnabled)
        {
            strLunarConsole = string.Format("_LunarConsole");
        }

        switch (report.summary.platform)
        {
            case BuildTarget.Android:
                {
                    // 현재 프로젝트 Path 적용(절대경로 지정)
                    // [Obfuscator-OptionsManager.cs:line 140] 연관됨
                    strBuildPath = string.Format(@"{0}/..", Application.dataPath);
                    //strBuildPath = Path.GetDirectoryName(report.summary.outputPath);
                    strBuildFileName_with_Ext = Path.GetFileName(report.summary.outputPath);
                    strExt = Path.GetExtension(report.summary.outputPath);  // .apk / .aab
                    strNameTranslation_txt_Src = string.Format(@"{0}/{1}.{2}", strBuildPath, m_strNameTranslation_Src, m_strExt_txt);

                    string strProductName = string.Format("{0}", Application.productName);
                    string strServer = string.Format("{0}", ClientSettings.ServerType.ToString());
                    string strVersion = string.Format("{0}", Application.version);
                    string strBundleVersionCode = string.Format("{0}", PlayerSettings.Android.bundleVersionCode);
                    string strDateTime = string.Format("{0}", DateTime.Now.ToString("yyyyMMdd_HHmmss", System.Globalization.CultureInfo.InvariantCulture));
                    string strPlatform = string.Format("{0}", report.summary.platform);

                    strNameTranslation_txt_Dest = string.Format(@"{0}/{1}_{2}_{3}({4})_{5}{6}_{7}{8}_{9}.{10}",
                                                                    strBuildPath,               // {0}
                                                                    strProductName,             // {1}
                                                                    strServer,                  // {2}
                                                                    strVersion,                 // {3}
                                                                    strBundleVersionCode,       // {4}
                                                                    strDateTime,                // {5}
                                                                    strExt,                     // {6}
                                                                    strPlatform,                // {7}
                                                                    strLunarConsole,            // {8}
                                                                    m_strNameTranslation_Src,   // {9}
                                                                    m_strExt_txt                // {10}
                                                                    );

                    #region OutputPath 기준 방식(Google Asset Delivery 대응 안됨)
                    //strBuildPath = Path.GetDirectoryName(report.summary.outputPath);
                    //strBuildFileName_with_Ext = Path.GetFileName(report.summary.outputPath);
                    //strNameTranslation_txt_Src = string.Format(@"{0}/{1}.{2}", strBuildPath, m_strNameTranslation_Src, m_strExt_txt);
                    //// Build File과 매칭하기 쉽도록
                    //// BuildFileName.ext_nameTranslation.txt 형태로 Dest 생성
                    //strNameTranslation_txt_Dest = string.Format("{0}/{1}_{2}.{3}", strBuildPath, strBuildFileName_with_Ext, m_strNameTranslation_Src, m_strExt_txt);
                    #endregion
                }
                break;

            case BuildTarget.iOS:
                {
                    /// iOS outputPath는 폴더만 있음(파일명.확장자는 없음.)
                    /// ex) [report.summary.outputPath] /User/{Users}/project_folder/build_folder

                    // ex) [Path.GetDirectoryName] /User/{Users}/project_folder
                    strBuildPath = Path.GetDirectoryName(report.summary.outputPath);
                    // ex) [Path.GetFileName] build_folder
                    strBuildFileName_with_Ext = Path.GetFileName(report.summary.outputPath);
                    //strExt = Path.GetExtension(report.summary.outputPath);  // .ipa   // empty
                    strExt = string.Format(".ipa"); // 직접 추가
                    strNameTranslation_txt_Src = string.Format(@"{0}/{1}.{2}", strBuildPath, m_strNameTranslation_Src, m_strExt_txt);

                    string strProductName = string.Format("{0}", Application.productName);
                    string strServer = string.Format("{0}", Anne.ClientSettings.ServerType.ToString());
                    string strVersion = string.Format("{0}", Application.version);
                    string strBuildNumber = string.Format("{0}", PlayerSettings.iOS.buildNumber);
                    string strDateTime = string.Format("{0}", DateTime.Now.ToString("yyyyMMdd_HHmmss", System.Globalization.CultureInfo.InvariantCulture));
                    string strPlatform = string.Format("{0}", report.summary.platform);

                    strNameTranslation_txt_Dest = string.Format(@"{0}/{1}_{2}_{3}({4})_{5}{6}_{7}{8}_{9}.{10}",
                                                                    strBuildPath,               // {0}
                                                                    strProductName,             // {1}
                                                                    strServer,                  // {2}
                                                                    strVersion,                 // {3}
                                                                    strBuildNumber,             // {4}
                                                                    strDateTime,                // {5}
                                                                    strExt,                     // {6}
                                                                    strPlatform,                // {7}
                                                                    strLunarConsole,            // {8}
                                                                    m_strNameTranslation_Src,   // {9}
                                                                    m_strExt_txt                // {10}
                                                                    );
                }
                break;
        }

        Debug.LogWarningFormat("[strNameTranslation_txt_Src] {0} [strNameTranslation_txt_Dest] {1}", strNameTranslation_txt_Src, strNameTranslation_txt_Dest);

        // 1. ./PROJECT_PATH/nameTranslation.txt 파일 유무 체크
        // 2. 있으면 - Rename : 해당 버전명 날짜/시간 파일명에 포함
        if (true == File.Exists(strNameTranslation_txt_Src))
        {
            File.Move(strNameTranslation_txt_Src, strNameTranslation_txt_Dest);
            Debug.LogWarningFormat("[Rename] {0} -> {1}", strNameTranslation_txt_Src, strNameTranslation_txt_Dest);
        }
        else
        {
            Debug.LogWarningFormat("[File Not Exists] {0}", strNameTranslation_txt_Src);
        }
    }
}'Unity3D > Plugins' 카테고리의 다른 글
| [Lunar Mobile Console - PRO] Actions and Variables Sample (0) | 2024.04.18 |
|---|---|
| [펌] AppIconChangerUnity - Change the app icon dynamically in Unity (iOS only) (0) | 2024.03.22 |
| [플러그인] GoogleMobileAds 8.6.0(with Unity2021) (0) | 2023.11.23 |
| [링크] iMessageStickerUnity (0) | 2023.08.07 |
| [에셋] Fast Script Reload (0) | 2023.06.13 |


