블로그 이미지
Every unexpected event is a path to learning for you. blueasa

카테고리

분류 전체보기 (2835)
Unity3D (883)
Script (93)
Extensions (16)
Effect (3)
NGUI (81)
UGUI (9)
Physics (2)
Shader (39)
Math (1)
Design Pattern (2)
Xml (1)
Tips (203)
Link (26)
World (1)
AssetBundle (25)
Mecanim (2)
Plugins (85)
Trouble Shooting (71)
Encrypt (7)
LightMap (4)
Shadow (4)
Editor (12)
Crash Report (3)
Utility (9)
UnityVS (2)
Facebook SDK (2)
iTween (3)
Font (18)
Ad (14)
Photon (2)
IAP (1)
Google (11)
URP (4)
Android (51)
iOS (46)
Programming (479)
Server (33)
Unreal (4)
Gamebryo (56)
Tip & Tech (188)
협업 (64)
3DS Max (3)
Game (12)
Utility (140)
Etc (99)
Link (32)
Portfolio (19)
Subject (90)
iOS,OSX (52)
Android (16)
Linux (5)
잉여 프로젝트 (2)
게임이야기 (3)
Memories (20)
Interest (38)
Thinking (38)
한글 (30)
PaperCraft (5)
Animation (408)
Wallpaper (2)
재테크 (19)
Exercise (3)
나만의 맛집 (3)
냥이 (10)
육아 (16)
Total
Today
Yesterday


image.png

들어가면서

socket.io

웹 환경에서는 클라이언트인 브라우저와 서버 간에 푸쉬나 실시간 데이터를 처리하는데 여러 가지 방법을 활용했습니다. 그중에 Ajax를 이용한 polling, Long polling과 Streaming의 특징은 다음 그림과 같이 비교할 수 있습니다.

image.png
출처 : https://blogs.oracle.com/theaquarium/entry/slideshow_example_using_comet_dojo

위와 같은 방식을 활용하다가 나온 표준이 Websocket입니다. Websocket은 기존에 게임 개발자들이 활용하고 있던 TCP socket과 비슷하게 데이터를 주고 받을 수 있으며 Polling보다 자유롭게 데이터를 주고 받을 수 있게 되었습니다. Webocket에 대해 좀더 자세한 내용을 원하시면 여기 링크(https://ko.wikipedia.org/wiki/웹소켓) 를 참조 부탁드립니다. 하지만 이 좋은 Websocket의 단점은 지원하는 브라우저가 없을 수 있다는 점이 입니다. 이런 단점을 보완 하고자 브라우저와 상관 없이 웹에서 실시간으로 데이터를 처리 할수 있게 도와주는 것이 바로 socket.io입니다. socket.io(http://socket.io)는 Guillermo Rauch에의해 LearnBoost라는 회사가 개발했으며 MIT 라이선스의 오픈소스입니다.

socket.io는 WebSocket, FlashSocket, JSONP과 Long Polling을 하나로 묶어 브라우저에서 Websocket을 지원하지 않더라도 실시간 데이터처리를 돕습니다. 다양한 브라우저에서 데이터를 처리하기 위한 방법 뿐만 아니라 데이터를 주고 받기 위한 메세지 규약, 연결 유지를 위한 핑퐁 등과 같이 socket 연결을 위해 기본으로 구현해야할 부분까지 처리가 되어있기 때문에 서비스 개발자는 실시간 데이터 처리만 집중할 수 있습니다. socket.io의 프로토콜 정의는 링크 https://github.com/socketio/socket.io-protocol와 https://github.com/socketio/engine.io-protocol 참조 하시면 됩니다.

socket.io-Client

요 근래 게임에서도 실시간으로 데이터를 처리 하기 위해 Websocket을 많이 활용하는 추세 입니다. 왜냐하면 TCP socket보다 단순하게 구현할 수 있기 때문입니다. 실제로 Unity3d에서 WebGL로 빌드 할 때에도 데이터를 주고 받는 방법으로 Websocket을 이용하고 있습니다. socket보다 구현하기 쉬운 Websocket도 사실 데이터처리가 용의할 뿐 연결을 체결하거나 유지하는 등의 네트워크 레이어는 개발자가 직접 구현해야 합니다. 하지만 socket.io를 이용하면 연결과 기본적인 프로토콜이 구현되어 있기 때문에 개발자는 컨텐츠 데이터를 주고 받는데만 집중할 수 있습니다.

socket.io는 다양한 언어를 지원합니다. Javascript는 물론이고, Java, Swift와 CPP을 지원합니다. 지원하는 언어는 아래와 같습니다.

개발 하기까지

우리 회사에는 풋볼데이와 야구9단과 같은 웹 게임을 개발하면서 데이터를 push해주기 위해 socket.io를 이용했습니다. 기존의 socket.io구현체는 Node.js를 활용한 구현체 였지만 우리회사는 JAVA를 활용하여 대용량 트래픽 처리와 보안 인증을 추가한 플랫폼으로 구현했습니다. 해당 플랫폼을 사내 공용 플랫폼화 하여 웹 게임 뿐만 아니라 다른 서비스에도 적용하였고, 웹과 네이티브 앱간의 데이터 통신하는데 활용하고 있습니다.

기존의 socket.io 클라이언트 들은 다양한 네이티브 언어를 지원하고 있으나 게임개발에 많이 활용되고 있는 unity3d는 지원하지 않습니다. 우리는 우리의 플랫폼을 게임에도 활용하여 게임 개발자들에게 데이터 처리를 위해 네트워크를 개발하는 수고를 덜어주고 싶었습니다. 서버는 우리 회사의 플랫폼도 있고 오픈소스인 socket.io node.js용 서버도 있으니 클라이언트만 있다면 게임 개발자들도 쉽게 개발 할수 있을 것 같았습니다. 하지만 기존의 unity3d용 라이브러리들은 0.9버전이거나 유지 보수가 되지 않아서 우리가 직접 socket.io-Client Unity3D 라이브러리를 개발하게 되었습니다.

socket.io 사용법

실제로 Node.js + socket.io-Client Unity3D를 이용하여 구현된 샘플 코드를 살펴보면서 socket.io 사용법을 소개하겠습니다. 서버/클라이언트 코드로 구성되며 서버 코드는 socket.io 공식 홈페이지에서 발췌/변경하였습니다. socket.io 공식 홈페이지는 아래 링크를 확인해주세요.
socket.io 공식 홈페이지

추가로 Node.js로 직접 서버 코드를 실행해보고 싶으신 분들은 아래 링크를 참조하여서 서버 개발 환경 셋팅을 할 수 있습니다.
Node.js and Visual Studio Code End to End

예제를 구현하기 위한 소스는 아래 링크에서 찾아 보실 수 있습니다.

Connect to Server

첫번째 해야할 것은 역시나 컨넥션을 맺는 것입니다. 서버는 우선 HTTP 서버를 오픈해야합니다. 이는 socket.io 클라이언트가 최초엔 Polling 모드로 접속을 시도하도록 구현되어 있기 때문입니다.

서버 코드 [https://github.com/nhnent/socket.io-client-unity3d/blob/master/Assets/__Sample/Server~/connection.js]
var app = require('http').createServer(handler)
var fs = require('fs');

app.listen(4444);

function handler (req, res) {
  fs.readFile(__dirname + '/index.html',
  function (err, data) {
      if (err) {
          res.writeHead(500);
          return res.end('Error loading index.html');
      }

      res.writeHead(200);
      res.end(data);
  });
}

// socket.io 스타트
var io = require('socket.io')(app);

// 클라이언트 컨넥션 이벤트 처리
io.on('connection', function (socket) {
  console.log('Hello, socket.io~');
});

Socket.io가 시작되는 것은 'socket.io' 모듈을 가져올 때, 원샷에 처리가 됩니다. 이 때, 인자값으로 HTTP 서버의 인스턴스 (app 변수)를 추가해주면 HTTP 서버의 주소로 Socket.io가 Bind되면서 자동으로 Listen을 시작합니다. 이 때, 리턴하는 io 변수는 일종의 매니저 객체로써 이를 통해서 실제 세션에 해당하는 socket 객체를 획득할 수 있습니다. io.on() 메소드에서 'connection'이라는 이벤트를 핸들링하도록 구현했고, 클라이언트에서 컨넥션이 완료되었을 때, 콜백 함수를 통해서 socket을 획득할 수 있습니다. socket은 일종의 세션 객체라고 생각해도 무방합니다. socket을 통해서 앞으로 각종 패킷을 Send/Receive하게 됩니다.

클라이언트 코드 [https://github.com/nhnent/socket.io-client-unity3d/blob/master/Assets/__Sample/Client/Src/Connection.cs]
using UnityEngine;
using socket.io;

namespace Sample {

    public class Connection : MonoBehaviour {

        void Start() {
            // 접속 Url
            var serverUrl = "http://localhost:4444";

            // 서버로 접속 시도~
            var socket = Socket.Connect(serverUrl);

            // 접속 완료 이벤트 처리
            socket.On("connect", () => {
                Debug.Log("Hello, socket.io~");
            });
        }

    }

}

클라이언트는 socket.io.Socket 클래스의 Connect() 메소드를 호출합니다. 이 때 인자값으로 서버의 Url을 입력합니다. 접속이 성공하면, socket 변수를 리턴하고 서버와 동일하게 각종 패킷을 Send/Receive하게 됩니다. 예제 코드에서는 'connect' 이벤트를 캐치하여 웰컴 메세지를 출력하도록 구현해보았습니다.

Event 핸들링

socket.io는 Event 기반으로써 모든 통신의 처리는 'Event 등록 + Callback 함수 구현'의 형식으로 구현됩니다. Event를 Send하는 메소드는 Emit(), 그리고 Event를 Receive하는 메소드는 On()입니다. 아래 예제를 보면서 좀 더 자세히 살펴보겠습니다.

서버 코드 [https://github.com/nhnent/socket.io-client-unity3d/blob/master/Assets/__Sample/Server~/events.js]
// HTTP 서버 코드는 생략 (...)

// socket.io 스타트
var io = require('socket.io')(app);

// 클라이언트 컨넥션 이벤트 처리
io.on('connection', function (socket) {

    // 'news' 이벤트 send
    socket.emit('news', { hello: 'world' });

    // 'my other event' 이벤트 receive
    socket.on('my other event', function(data) {
        console.log(data);
    });

});
클라이언트 코드 [https://github.com/nhnent/socket.io-client-unity3d/blob/master/Assets/__Sample/Client/Src/Events.cs]
using UnityEngine;
using socket.io;

namespace Sample {

    public class Events : MonoBehaviour {

        void Start() {
            var serverUrl = "http://localhost:4444";
            var socket = Socket.Connect(serverUrl);

            // "news" 이벤트 처리 Receive
            socket.On("news", (string data) => {
                Debug.Log(data);

                // "my other event" 이벤트 Send
                socket.Emit(
                    "my other event",       // 이벤트명
                    "{ \"my\": \"data\" }"  // 데이터 (Json 텍스트)
                    );
            });
        }

    }

}

2개의 이벤트를 정의하여 서버와 클라이언트 간의 패킷 송수신을 구현했습니다. 서버는 'news' 이벤트를 Send하고 'my other event'를 Receive합니다. 클라이언트는 반대입니다.

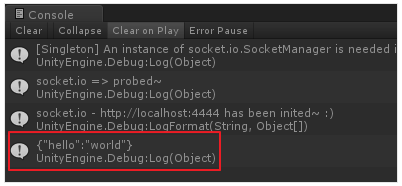
실행 결과
  • 서버
    image.png
  • 클라이언트
    image.png

Emit() 메소드

Send를 담당하는 Emit() 메소드는 다음과 같은 형식을 같습니다.

public void Emit(string evtName, string data);
  • Emit() 파라메터
evtNamedata
이벤트 이름이벤트 데이터 (주로 Json 객체)

On() 메소드

Receive를 담당하는 On() 메소드의 정의는 다음과 같습니다.

public void On(string evtName, Action<string> callback);
  • On() 파라메터
evtNamecallback
이벤트 이름이벤트 핸들러 함수

System Event

Emit()과 On() 메소드에서 선언한 이벤트 이름 중 일부 문자열은 시스템 예약어이므로 사용을 금지합니다. 서버 용 시스템 이벤트는 아래 링크에서 확인이 가능합니다.

[https://socket\.io/docs/server\-api/\]\(socket\.io Server API)

여기서는 클라이언트 용 시스템 이벤트만 정리해보겠습니다.

이벤트 이름콜백 파라메터비고
connect없음접속 완료
connectTimeOut없음시간 초과로 인한 접속 실패
reconnectAttempt없음재접속 시도
reconnectFailed없음재접속 실패
reconnectint (재접속 횟수)재접속 완료
reconnectingint (재접속 횟수)재접속 중
connectErrorException접속 실패
reconnectErrorException재접속 실패

콜백 파라메터를 기준으로 On() 메소드 호출 형식이 바뀌게 됩니다. 예를 들어 'reconnect' 이벤트를 핸들링하고 싶다면 다음과 같이 코드를 작성해야 합니다.

socket.On("reconnect", (int attempt) => {
    Debug.LogFormat("Reconnected after {0} trials, attempt);
});

Event Ack

이번엔 이벤트를 Send하고 이에 대한 응답을 Receive하는 방법을 알아보겠습니다.

서버 코드 [https://github.com/nhnent/socket.io-client-unity3d/blob/master/Assets/__Sample/Server~/acks.js]
// HTTP 서버 코드는 생략 (...)

// socket.io 스타트
var io = require('socket.io')(app);

// 클라이언트 컨넥션 이벤트 처리
io.on('connection', function (socket) { 

   socket.on('ferret', function (name, fn) {
        // 'woot' 문자열을 Ack 메세지로 보냄
        fn('woot');
    }); 
});
클라이언트 코드 [https://github.com/nhnent/socket.io-client-unity3d/blob/master/Assets/__Sample/Client/Src/Acks.cs]
using UnityEngine;
using socket.io;

namespace Sample {

    public class Acks : MonoBehaviour {

        void Start() {
            var serverUrl = "http://localhost:4444";
            var socket = Socket.Connect(serverUrl);

            socket.On("connect", () => {

                // "ferret" 이벤트 Send
                socket.Emit(
                    "ferret", "\"toby\"", 
                    (string ackData) => { Debug.Log(ackData); } // 3번째 인자로 콜백을 셋팅하면 Ack 모드로 동작하며 Ack 시에 콜백이 호출됨
                    );
            });
        }

    }

}

앞서 소개한 Event 핸들링 예제와 달라진 점은 클라이언트 코드에서 Emit() 메소드에 3번째 인자로 콜백을 추가한 것입니다. 이렇게 호출하게 되면 Ack 모드로 Emit() 메소드가 동작하게 됩니다. 위의 예제에서는 서버 코드에서 Ack 메시지로 'woot' 문자열을 리턴하였고, 클라이언트는 Ack 콜백에서 'woot' 문자열을 인자값으로 받게 됩니다.

Namespace

하나의 소켓을 논리적인 처리 단위로 구분할 수 있습니다. Multiplexing이라고도 불리는 이러한 패턴을 통해서 하나의 커넥션(소켓 인스턴스)에서 여러 개의 독립적인 코드를 개발할 수 있습니다.

서버 코드 [https://github.com/nhnent/socket.io-client-unity3d/blob/master/Assets/__Sample/Server~/namespace.js]
// HTTP 서버 코드는 생략 (...)

// socket.io 스타트
var io = require('socket.io')(app);

// chat 네임스페이스
var chat = io
  .of('/chat')
  .on('connection', function (socket) {
    chat.emit('a message', { everyone: 'in', '/chat': 'will get' });
    socket.emit('a message', { that: 'only', '/chat': 'will get' });
  });

// news 네임스페이스
var news = io
  .of('/news')
  .on('connection', function (socket) {
    socket.emit('item', { news: 'item' });
  });
클라이언트 코드 [https://github.com/nhnent/socket.io-client-unity3d/blob/master/Assets/__Sample/Client/Src/Namespace.cs]
using UnityEngine;
using socket.io;

namespace Sample {

    public class Namespace : MonoBehaviour {

        void Start() {
            var serverUrl = "http://localhost:4444";

            // news 네임스페이스
            var news = Socket.Connect(serverUrl + "/news");
            news.On("connect", () => {
                news.Emit("woot");
            });
            news.On("a message", (string data) => {
                Debug.Log("news => " + data);
            });
            news.On("item", (string data) => {
                Debug.Log(data);
            });

            // chat 네임스페이스
            var chat = Socket.Connect(serverUrl + "/chat");
            chat.On("connect", () => {
                chat.Emit("hi~");
            });
            chat.On("a message", (string data) => {
                Debug.Log("chat => " + data);
            });
        }

    }

}

서버는 of() 메소드를 통해서 네임스페이스를 선언합니다. 클라이언트는 단순히 Url에 주소를 추가하는 것으로 선언이 가능합니다. 위 예제에선 "http://localhost:4444/chat"과 "http://localhost:4444/news"와 같이 chat과 news 네임스페이스를 선언하였습니다. 그 외에 나머지는 일반적인 이벤트 핸들링과 동일합니다.

실행 결과
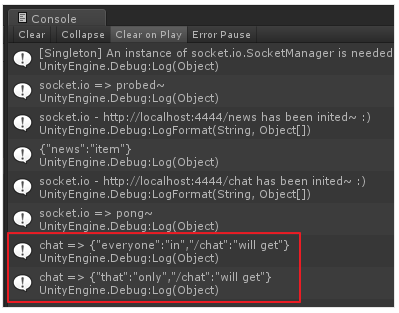
image.png

위 예제의 포인트는 클라이언트 코드에서 chat과 news이 모두 'a message' 이벤트를 등록하였지만 오직 chat 소켓만이 'a message' 이벤트를 핸들링하게 되는 점입니다. 네임스페이스로 구분하여 이벤트명을 중복하여 사용하는 것이 가능하다라는 것을 시사하며 이를 통해서 채널 혹은 컨텐츠 개발 스코프마다 각각 네임스페이스르 할당해서 작업한다면 하나의 소켓 컨넥션 안에서도 이벤트 이름의 충돌없이 코드 작성이 가능하게 됩니다.

결론

오랫동안 게임 개발에서는 Socket을 이용한 네트워크를 구현해 왔습니다. 하지만 socket을 이용하여 데이터를 주고 받기 위해서는 네트워크의 연결 유지와 데이터 전송을 위해 너무 많은 노력이 필요합니다. 게임 개발에 있어서 어려운 네트워크 구현을 빼고 컨텐츠 개발에 힘을 쓴다면 더 좋은 게임이 나올 것이라 생각됩니다. 더욱이 웹과 같은 다양한 플랫폼을 지원 하는 게임을 개발하는데 있어 네트워크 레이어마다 개발을 해야한다면 좀더 좋은 게임을 개발할 수 있는시간을 빼앗기게 됩니다. 그래서 우리는 게임 개발자들이 데이터 통신에 많은 시간을 투자하지 않고 게임을 개발 할수 있도록 socket.io를 위한 Unity3d를 MIT라이선스로 공개하기로 했습니다. socket.io-client-unity3d를 활용하여 좀더 컨텐츠 개발에 시간을 투자하고, 하나의 서버 플랫폼을 이용해 다양한 클라이언트 플랫폼을 지원 하는데 도움이 되었으면 좋겠습니다.

해당 라이브러리에 관심이 있으신분들은 https://github.com/nhnent/socket.io-client-unity3d에서 확인 하실 수 있습니다. 또한 참여하시고 싶으신 분들은 https://github.com/nhnent/socket.io-client-unity3d/blob/master/CONTRIBUTING.md를 참조하셔서 참여하여 주시면 감사하겠습니다.


[출처]

https://meetup.toast.com/posts/112


[추가]

socket.io v2.x에서 수정해야 될 내용

https://github.com/nhnent/socket.io-client-unity3d/commit/48b1fb6e743ff2228942a6e08f2eb9a73e1ff2a0


[추가2]

socket.io https 대응 (출처: shmhlove)

https://github.com/shmhlove/Asgardium_Client/tree/develop/Assets/Plugins/socket.io

반응형

'Unity3D > Plugins' 카테고리의 다른 글

[링크] Simple Unity browser  (0) 2019.03.28
[링크] 유니티랑 nodejs 간단 연동 테스트 해보기  (0) 2019.03.08
[링크] iOSPlugin Sample  (0) 2019.01.29
[펌] Unity Excel Importer  (0) 2019.01.03
[링크] Emoji_Extension  (0) 2018.06.07
Posted by blueasa
, |


[링크] https://github.com/shmhlove/iOSPlugin

반응형
Posted by blueasa
, |

[파일] 

unity-excel-importer-master.zip


Unity Excel Importer

Automatically import from xls, xlsx to custom ScriptableObject in Unity Editor

Import Setup

1. Create Excel and add to Unity

Create an Excel file, make the first row the name of the column, and enter the data from the second row. And add it to Unity’s Project view.

create_excel import_excel_to_unity

2. Create Entity Class Script

Create a new script and define a class with Excel column names and public fields of the desired type. Also give the class ‘System.Serializable’ attribute.

using System.Collections;
using System.Collections.Generic;
using UnityEngine;

[System.Serializable]
public class MstItemEntity
{
	public int id;
	public string name;
	public int price; 
}

3. Create Excel Asset Script

After selecting Excel, execute ExcelAssetScript from the Create menu and create a ScriptableObject script for Excel.

create_excel_asset

As for the generated script, the Excel file name and the sheet name are extracted and the part is commented out as below.

using System;
using System.Collections;
using System.Collections.Generic;
using UnityEngine;

[ExcelAsset]
public class MstItems : ScriptableObject
{
	//public List<EntityType> Entities; // Replace 'EntityType' to an actual type that is serializable.
}

4. Replace EntityType in created Excel Asset

Uncomment fields and replace the generic type of List with the Entity class defined above.

using System;
using System.Collections;
using System.Collections.Generic;
using UnityEngine;

[ExcelAsset]
public class MstItems : ScriptableObject
{
	public List<MstItemEntity> Entities;
}

4. Reimport or re-save Excel

When you import or re-save Excel, a ScriptableObject with the same name as Excel is created in the same directory and the contents of Excel are imported.

reimport_excel imported_entities

After this setting, updating Excel automatically updates ScriptableObject as well.

Advanced

Comment Row

If you enter ‘#’ in the first cell of the row, you can treat it as a comment and skip.

Change Asset Path

You can change the ScriptableObject generation position by specifying AssetPath as the ExcelAssetAttribute as shown below.

using System;
using System.Collections;
using System.Collections.Generic;
using UnityEngine;

[ExcelAsset(AssetPath = "Resources/MasterData")]
public class MstItems : ScriptableObject
{
	public List<MstItemEntity> Entities;
}

Use Enum

You can use enum by entering the element name as string in cell. It is also useful to set Data Validation pull down as an element of enum in Excel.

Lisence

This library is under the MIT License. This software includes the work that is distributed in the Apache License 2.0.


[출처] https://unitylist.com/p/28t/Unity-excel-importer

반응형

'Unity3D > Plugins' 카테고리의 다른 글

[펌] Socket.io-Client for Unity3D 소개  (0) 2019.03.08
[링크] iOSPlugin Sample  (0) 2019.01.29
[링크] Emoji_Extension  (0) 2018.06.07
[펌] Background Worker for Unity3D  (0) 2018.06.01
[Link] UnityAppNameLocalizationForIOS  (0) 2018.03.27
Posted by blueasa
, |


[링크] https://assetstore.unity.com/packages/tools/gui/emoji-extension-27267


it is a perfect Emoji solution that lets you make your animated Emoji Text easily.

Now Support emojis of IME 

Demo: Emoji_Extension

887 Emojis 

-Works with dynamic TTF fonts like Korean,Japanese, and Chinese
-Pixel perfect alignment
-the perfect emoticon and text solution for chat rooms
-Complete source code
-Supports the nativeSize of emoticonImage

Key Features:
* Supports animated images
* Supports dynamic fonts
* Scripting Interface and dynamic control of text and Emoticon objectss
* Fully supports richtext 
Formatting and Styling Options
* Dynamic font sizing
* Text Anchoring - The usual 9 positions
* Text Alignment - Left, Center, Right and Justified
* Character, Line and Paragraph spacing control
* Automatic Word-Wrapping


Mail me


Thank you.

반응형

'Unity3D > Plugins' 카테고리의 다른 글

[링크] iOSPlugin Sample  (0) 2019.01.29
[펌] Unity Excel Importer  (0) 2019.01.03
[펌] Background Worker for Unity3D  (0) 2018.06.01
[Link] UnityAppNameLocalizationForIOS  (0) 2018.03.27
[에셋] Anti-Cheat Toolkit  (0) 2018.03.06
Posted by blueasa
, |

If you need to execute some long running task on the background in Unity, you may find this tool I just wrote, useful. This is BackgroundWorker for Unity 3D

BackGround Worker for Unity3D

You will only need the class BackgroundWorker

It worth noting that a lot of seemingly background tasks can be implemented with Unity Coroutines. For example using WWW service to send or receive data from a remote server. Or any case where we just wait for a response from a remote computer.

However because coroutines run on the main thread if you really have a long running, not just waiting for response but computing intensely something, you will need to run it on a background thread. Here is how you use this tool:

if (_backgroundWorker != null) _backgroundWorker.CancelAsync();
_backgroundWorker = new BackgroundWorker();

_backgroundWorker.DoWork += (o, a) =>
{
    // executed on background thread
    // do slow running computationaly intense work, check periodically 
    // if (a.IsCanceled) return;
    
    // assign result as 
    // a.Result = a.Argument+"!";
};
_backgroundWorker.RunWorkerCompleted += (o, a) =>
{
    // executed on main thread
    // you can use a.Result
};

_backgroundWorker.RunWorkerAsync(argumetToPassOrNull);

And then on each frame execute:

if (_backgroundWorker != null) _backgroundWorker.Update();

The tool has been tested on Windows, Mac, iPhone, and Android.

This is a sample usage of the BackgroundWorker class.


[출처] http://blog.bodurov.com/Background-Worker-for-Unity3D/

반응형

'Unity3D > Plugins' 카테고리의 다른 글

[펌] Unity Excel Importer  (0) 2019.01.03
[링크] Emoji_Extension  (0) 2018.06.07
[Link] UnityAppNameLocalizationForIOS  (0) 2018.03.27
[에셋] Anti-Cheat Toolkit  (0) 2018.03.06
[펌] UnityIPhoneXSupport  (0) 2017.11.10
Posted by blueasa
, |


[Link] https://github.com/zeyangl/UnityAppNameLocalizationForIOS


[참조] https://answers.unity.com/questions/789428/how-to-add-languages-automatically-when-you-export.html


반응형

'Unity3D > Plugins' 카테고리의 다른 글

[링크] Emoji_Extension  (0) 2018.06.07
[펌] Background Worker for Unity3D  (0) 2018.06.01
[에셋] Anti-Cheat Toolkit  (0) 2018.03.06
[펌] UnityIPhoneXSupport  (0) 2017.11.10
[Link] unity-webview  (0) 2017.10.23
Posted by blueasa
, |
반응형

'Unity3D > Plugins' 카테고리의 다른 글

[펌] Background Worker for Unity3D  (0) 2018.06.01
[Link] UnityAppNameLocalizationForIOS  (0) 2018.03.27
[펌] UnityIPhoneXSupport  (0) 2017.11.10
[Link] unity-webview  (0) 2017.10.23
[펌] E-Motion . . . Live 2D 와 비슷한 계열의 툴.  (0) 2017.04.28
Posted by blueasa
, |

以下はUnity2017.1.1f1Xcode9.0GMで確認しています。

前置き

iPhoneXの対応がめんどくさそう
https://developer.apple.com/ios/human-interface-guidelines/overview/whats-new/

やりたいこと

Unity側でいちいち対応するのは面倒なので、Unityの描画領域を変更して、
iPhoneXの場合は上下に余白を持たせれば良いのでは?という案。

iPhone 8iPhoneX beforeiPhoneX after
iphonex8p.pngiphonex1.pngiphonex2.png

iPhoneX beforeの画像は、iPhone 8の画像と同じコードをそのまま実行したものです。
どう表示されるかはもちろんUnityでの実装によりますが、このサンプルの場合は
画面上部に合わせてテキストを表示しているので、iPhoneXの凹部に隠れてしまっています。

iPhoneX afterの画像は、Unityの描画領域を上50pt、下40pt短くし、余白部分に画像を設定しています。
ついでにステータスバーも表示しています。

ソース

GitHubに上げました。
https://github.com/tkyaji/UnityIPhoneXSupport

UnityIPhoneXSupport.unitypackage をインポートすると、
PostProcessBuildでビルド時にUnityのソースを書き換えて、余白を設定するようになります。

余白のサイズと色、または画像を定数で指定できます。

やってること

1. iPhoneXの場合、ステータスバーを表示する

iPhoneXではステータスバーの非表示は非推奨とのことなので、表示するようにします。

UnityのPlayerSettingsで、Status Ber Hiddenが設定されている場合のみ以下の処理を行います。

  • Info.plistの設定を、ステータスバー表示とする
  • UnityViewControllerBaseiOS.mmを書き換え、iPhoneXの場合は表示、それ以外は非表示とする

2. UnityのViewサイズを変更する

UnityAppController.mmUnityView.mmを書き換え、UIWindowUIViewのサイズをそれぞれ変更します。
高さを90pt短くし、Windowの位置を50pt下げています。
これで上50pt、下40ptの余白ができます。
上下余白部分にUIViewをそれぞれ設定し、色を設定します。
さらに画像がある場合はUIImageViewaddSubViewします。

備考

  • シミュレータで少し確認しただけなので、もしかしたら色々問題があるかもしれません。使用する場合は自己責任でお願いします。
  • iPhoneXのSafe Areaは左右にも余白があるため、ちゃんとやるなら左右にも気を使う必要がありそうです
  • 余白部分がただの黒帯とかだと、そのせいでリジェクトになる可能性があるかもしれません
  • iPhoneXかどうかは画面アスペクト比でざっくり判定しています


[출처] https://qiita.com/tkyaji/items/8cdc0a4324d4e89633e8

반응형
Posted by blueasa
, |

[Link] unity-webview

Unity3D/Plugins / 2017. 10. 23. 19:11


[Link] https://github.com/gree/unity-webview

반응형
Posted by blueasa
, |

http://www.forest.impress.co.jp/docs/news/20140627_655577.html


먼저 E-Motion 에 관한 내용 입니다.


http://emote2.mtwo.co.jp/index.php

요기는 홈페이지


다른것 보다 눈에 띄는건, 유니티에 넣을수 있다는 점 이네요. Live2D의 경우에 인티그레이션이 되어있었나;;가물가물 합니다.

안드로이드, ISO, PSP, 3DS, PSVITA라거나  플스3, 엑박 다 호환되는듯 합니다.


피쳐를 살펴보면, E-motion은 유니티에 대응해, 보다 범용적으로 사용할 수 있게 되었다고 합니다.   물론 유니티 Pro대응입니다.


E-mote의 캐릭터 생성

기본 제작은 PSD로 조각조각 그린 그림을 가져와서, 이미지를 구부리거나 휘거나 돌리는 등? 으로 작업을 합니다.   일단 인티그레이션이 Live2D에 비해 잘 되어있는것 같고, 유니티에서 바로 쓸수 있는거 같아서??(확인은 해봐야 합니다)  맘에 드네요.


PSD 원화 만들기E-mote에 PSD를 캡처

타임 라인에서 애니메이션 - 숀을 낸다


대략 위와 같은 느낌??


다운로드는 아래 링크를 따라가세요~


http://emote2.mtwo.co.jp/download.php


물론, 그때그때 업데이트가 됩니다.


자주 업데이트가 되니, 잘 읽어보시고 다운로드 받으시기 바랍니다.  평가판을 받아서 써 볼 수 있습니다.  평가판은 90일간 사용해 볼 수 있습니다.   가격도 Live2D보다 저렴한거 같네요.


[출처] E-Motion . . . Live 2D 와 비슷한 계열의 툴. |작성자 세라프


반응형
Posted by blueasa
, |