블로그 이미지
Every unexpected event is a path to learning for you.

카테고리

분류 전체보기 (2737)
Unity3D (817)
Programming (474)
Server (33)
Unreal (4)
Gamebryo (56)
Tip & Tech (228)
협업 (58)
3DS Max (3)
Game (12)
Utility (136)
Etc (96)
Link (32)
Portfolio (19)
Subject (90)
iOS,OSX (53)
Android (14)
Linux (5)
잉여 프로젝트 (2)
게임이야기 (3)
Memories (20)
Interest (38)
Thinking (38)
한글 (30)
PaperCraft (5)
Animation (408)
Wallpaper (2)
재테크 (18)
Exercise (3)
나만의 맛집 (3)
냥이 (10)
육아 (16)
Total
Today
Yesterday
04-26 06:22

Jenkins에서 두 브랜치를 매일 자동으로 Merge 하려고 찾아보면서 삽질하고 정리해 둠.

shall script로 해야되는건가 했는데 의외로 Jenkins에 관련 메뉴가 다 있는 것 같다.

Jenkins 메뉴로 git merge(소스 코드 관리-Merge before build 메뉴) 하고, git origin에 push(빌드 후 조치-Git Publisher 메뉴)까지 처리함.


----


To implement this task you can follow the below given steps.

  • Set your GitHub repo with credentials.


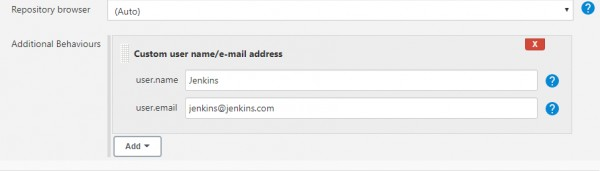
  • After that you have to set your branch name to merge. Go to source code management->Additional Behaviours->Merge before build.


  • Set your user name and user email. Go to source code management->Additional Behaviours->Custom user name and email.


Now your job is ready to merge your branch. You can also go through the below GitHub link to get more information.

https://github.com/nadim70/Newproject.git


GitHub - nadim70/Newproject

Contribute to nadim70/Newproject development by creating an account on GitHub.

github.com


[출처] https://www.edureka.co/community/68544/how-to-merge-two-branch-in-github-using-jenkins


How to merge two branch in GitHub using jenkins

Hi Everyone, I want to merge two branch in GitHub using jenkins. But I am not able to do this task. Can anyone help me to implement this task?

www.edureka.co


[참조] https://osc131.tistory.com/89


[jenkins] GIT Publisher

[jenkins] GIT Publisher 작성일자 : 2018년 10월 20일환경 : Jenkins 2.129, JDK 1.8.0_101목표 : Jenkins Build 작업 진행 후 Build에 사용됐던 GIT 버전을 Tags로 저장 ( 일종의 백업 ) * Jenkins - Git 연동 설정 및 GIT Plugin 설

osc131.tistory.com


반응형
Posted by blueasa
, |

Android 13에서 Runtime에 android.permission.POST_NOTIFICATIONS Permission 요청하기.

----


1. Android Target API 33으로 셋팅


2. AndroidManifest.xml에 POST_NOTIFICATIONS Permission 추가

<manifest ...>
    <application ...>
        ...
    </application>
    <uses-permission android:name="android.permission.POST_NOTIFICATIONS"/>
</manifest>


3. 권한 요청 원하는 시점에 아래 함수 호출(함수 호출하면 Android 13이상 폰에서는 알림 권한 허용 요청 팝업이 뜸)

void CheckPermission_PostNotifications_Android13()
{
    // 디바이스의 안드로이드 api level 얻기
    // ex) Prints "Android OS API-33" on Android 13.0
    // https://docs.unity3d.com/ScriptReference/SystemInfo-operatingSystem.html
    string androidInfo = SystemInfo.operatingSystem;
    Debug.Log("androidInfo: " + androidInfo);
    
    int apiLevel = int.Parse(androidInfo.Substring(androidInfo.IndexOf("-") + 1, 3), System.Globalization.CultureInfo.InvariantCulture);
    Debug.Log("apiLevel: " + apiLevel);

    // 디바이스의 api level이 33 이상이라면 퍼미션 요청
    if (33 <= apiLevel 
        && !UnityEngine.Android.Permission.HasUserAuthorizedPermission("android.permission.POST_NOTIFICATIONS"))
    {
        UnityEngine.Android.Permission.RequestUserPermission("android.permission.POST_NOTIFICATIONS");
    }
}


-----------------------------------------------------------------------------------------

[참고]

안드로이드 알림은 api level 26 과 33 에서 변경점이 있다. 내 앱이 대상으로 삼은 Sdk Version 범위에 이 버전이 포함되어 있다면 버전에 따라 분기 처리를 해주는 편이 좋다.
API level 26 (Android 8.0 Oreo) 이상 변경점
API level 33 (Android 13 Tiramisu) 이상 변경점

public void InitializeAndroidLocalPush()
{
	// 디바이스의 안드로이드 api level 얻기
	string androidInfo = SystemInfo.operatingSystem;
	Debug.Log("androidInfo: " + androidInfo);
	apiLevel = int.Parse(androidInfo.Substring(androidInfo.IndexOf("-") + 1, 2));
	Debug.Log("apiLevel: " + apiLevel);

	// 디바이스의 api level이 33 이상이라면 퍼미션 요청
	if (apiLevel >= 33 &&
		!Permission.HasUserAuthorizedPermission("android.permission.POST_NOTIFICATIONS"))
	{
		Permission.RequestUserPermission("android.permission.POST_NOTIFICATIONS");
	}

	// 디바이스의 api level이 26 이상이라면 알림 채널 설정
	if (apiLevel >= 26)
	{
		var channel = new AndroidNotificationChannel()
		{
			Id = CHANNEL_ID,
			Name = "pubSdk",
			Importance = Importance.High,
			Description = "for test",
		};
		AndroidNotificationCenter.RegisterNotificationChannel(channel);
	}
}

api level 얻기 코드 출처


[참고 내용 출처]

https://velog.io/@maratangsoft/%EC%9C%A0%EB%8B%88%ED%8B%B0-%EC%95%88%EB%93%9C%EB%A1%9C%EC%9D%B4%EB%93%9C-%EC%95%B1%EC%97%90%EC%84%9C-FCM-%EC%84%9C%EB%B2%84-%ED%91%B8%EC%8B%9C-%EB%B0%9B%EA%B8%B0


유니티 안드로이드 앱에서 FCM 서버 푸시 받기

유니티 모바일 앱 개발시 안드로이드 앱은 Firebase Cloud Messaging(이하 FCM) 서비스, iOS 앱은 Apple Push Notification 서비스를 이용해서 (FCM으로도 가능) 푸시를 수신할 수 있다. 그 중 FCM을 이용한 안드로

velog.io


[참고]

https://android-developer.tistory.com/entry/%EC%95%88%EB%93%9C%EB%A1%9C%EC%9D%B4%EB%93%9C13%EC%97%90%EC%84%9C-Notification-%ED%97%88%EA%B0%80-%EB%B0%9B%EA%B8%B0-%EB%B0%A9%EB%B2%95-%EB%B0%8F-%EB%B3%80%EA%B2%BD%EC%A0%90


안드로이드13에서 Notification 허가 받기 방법 및 변경점

안드로이드13에서 Notification에 대해 바뀐점 POST_NOTIFICATIONS (Notification Permission) 은 Target SDK API 33 이상부터 추가 가능 Target SDK API 32 이하의 앱이 Android 13 디바이스에 설치되면 Notification Channel을 등록

android-developer.tistory.com

반응형
Posted by blueasa
, |

Tag 이름과 Branch 이름이 같으면 Push 할 때 Error가 난다.


[결론] Tag와 Branch 이름은 같게 만들지 말자..


[참조] jira.atlassian.com/browse/SRCTREE-1474


[SRCTREE-1474] Pushing Branch With the Same Name as a Tag Fails - Create and track feature requests for Atlassian products.

When a branch has the same name as a tag, it errors when pushing to origin. Steps to reproduce: Add a Git repository. Push to a remote. Create a branch (eg. stsp-420). Create a tag on master with the same name (eg. stsp-420). Push the created tag to the re

jira.atlassian.com


반응형
Posted by blueasa
, |