Unity’s Platform Dependent Compilation feature consists of some preprocessor directives that let you partition your scripts to compile and execute a section of code exclusively for one of the supported platforms.
You can run this code within the Unity Editor, so you can compile the code specifically for your target platform and test it in the Editor.
Platform #define directives
The platform #define directives that Unity supports for your scripts are as follows:
Define
Function
UNITY_EDITOR
#define directive to call Unity Editor scripts from your game code.
UNITY_EDITOR_WIN
#define directive for Editor code on Windows.
UNITY_EDITOR_OSX
#define directive for Editor code on Mac OS X.
UNITY_EDITOR_LINUX
#define directive for Editor code on Linux.
UNITY_STANDALONE_OSX
#define directive to compile or execute code specifically for Mac OS X (including Universal, PPC and Intel architectures).
UNITY_STANDALONE_WIN
#define directive for compiling/executing code specifically for Windows standalone applications.
UNITY_STANDALONE_LINUX
#define directive for compiling/executing code specifically for Linux standalone applications.
UNITY_STANDALONE
#define directive for compiling/executing code for any standalone platform (Mac OS X, Windows or Linux).
UNITY_WII
#define directive for compiling/executing code for the Wii console.
UNITY_IOS
#define directive for compiling/executing code for the iOS platform.
UNITY_IPHONE
Deprecated. Use UNITY_IOS instead.
UNITY_ANDROID
#define directive for the Android platform.
UNITY_PS4
#define directive for running PlayStation 4 code.
UNITY_XBOXONE
#define directive for executing Xbox One code.
UNITY_LUMIN
#define directive for the Magic Leap OS platform. You can also use PLATFORM_LUMIN.
UNITY_TIZEN
#define directive for the Tizen platform.
UNITY_TVOS
#define directive for the Apple TV platform.
UNITY_WSA
#define directive for Universal Windows Platform . Additionally, NETFX_CORE is defined when compiling C# files against .NET Core and using .NET scripting backend .
UNITY_WSA_10_0
#define directive for Universal Windows Platform. Additionally WINDOWS_UWP is defined when compiling C# files against .NET Core.
UNITY_WINRT
Same as UNITY_WSA.
UNITY_WINRT_10_0
Equivalent to UNITY_WSA_10_0
UNITY_WEBGL
#define directive for WebGL .
UNITY_FACEBOOK
#define directive for the Facebook platform (WebGL or Windows standalone).
UNITY_ANALYTICS
#define directive for calling Unity Analytics methods from your game code. Version 5.2 and above.
UNITY_ASSERTIONS
#define directive for assertions control process.
UNITY_64
#define directive for 64-bit platforms.
You can also compile code selectively. The options available depend on the version of the Editor that you are working on. Given a version number X.Y.Z (for example, 2.6.0), Unity exposes three global #define directives in the following formats: UNITY_X, UNITY_X_Y and UNITY_X_Y_Z.
Here is an example of #define directives exposed in Unity 5.0.1:
Define
Function
UNITY_5
#define directive for the release version of Unity 5, exposed in every 5.X.Y release.
UNITY_5_0
#define directive for the major version of Unity 5.0, exposed in every 5.0.Z release.
UNITY_5_0_1
#define directive for the minor version of Unity 5.0.1.
Starting from Unity 5.3.4, you can compile code selectively based on the earliest version of Unity required to compile or execute a given portion of code. Given the same version format as above (X.Y.Z), Unity exposes one global #define in the format UNITY_X_Y_OR_NEWER, that can be used for this purpose.
The supported #define directives are:
Define
Function
CSHARP_7_3_OR_NEWER
Defined when building scripts with support for C# 7.3 or newer.
ENABLE_MONO
Scripting backend #define for Mono.
ENABLE_IL2CPP
Scripting backend #define for IL2CPP .
NET_2_0
Defined when building scripts against .NET 2.0 API compatibility level on Mono and IL2CPP.
NET_2_0_SUBSET
Defined when building scripts against .NET 2.0 Subset API compatibility level on Mono and IL2CPP.
NET_LEGACY
Defined when building scripts against .NET 2.0 or .NET 2.0 Subset API compatibility level on Mono and IL2CPP.
NET_4_6
Defined when building scripts against .NET 4.x API compatibility level on Mono and IL2CPP.
NET_STANDARD_2_0
Defined when building scripts against .NET Standard 2.0 API compatibility level on Mono and IL2CPP.
ENABLE_WINMD_SUPPORT
Defined when Windows Runtime support is enabled on IL2CPP. See Windows Runtime Support for more details.
ENABLE_INPUT_SYSTEM
Defined when the Input System package is enabled in Player Settings .
ENABLE_LEGACY_INPUT_MANAGER
Defined when the legacy Input Manager is enabled in Player Settings.
You use the DEVELOPMENT_BUILD #define to identify whether your script is running in a player which was built with the “Development Build ” option enabled.
You can also compile code selectively depending on the scripting back-end.
Testing precompiled code
Below is an example of how to use the precompiled code. It prints a message that depends on the platform you have selected for your target build.
First of all, select the platform you want to test your code against by going to File > Build Settings. This displays the Build Settings window; select your target platform from here.
Build Settings window with PC, Mac & Linux selected as the target platforms
Select the platform you want to test your precompiled code against and click Switch Platform to tell Unity which platform you are targeting.
Create a script and copy/paste the following code:
// C#
using UnityEngine;
using System.Collections;

public class PlatformDefines : MonoBehaviour {
  void Start () {

    #if UNITY_EDITOR
      Debug.Log("Unity Editor");
    #endif

    #if UNITY_IOS
      Debug.Log("Iphone");
    #endif

    #if UNITY_STANDALONE_OSX
    Debug.Log("Stand Alone OSX");
    #endif

    #if UNITY_STANDALONE_WIN
      Debug.Log("Stand Alone Windows");
    #endif

  }
}
To test the code, click Play Mode. Confirm that the code works by checking for the relevant message in the Unity console, depending on which platform you selected - for example, if you choose iOS , the message “Iphone” is set to appear in the console.
In C# you can use a CONDITIONAL attribute which is a more clean, less error-prone way of stripping out functions. See ConditionalAttribute Class for more information. Note that common Unity callbacks (ex. Start(), Update(), LateUpdate(), FixedUpdate(), Awake()) are not affected by this attribute because they are called directly from the engine and, for performance reasons, it does not take them into account.
In addition to the basic #if compiler directive, you can also use a multiway test in C#:
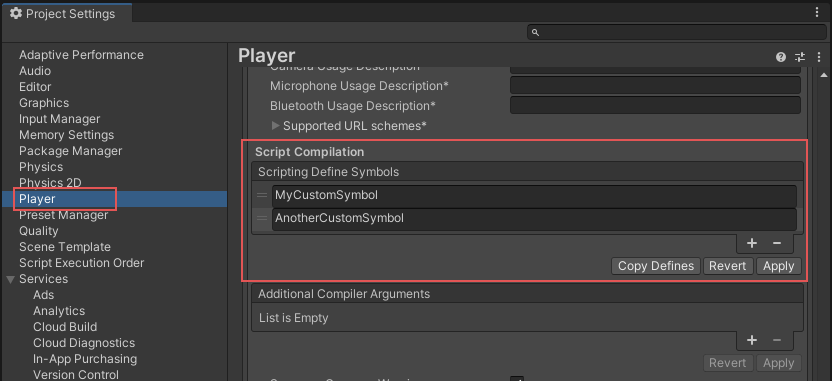
It is also possible to add to the built-in selection of #define directives by supplying your own. Open the Other Settings panel of the Player settings and navigate to the Scripting Define Symbols text box.
Enter the names of the symbols you want to define for that particular platform, separated by semicolons. These symbols can then be used as the conditions for #if directives, just like the built-in ones.
Global custom #defines
You can define your own preprocessor directives to control which code gets included when compiling. To do this you must add a text file with the extra directives to the Assets folder. The name of the file depends on the language you are using. The extension is .rsp:
C# (player and editor scripts)
<Project Path>/Assets/mcs.rsp
As an example, if you include the single line -define:UNITY_DEBUG in your mcs.rsp file, the #define directive UNITY_DEBUG exists as a global #define for C# scripts, except for Editor scripts.
Every time you make changes to .rsp files, you need to recompile in order for them to be effective. You can do this by updating or reimporting a single script (.js or .cs) file.
Note:__If you want to modify only global #define directives, use Scripting Define Symbols__ in Player settings, because this covers all the compilers. If you choose the .rsp files instead, you need to provide one file for every compiler Unity uses.
The use of .rsp files is described in the ‘Help’ section of the mcs application, which is included in the Editor installation folder. You can get more information by running mcs -help.
Note that the .rsp file needs to match the compiler being invoked. For example:
when targeting the .NET 3.5 Equivalent (deprecated) scripting runtime version, mcs is used with mcs.rsp, and
when targeting the .NET 4.x Eqivalent scripting runtime version compiler, csc is used with csc.rsp.
NGUI's clipping is done by choosing a different shader with a similar name. Look at the existing shaders, for exmaple:
Unlit - Transparent Colored < -- used if no clipping is needed Unlit - Transparent Colored 1 <-- used if there is 1 panel clipping the content Unlit - Transparent Colored 2 <-- used if there are 2 panels clipping the content Unlit - Transparent Colored 3 <-- used if there are 3 panels clipping the content
When making custom shaders, you would need to follow the same naming convention. The easiest thing to do is to just make a copy of at least two shaders (the first two) and modify them to suit your needs. In case of additive blending, all you would do is change the blend line from:
- 어플리케이션의 Runtime 시 외부에서 Resource(Asset)를 가져올 수 있도록 해주는 Unity3D 고유의 기능
- 패키지지향 게임과 서비스지향 게임(업데이트)
- Web 기반과 Smart phone 기반에서의 분할 다운로드 * 아이폰 앱스토어나 안드로이드 마켓에서 파일이 일정 크기 이상이면 3g로 다운로드가 허용되지 않으며 wi-fi 로 다운 받게 끔 되어 있음. 여기서 wi-fi 모드로 다운 받게 끔 제한시 다운로드 횟수가 현저히 저하되는 경우 발생 (컨텐츠의 접근성에 심각한 문제가 발생) -> 초기 실행 파일을 작게하고 게임 내에서 다운로드 받는 기법 사용하여 해결, 이 경우 AssetBundle 을 사용하여 해결 가능
2. Native 구현 vs AssetBundle >> AssetBundle는 Unity3D(Pro만!)에서 제공하는 런타임에 리소스를 가지고 오는 기술을 말하는데
C# 등으로 직접 구현하는 것과 무슨 차이점이 있고 또, 어떤 특징이 있는가?
- 모든 플랫폼에서 일관적인 방법으로 이용 가능 (Flash 빌드 제외!) * 웹플랫폼으로 만들경우 Sandbox 보안 정책이 적용 - 로컬에서 파일을 읽기는 가능하지만 저장하지 못함. * 다른 플랫폼에서는 가능 (stand-alone, ios, android) * AssetBundle을 사용하면 웹플랫폼 빌드 일 때 로컬에 cache로 저장하는 방법이 사용 가능함
(웹플레이어가 AssetBundle의 cache를 생성 해줌)
참고) Flash 일경우에는 AssetBundle 및 WWW 클래스 사용 불가능, 웹서버를 사용하는 등의 우회적인 방법만 가능한 것으로 보임
- Unity3D Editor에서 제공하는 Asset pipeline을 Runtime에 이용할 수 있는 유일한 수단 * AssetBundle을 써야하는 가장 중요한 이유, * 유니티는 에디터하고 플레이어하고 분리가 되어 있는 데 어셋을 불러와서 실제로 사용할 수 있게 가공해주는 건 에디터 밖에 못해줌 >> 에디터에는 어셋을 임포트 해 주는 기능 하는 임포터가 존재함. >> 실제 유니티 프로젝트에서 보는 에셋들은 실제 데이타가 아니라 한번 가공한 데이타 (임포터 할때 마다 유니티 폴더 안 Library 내에 가공한 데이타가 들어감) >> 런타임 중에는 메쉬(fbx 파일) 등을 임포트 할 수 없다. 임포트를 하려면 임포터를 거쳐야하는데 임포터는 에디터 밖에 존재 하지 않음. >> 유니티는 네이티브한 데이타를 사용하는 데 상당히 제한적인 면이 있다. (예외적으로 텍스처(제약많음), 텍스트에셋 등은 임포터를 거치지 않고 사용할 수 있지만 그 외 기타 매터리얼, 게임 오브젝트, 메쉬 등의 오브젝트들은 임포터를 거쳐야 한다.) >> 어셋 번들에 에디터 내 임포터를 통해 가공된 데이타를 저장하여 런타임시 해당 어셋 번들을 사용할 수 있다.
- Push, Pop의 개념을 이용한 AssetBundle끼리의 의존관계 설정 가능 * 두개 모델이 같이 사용하는 텍스처를 모델과 따로 어셋번들로 뽑아서 두개 모델이 해당 텍스처를 같이 사용하는 식으로 사용 가능.
- Memory관리 용도로 사용 가능
- Caching과 Version관리기능 제공 * 로컬에 캐싱해서 매번 다운로드를 방지. 또한 캐싱시 버전을 부여하여 관리 가능 (이것을 이용하면 온라인 게임의 Patch시스템 구현 가능)
* AssetBundle.Contains() : 특정 어셋이 있는지 확인 * AssetBundle.Load() : 실제 어셋을 가져오는 것 * AssetBundle.LoadAsync() : 어셋을 비동기로 가지고 옴
- 메모리에서 제거
* AssetBundle.Unload(bool unloadAllLoadedObjects) >> true : 강제로 모두 내려버림. 어셋간 링크가 깨짐. false : 사용하지 않는 것만 추려서 메모리에서 내림 ( GC.Collect()를 먼저 호출해주면 더 안정적으로 동작 )
4. AssetBundle의 생성 방법 >> BuildPipeline를 이용하여 에디터 상에서만 생성 가능
- BuildPipeline.BuildAssetBundle() : 어셋을 어셋번들로 만들 때 일반적으로 사용
Scene 를 어셋 번들로 생성할 수 있는 방법 - BuildPipeline.BuildStreamedSceneAssetBundle()
- BuildPipeline.BuildPlayer()
참고) BuildPipeline.BuildStreamedSceneAssetBundle() 와 BuildPipeline.BuildPlayer() 차이점 이란 ??
If you are seeking a reliable, bug-free and effective webview plugin for Unity mobile games, now you are in right place.
What is UniWebView?
UniWebView is to help you using WebView easily on iOS and Android platform (WP8 support is under development). You can set up a web view and embed web content in your game with less than 10 lines of code. There is also a clean and simple interface for you to interact between the game and webview.
Main features:
A native webview (UIWebView for iOS, WebView for Android). Compatible with html5, css3 and javascript.
Send a message from webpage to Unity, using a specified url scheme. You can control the game flow and run your script code by clicking a url in the web page. By this strategy, you can implement a dynamic workflow to change your game logic on air.
Excute and eval javascript defined in Unity game or webpage.
The size and apperence of webview is customizable. Users can keep your game scene visble and running even when they interacting with web page.
Play youtube video and other media.
All source code of C# script and native plugin is included for a reference, with detailed documentation.
Easy debug for Unity Mac Editor. There is no need to build and run again and again in your device. You can preview and interact with the webview just in editor. (Supporting for Windows Editor is on the way)
Supporting The code itself is well documented. There is also online user manual, script reference and supporting forum for you. Use the link below and feel free to visit them and ask if you have any question.
public GUISkin guiSkin; public GameObject redBoxPrefab; public GameObject blueBoxPrefab;
private string note;
// Show the web view (with margins) and load the index page. void ActivateWebView() { WebMediator.LoadUrl("http://keijiro.github.com/unity-webview-integration/index.html"); WebMediator.SetMargin(12, Screen.height / 2 + 12, 12, 12); WebMediator.Show(); }
// Hide the web view. void DeactivateWebView() { WebMediator.Hide(); // Clear the state of the web view (by loading a blank page). WebMediator.LoadUrl("about:blank"); }
// Process messages coming from the web view. void ProcessMessages() { while (true) { // Poll a message or break. WebMediatorMessage message = WebMediator.PollMessage(); if (message == null) break;
if (message.path == "/spawn") { // "spawn" message. GameObject prefab = null; if (message.args.ContainsKey("color")) { prefab = (message.args["color"] == "red") ? redBoxPrefab : blueBoxPrefab; } else { prefab = Random.value < 0.5 ? redBoxPrefab : blueBoxPrefab; } var box = Instantiate(prefab, redBoxPrefab.transform.position, Random.rotation) as GameObject; if (message.args.ContainsKey("scale")) { box.transform.localScale = Vector3.one * float.Parse(message.args["scale"] as string); } } else if (message.path == "/note") { // "note" message. note = message.args["text"] as string; } else if (message.path == "/print") { // "print" message. var text = message.args["line1"] as string; if (message.args.ContainsKey("line2")) { text += "\n" + message.args["line2"] as string; } Debug.Log(text); Debug.Log("(" + text.Length + " chars)"); } else if (message.path == "/close") { // "close" message. DeactivateWebView(); } } }


 SetTexture.cs