블로그 이미지
Every unexpected event is a path to learning for you. blueasa

카테고리

분류 전체보기 (2861)
Unity3D (899)
Programming (479)
Server (33)
Unreal (4)
Gamebryo (56)
Tip & Tech (192)
협업 (65)
3DS Max (3)
Game (12)
Utility (142)
Etc (99)
Link (34)
Portfolio (19)
Subject (90)
iOS,OSX (53)
Android (16)
Linux (5)
잉여 프로젝트 (2)
게임이야기 (3)
Memories (20)
Interest (38)
Thinking (38)
한글 (30)
PaperCraft (5)
Animation (408)
Wallpaper (2)
재테크 (19)
Exercise (3)
나만의 맛집 (3)
냥이 (10)
육아 (16)
Total
Today
Yesterday


[Link] https://github.com/textcube?tab=repositories

반응형
Posted by blueasa
, |

[요약] Microsoft Windows Update(KB3035583) 제거


[링크] http://jhblog.tistory.com/325

반응형
Posted by blueasa
, |

[링크] http://ilikeen.tistory.com/1657

반응형

'Etc' 카테고리의 다른 글

[링크] NDC 2016-강연 자료를 한 자리에 모아 보아요!  (0) 2016.04.29
크런치  (0) 2016.03.27
DL  (0) 2016.01.29
[펌] 소녀  (0) 2015.12.18
FYI (for your information)  (0) 2015.09.15
Posted by blueasa
, |

[링크] http://mastmanban.tistory.com/830

반응형
Posted by blueasa
, |

[펌] GPGS

Unity3D/Plugins / 2016. 3. 8. 10:02

으흠??

GPGS 를 이용하고싶으시다면 가장 좋은 예제를 이미 구글에서 샘플을 만들어놔서 그걸 보시면 편하실겁니다.

구현자체가 이미 잘되있어서 상당히 쉽게 구현하실 수 있어요.

P2P방식의 멀티플레이도 지원이되고 리더보드나 업적등등 뭐 다양한 기능들이 많아요.

iOS같은 경우는 

게임센터라는것이 있습니다. 애초에 방식이 구글이 훔쳐배운건지?? 거의 비슷비슷하게 구현이 되어있더라구요.

https://github.com/playgameservices/play-games-plugin-for-unity

유니티라 하시니 일단 구글에서 지원하는 예제소스 입니당!


출처 : http://www.gamecodi.com/board/zboard.php?id=GAMECODI_Talkdev&page=1&page_num=35&select_arrange=headnum&desc=asc&sn=off&ss=on&sc=on&keyword=&no=3883&category=

반응형
Posted by blueasa
, |

using UnityEngine;

using System.Collections;

using System.Collections.Generic;

using System.Linq;

using UnityEditor;


public class FindReferencesToThis : ScriptableObject

{


    [MenuItem("CONTEXT/Component/Find references to this")]

    private static void FindReferences(MenuCommand data)

    {

        Object context = data.context;

        if (context)

        {

            var comp = context as Component;

            if (comp)

                FindReferencesTo(comp);

        }

    }


    [MenuItem("Assets/Find references to this")]

    private static void FindReferencesToAsset(MenuCommand data)

    {

        var selected = Selection.activeObject;

        if (selected)

            FindReferencesTo(selected);

    }


    private static void FindReferencesTo(Object to)

    {

        var referencedBy = new List<Object>();

        var allObjects = Object.FindObjectsOfType<GameObject>();

        for (int j = 0; j < allObjects.Length; j++)

        {

            var go = allObjects[j];


            if (PrefabUtility.GetPrefabType(go) == PrefabType.PrefabInstance)

            {

                if (PrefabUtility.GetPrefabParent(go) == to)

                {

                    Debug.Log(string.Format("referenced by {0}, {1}", go.name, go.GetType()), go);

                    referencedBy.Add(go);

                }

            }


            var components = go.GetComponents<Component>();

            for (int i = 0; i < components.Length; i++)

            {

                var c = components[i];

                if (!c) continue;


                var so = new SerializedObject(c);

                var sp = so.GetIterator();


                while (sp.NextVisible(true))

                    if (sp.propertyType == SerializedPropertyType.ObjectReference)

                    {

                        if (sp.objectReferenceValue == to)

                        {

                            Debug.Log(string.Format("referenced by {0}, {1}", c.name, c.GetType()), c);

                            referencedBy.Add(c.gameObject);

                        }


                        // 선택된 오브젝트가 텍스쳐일 경우 매트리얼에서 MainTexture 이름 비교

                        // 쉐이더에 링크된 텍스쳐가 여러개일 경우 ShaderUtil로 프로퍼티를 다 받아와서 비교해야 될 듯..

                        System.Type cToType = to.GetType();

                        if (true == cToType.Name.Equals("Texture2D"))

                        {

                            if (null != sp.objectReferenceValue)

                            {

                                System.Type cSpType = sp.objectReferenceValue.GetType();

                                if (true == cSpType.Name.Equals("Material"))

                                {

                                    Material mat = sp.objectReferenceValue as Material;


                                    if(null != mat.mainTexture && true == to.name .Equals(mat.mainTexture.name))

                                    {

                                        Debug.Log("[c.gameObject ] " + c.gameObject);

                                        referencedBy.Add(c.gameObject);

                                    }

                                }

                            }

                        }

                    }

            }

        }


        if (referencedBy.Any())

            Selection.objects = referencedBy.ToArray();

        else Debug.Log("no references in scene");

    }

}


  1. List<Texture> allTexture = new List<Texture>();
  2. Shader shader = obj.renderer.sharedMaterial.shader;
  3. for(int i=0; i<ShaderUtil.GetPropertyCount(shader); i++) {
  4. if(ShaderUtil.GetPropertyType(shader, i) == ShaderUtil.ShaderPropertyType.TexEnv) {
  5. Texture texture = obj.renderer.sharedMaterial.GetTexture(ShaderUtil.GetPropertyName(shader, i));
  6. allTexture.Add(texture);
  7. }
  8. }


반응형
Posted by blueasa
, |

Momentum And Spring 


옵션을 주면.


양끝.


1~10번까지의 리스트가 있다면.


1번에서  리스트에 없는 0번위치까지 드래그가 되서 다시 1번으로 스프링되서 돌아오는 방식이다.(10번도 마찬가지 없는 11번으로 갔다가 다시 원래 10번으로 돌아옴)


Momentum 


옵션은.


그냥 정확히 끝에 1번이나 10번에서 멈춰서 양끝으로 더이상 드래그가 되질 않는 방식이다.


이 두개를 합쳐서 


Momentum And Spring 


옵션을 주고.


한쪽방향은 더이상 못움직이게.   한쪽방향은 스프링처럼 돌아오게 하려면.


UIScrollView - 클래스에서.


public bool m_BottomStop = false;
public bool m_TopStop = false;

변수 선언.

public void Drag () 의 

Vector3 constraint = mPanel.CalculateConstrainOffset(bounds.min, bounds.max);

if (constraint.magnitude > 1f)
{
    MoveAbsolute(offset * 0.5f);
mMomentum *= 0.5f;

}

이부분에.


if (constraint.magnitude > 1f)
{
MoveAbsolute(offset * 0.5f);
mMomentum *= 0.5f;

       //StopOption.
       if (m_BottomStop == true)
       {
             if (offset.y > 0)
               RestrictWithinBounds(true, canMoveHorizontally, canMoveVertically);
        }
        if (m_TopStop == true)
        {
              if (offset.y < 0)
                 RestrictWithinBounds(true, canMoveHorizontally, canMoveVertically);
         }
}

이렇게 적어주고

m_BottomStop 과 m_TopStop   에 True 값을 넣어줘서. 값을 셋팅해서 사용하면된다.


왼쪽 오른쪽도 만들고싶다면.

offset.x 를 활용하면 된다.


[출처] http://hanamoni.tistory.com/25

반응형
Posted by blueasa
, |
using System.Text.RegularExpressions;

bool IsValidStr(string text)
{
    string pattern = @"^[a-zA-Z0-9가-힣]*$";
    return Regex.IsMatch(text, pattern);
}


텍스트의 문자열이 대소문자, 알파벳, 숫자, 한글인지 체크하는 정규식이다.

특수 문자를 사용할수 없게 한다.


참고 할만한 곳 : http://highplus.org/app/header/js/fun_form_check.js@cacheBreak=


출처 : http://tenuakan.tistory.com/108


반응형
Posted by blueasa
, |

Git : https://github.com/aws/aws-sdk-unity

http://aws.amazon.com/ko/mobile/sdk/

위 페이지에 들어가면 아래와 같이 Unity버전 AWS SDK를 다운로드 받을수있습니다.

다운로드를 받아서 ZIP파일을 풀면

아래와 같이 서비스 별로 SDK가 분류되어있는 것을 확인할수있을텐데요.

우리는 여기서 extas에 있는 aws-unity-sdk-cognitosync-2.0.0.4.unitypackage를 실행시켜주어 import해주도록 하겠습니다.


Import가 완료되면 프로젝트 탐색창에서 AWSSDK\example\Congnito Sync에 있는 CognitoSyncManagerSample.unity을 실행하여 장면을 연뒤 Play를 눌러 샘플을 실행해보도록 합시다.

Play를 누르게 되면 위 그림과 같이 AgumentNullException이 발생하는데요.

Play를 중단시키고 Hierachy에서 CognitoSyncManagerSample오브젝트를 선택하면 나타나는 Component의 Identity Pool Id값을 채워주어야하는데요.

해당 PoolId값을 만들려면 우선적으로 aws에 샘플에서 사용할 identity pool을 생성하여야합니다.

https://console.aws.amazon.com/cognito/create/.

Aws에 가입되어있다면 위 링크를 통해 새로운 identity pool을 생성할수있습니다.

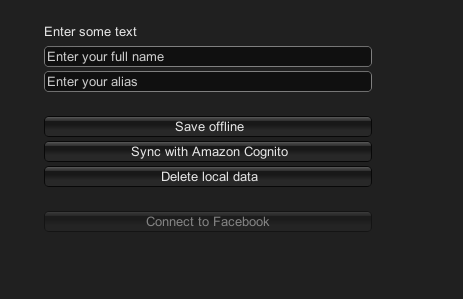
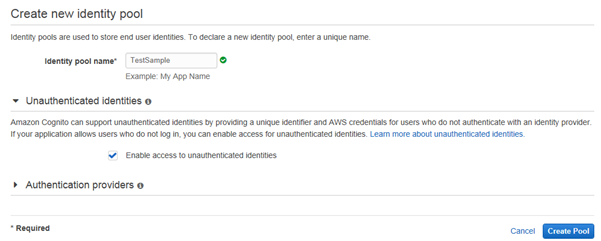
이름 같은 경우 원하는대로 작성해서 넣으시면 되고 해당 샘플을 테스트 해보려면 Unauthenticated identities에 있는 Enable access to unauthenticated identities을 체크해두어야합니다. (기본값은 체크가 해제되어있습니다.)

샘플의 추가적인 Facebook 연동을 테스트하려면 FacebookSDK도 설치되어있고 추가적인 세팅이 필요하니 이번 포스트에서는 다루지않도록 하겠습니다.


어쨌든 생성을 하고나면 위와 같은 페이지로 이동하는데요. 설정에서도 확인할수있지만 해당 페이지에서도 Identity Pool ID를 확인할수있습니다. 이를 복사한뒤에 Unity로 돌아와서 CognitoSyncManagerSample의 Identity Pool Id값을 채워주도록 합시다.


해당 값을 채운뒤 다시 Play를 누르게되면 에러가 뜨지 않고 아래와 같은 화면을 볼수있습니다.

Full Name과 alias를 입력한뒤 Save offline을 누르면 단순히 기기내에 있는 cognito dataset에 저장을 합니다. 내부적으로는 아래와 같은 코드로 동작합니다.

playerInfo.Put("playerName"playerName);

playerInfo.Put("alias"alias);


playerInfo Dataset이라는 클래스로 선언이 되어있으며 이는 Put으로 특정 키와 값을 넣어줄수있습니다어플을 삭제하지않는 이상  값은 내부적으로 저장이 되도록 되어있습니다.


여기까지는 Unity에서 제공하는 PlayerPref 같은 기능을 하는것처럼 보입니다이번에는 Sync with Amazon Cognito버튼을 클릭해보도록 하겠습니다.


해당 버튼을 클릭하게 되면 내부적으로 비슷하게 Dataset Put해주는것까지는 Save offline 눌렀을때와 같지만 Put이후에 Dataset::Sychronize메서드를 호출해주어 AWS 있는 IdentityPool 저장해주도록 되어있습니다.


AWS Cognito Console 이동하여 Identity browser탭을 클릭하면 아래와 같이 cognito 통해 싱크된 사용자 데이터를 확인할수있습니다.


만약에 sychronize에서 문제가 생긴다면 Identity pool id 잘못되었거나 Unauthenticated identities에 있는 Enable access to unauthenticated identities을 체크를 하지않았는지 다시 한번 확인해보면 될것입니다.


출처 : http://lancekun.com/tc/200

반응형
Posted by blueasa
, |

해외에서 무료 푸시서비스로 개발자들에게 가장 추천받는 pushwoosh 서비스 연동 안내 방법(한글^^;)과 샘플코드입니다.

무료 푸시서비스를 검색하면 해외는 수십개가 나오는데 국내는 전무하네요... 암튼 앱개발자 분들 중

서버가 없거나 푸시서비스를 위하여 서버를 유지하기 어려운 경우에 사용하시면 좋습니다.


간단히 pushwoosh에 대해 말씀드리면 


- pushwoosh.com에서 제공하는 push 서비스로 사용이 무제한입니다.

 ( 단 다운로드 device가 1,000,000 이상인경우 부터는 유료버전을 사용해야 합니다.제가 만든 앱이 100만대 이상의 디바이스에 설치만 되면 ......쩝.. 그래서 전 그냥 완전 무제한이라 생각합니다. )

- 가입은 이메일 인증만 하면 됩니다.

- 이메일 계정당 5개의 앱을 관리 할 수 있습니다.

- 간단한 통계 정보를 보여줍니다.


기타 기능들은 많으나 여러 기능들을 사용하기 위해서는 유료버전을 사용하셔야 합니다. 그러나 해외에서 무료 푸시서버로 가장 추천을 많이 받는 서비스로 회사 또는 개인적으로 푸시서버를 유지하기 어려우신 분들은 한번 사용해보는 것도 나쁘지 않을 것 같습니다.


아래는 연동안내서와 네이티브 연동 코드 샘플입니다. 샘플코드는 applusform.com의 앱템플릿과 연동하는 코드도 몇 줄 있으나 대부분 네이티브코드인 관계로 개발자라면 쉽게 코드를 이해하실 꺼라 생각합니다.


http://www.applusform.com/down/Pushwoosh.pdf  [연동안내서]

http://www.applusform.com/down/Pushwoosh.zip  [연동안내서 + 샘플코드 (android, iOS)]


그럼 쉬운 앱개발 템플릿을 제공하는 ApplusForm 이었습니다~~ ^^;


[출처] http://www.androidpub.com/2552814

반응형

'Unity3D > Plugins' 카테고리의 다른 글

[펌] GPGS  (1) 2016.03.08
[펌] AWS Cognito + Unity3d  (0) 2016.02.14
[에셋] 유니티용 네트워크 엔진(넷드론)  (0) 2016.01.04
[에셋] Android Keyboard (with NGUI)  (0) 2015.12.23
[링크] Live2D 적용 및 튜토리얼  (0) 2015.12.17
Posted by blueasa
, |