[M/V] 자상무색(自傷 無色) - kk
'Thinking' 카테고리의 다른 글
| [링크] 수평적 조직문화, 자율적 조직문화 (0) | 2017.03.24 |
|---|---|
| [펌] 임신중 전자파 차단의 모든것! (0) | 2016.09.02 |
| [펌] 언제 들어도 좋은 말 - 이석원 (0) | 2016.05.13 |
| [펌] no투표와 무효표의 차이 (0) | 2016.05.12 |
| [펌] 논쟁할 때는.. (0) | 2015.12.21 |

| [링크] 수평적 조직문화, 자율적 조직문화 (0) | 2017.03.24 |
|---|---|
| [펌] 임신중 전자파 차단의 모든것! (0) | 2016.09.02 |
| [펌] 언제 들어도 좋은 말 - 이석원 (0) | 2016.05.13 |
| [펌] no투표와 무효표의 차이 (0) | 2016.05.12 |
| [펌] 논쟁할 때는.. (0) | 2015.12.21 |
ios는 상관없지만.. android의 경우 시간을 사용자 임의로 변경할 수 있기 때문에, 시간과 관련하여 컨텐츠의 변경이 필요할 경우 정확한 시간의 정보가 필요함.
이럴때, 미국 국립표준 연구소의 시간을 받아와서 사용하는 방법이 있다.
출처는 - http://stackoverflow.com/questions/6435099/how-to-get-datetime-from-the-internet 요기
실제 수정해서 사용한 코드는 다음과 같음.
TcpClient tcpClient = new TcpClient("time.nist.gov", 13);
StreamReader sr = new StreamReader(tcpClient.GetStream());
// 형태 57486 16-04-08 08:53:18 50 0 0 737.0 UTC(NIST) *
string readData = sr.ReadToEnd();
// 형태 16-04-08 08:57:07
string _time = readData.Substring(readData.IndexOf(" ") + 1, 17);
// 대한민국은 UTC 기준 +9시간.
Datetime currentTime = Convert.ToDateTime(_time).AddHours(9);
// Debug.Log("현재 시간 : " + currentTime.ToString("yyyy-MM-dd HH:mm:ss"));
| [펌] OnApplicationFocus 와 OnApplicationPause 차이 (0) | 2016.09.22 |
|---|---|
| [펌] CUSTOM COROUTINES(Unity 5.3) (0) | 2016.07.21 |
| [펌] 4. Coroutine 구현에 대해서 공부 (0) | 2016.05.11 |
| [펌] Root Motion in Legacy Animation (0) | 2016.03.28 |
| BigNumber (0) | 2016.02.04 |
I've come across the situation on a number of occasions when coding where I've wanted to convert from a string to an enum. In the Media Catalog sample, I resorted to one giant switch statement that has a case block for each string that returns an enum from it.
One of my colleagues came up with the answer yesterday; it's one of those methods that you can never find when you're looking for it, but once discovered it seems blindingly obvious:
object Enum.Parse(System.Type enumType, string value, bool ignoreCase);
So you can write the following kind of code:
   enum Colour
   {
      Red,
      Green,
      Blue
   }

   // ...
   Colour c = (Colour) Enum.Parse(typeof(Colour), "Red", true);
   Console.WriteLine("Colour Value: {0}", c.ToString());

   // Picking an invalid colour throws an ArgumentException. To
   // avoid this, call Enum.IsDefined() first, as follows:
   string nonColour = "Polkadot";

   if (Enum.IsDefined(typeof(Colour), nonColour))
      c = (Colour) Enum.Parse(typeof(Colour), nonColour, true);
   else
      MessageBox.Show("Uh oh!");
What a time saver - thanks, Simon!
Footnote: interestingly, whilst writing this up I noticed that Enum.IsDefined() doesn’t offer the ignoreCase parameter. If you don’t know whether the casing is right, it seems the only way to do the conversion is using the Parse method and catching the ArgumentException. That's not ideal, since it runs a lot slower. I wonder if this is a loophole in the design; no doubt someone like Brad could cast light on it...
posted on Friday, April 02, 2004 1:49 PM
You can get the string values of enums also by calling Enum.GetNames or Enum.GetName...
| [펌] 반복문 유틸 (0) | 2016.12.07 |
|---|---|
| [펌] Loop Dictionary (0) | 2016.12.07 |
| [C#] 시간체크(Stopwatch) (0) | 2015.09.15 |
| [오류] 'Microsoft.ACE.OLEDB.12.0' 공급자는 로컬 컴퓨터에 등록할 수 없습니다. (0) | 2015.02.12 |
| Sorting Arrays (0) | 2014.11.21 |
가장 처음 만들었던 게임을 만들고 난 후에 가장 아쉬운 부분은 보안적인 처리가 취약했다는거.
아는 게 너무 없어서 이것저것 서칭해본 결과 아래의 클래스를 프로젝트에 만들어 두었다.
using System;
using System.Collections;
using System.Security.Cryptography;
using System.Text;
public static class SecureConverter
{
private static int xorCode = (UnityEngine.Random.Range(0, 10000) + UnityEngine.Random.Range(0, 10000) + UnityEngine.Random.Range(0, 10000)).GetHashCode();
public static int SecureInt(int data)
{
return data ^ xorCode;
}
public static string SecureString(string data)
{
string newText = "";
for (int i = 0; i < data.Length; i++)
{
int charValue = Convert.ToInt32(data[i]); //get the ASCII value of the character
charValue ^= xorCode; //xor the value
newText += char.ConvertFromUtf32(charValue); //convert back to string
}
return newText;
}
}
private int _abc;
public int abc { get { return SecureConvert.SecureInt(_abc); } set { _abc = SecureConvert.SecureInt(value); } }
어디서든 abc = 300; 과 같은 형태로 저장하면 실제 암호화된 형태로 저장되기 때문에 원시적인 데이터 검색만으로는 실제 메모리 주소를 찾기가 어렵게 된다.
추신. MD5 나 SHA1 같은 것으로 대체하면 더욱 좋을듯. 이는 추후 포스팅~
| [Asset] Obfuscator (2) | 2017.11.17 |
|---|---|
| [펌] Unity3D Android .dll 난독화 가이드 [Spices.Net] (0) | 2016.10.19 |
| [펌] Playerprefs 암호화 (0) | 2016.05.23 |
| C# AES 암복호화 알고리즘 (0) | 2014.03.29 |
| 안드로이드에서 암호화 팁 - 에셋번들 암호화 (0) | 2014.02.28 |
아무런 처리 없이 PlayerPrefs를 사용할 경우 값이 그대로 노출되면서 접근이 가능하고, 프로그램 밖에서 값을 수정할 경우 수정된 값 그대로 프로그램에 적용되는 문제점이 있음.
그런고로 1차적으로 어느정도는 암호화해야 하는데..구글링 한 결과 아주 만족스럽지는 않지만 적어도 원하지 않는 값으로 프로그램에 적용되는 것을 막아주도록 작성된 내용을 유니티포럼에서 찾아 포스팅한다..
(출처 - http://forum.unity3d.com/threads/playerprefs-encryption.26437/)
아래 코드의 포인트는 테스트해본 결과 실제 저장되는 PlayerPrefs의 값은 원본 그대로 저장된다. 노출자체는 된다는 얘기지. 다만, 직접 해당 유저가 해당 값을 수정하면 CheckEncryption함수를 통과하지 못해 DEFAULT 값으로 처리되면서, 기존에 저장되어 있던 PlayerPrefs의 해당 키(3개)는 모두 삭제처리된다.
using UnityEngine;
using System.Collections;
using System.Security.Cryptography;
using System.Text;
public class EncryptedPlayerPrefs {
// Encrypted PlayerPrefs
// Written by Sven Magnus
// MD5 code by Matthew Wegner (from [url]http://www.unifycommunity.com/wiki/index.php?title=MD5[/url])
// Modify this key in this file :
private static string privateKey="9ETrEsWaFRach3gexaDr";
// Add some values to this array before using EncryptedPlayerPrefs
public static string[] keys;
public static string Md5(string strToEncrypt) {
UTF8Encoding ue = new UTF8Encoding();
byte[] bytes = ue.GetBytes(strToEncrypt);
MD5CryptoServiceProvider md5 = new MD5CryptoServiceProvider();
byte[] hashBytes = md5.ComputeHash(bytes);
string hashString = "";
for (int i = 0; i < hashBytes.Length; i++) {
hashString += System.Convert.ToString(hashBytes[i], 16).PadLeft(2, '0');
}
return hashString.PadLeft(32, '0');
}
public static void SaveEncryption(string key, string type, string value) {
int keyIndex = (int)Mathf.Floor(Random.value * keys.Length);
string secretKey = keys[keyIndex];
string check = Md5(type + "_" + privateKey + "_" + secretKey + "_" + value);
PlayerPrefs.SetString(key + "_encryption_check", check);
PlayerPrefs.SetInt(key + "_used_key", keyIndex);
}
public static bool CheckEncryption(string key, string type, string value) {
int keyIndex = PlayerPrefs.GetInt(key + "_used_key");
string secretKey = keys[keyIndex];
string check = Md5(type + "_" + privateKey + "_" + secretKey + "_" + value);
if(!PlayerPrefs.HasKey(key + "_encryption_check")) return false;
string storedCheck = PlayerPrefs.GetString(key + "_encryption_check");
return storedCheck == check;
}
public static void SetInt(string key, int value) {
PlayerPrefs.SetInt(key, value);
SaveEncryption(key, "int", value.ToString());
}
public static void SetFloat(string key, float value) {
PlayerPrefs.SetFloat(key, value);
SaveEncryption(key, "float", Mathf.Floor(value*1000).ToString());
}
public static void SetString(string key, string value) {
PlayerPrefs.SetString(key, value);
SaveEncryption(key, "string", value);
}
public static int GetInt(string key) {
return GetInt(key, 0);
}
public static float GetFloat(string key) {
return GetFloat(key, 0f);
}
public static string GetString(string key) {
return GetString(key, "");
}
public static int GetInt(string key,int defaultValue) {
int value = PlayerPrefs.GetInt(key);
if(!CheckEncryption(key, "int", value.ToString())) return defaultValue;
return value;
}
public static float GetFloat(string key, float defaultValue) {
float value = PlayerPrefs.GetFloat(key);
if(!CheckEncryption(key, "float", Mathf.Floor(value*1000).ToString())) return defaultValue;
return value;
}
public static string GetString(string key, string defaultValue) {
string value = PlayerPrefs.GetString(key);
if(!CheckEncryption(key, "string", value)) return defaultValue;
return value;
}
public static bool HasKey(string key) {
return PlayerPrefs.HasKey(key);
}
public static void DeleteKey(string key) {
PlayerPrefs.DeleteKey(key);
PlayerPrefs.DeleteKey(key + "_encryption_check");
PlayerPrefs.DeleteKey(key + "_used_key");
}
}
사용법은 PlayerPrefs의 사용법과 동일하다. (아래의 암호화를 위한 키를 추가한 후 사용하면 된다.)
EncryptedPlayerPrefs.keys=new string[5];
EncryptedPlayerPrefs.keys[0]="23Wrudre";
EncryptedPlayerPrefs.keys[1]="SP9DupHa";
EncryptedPlayerPrefs.keys[2]="frA5rAS3";
EncryptedPlayerPrefs.keys[3]="tHat2epr";
EncryptedPlayerPrefs.keys[4]="jaw3eDAs";
사용시 PlayerPrefs 클래스 대신 EncryptedPlayerPrefs을 사용하면 된다. 키값 전부 지워주는 것은 기존대로 PlayerPrefs꺼 가져다가 쓰면 됨. 추후 빌드시 난독화 과정을 거치면 어느정도 보안처리를 했다고 볼수 있겠지.
---- 10월 27일 추가.
위의 클래스를 사용하면 값이 그대로 보이기때문에, 이러한 문제를 해결하기위해서는 PlayerPrefs를 약간 가공해서 쓰는것도 한가지 방법이다.
특정 시크릿키를 사용해 Int일 경우 String으로 변환해서 변환된 문자열을 암호화하여 PlayerPrefs.SetString으로 저장하고 불러올때는 복호화 후 Convert 등을 이용해 다시 int 로 바꾸어 호출해 사용하는 방법이 좋아보인다.
이와 관련하여 암/복호화를 특정키를 사용하여 쉽게 할 수 있도록 하는 클래스는 검색하면 어느정도 나오니 그것을 이용해 구현하는 것이 적합.
---- 2015.06.17
http://ikpil.com/1342
| [펌] Unity3D Android .dll 난독화 가이드 [Spices.Net] (0) | 2016.10.19 |
|---|---|
| [펌] 기본 변수 저장시 암호화 (0) | 2016.05.23 |
| C# AES 암복호화 알고리즘 (0) | 2014.03.29 |
| 안드로이드에서 암호화 팁 - 에셋번들 암호화 (0) | 2014.02.28 |
| Unity3D에서 PlayerPrefs 암호화하기 (0) | 2014.02.27 |
Android 나 PC 의 유니티에서 WWW 를 통해 파일을 받을 경우 IOS 는 해당 컨텐츠 헤더에 있는 값으로 자동으로 캐싱을 진행해 준다.
너무나 완벽한 OS 라서 문제가 생긴다..
아래 두가지 경우의 파일이 있다.
< Cache-Control 이 설정되어 있는 경우 >
< Cache-Control 이 없는 경우 >
Cache-Control 이 있는경우 IOS 에서는 해당 파일 캐싱을 진짜로 구현해 준다. ( 원래 이게 당연한 거지만.. )
따라서 저 만료 날자가 되기 전에 다시 같은 주소로 요청을 하면 새로 받아오지 않고 이전 캐싱된 데이터를 준다.
이 경우 가장 간단하게 해결하는 방법은 주소뒤에 의미없는 값을 추가하여 캐싱되지 않는 것처럼 꾸미는 것이다.
WWW( "http://www.naver.com/file.json?t=213948712" );
그러나 이 경우 클라이언트나 CDN 등에 쓸데없는 캐싱이 생길 수 있으며, 깔끔하지 않다.
가능한 Request 에서 요청 헤더에 다음과 같이 캐싱을 하지 않겠다고 추가하는것이 좋다.
WWWForm form = new WWWForm();
form.AddField( "Cache-Control", "no-cache" );
| Unity Job Process (0) | 2016.06.27 |
|---|---|
| [펌] 윈도우 빌드시 해상도 선택 다이얼로그 안나오게 하는 방법 (0) | 2016.06.14 |
| [펌] Application.LoadLevel(string) is obsolete 마이그레이션 (0) | 2016.05.16 |
| [펌] Unity로 다수의 인원이 개발할 때 알아두면 좋은 9가지 (0) | 2016.05.11 |
| [펌] Unity 에서 장치 ID, MAC 주소 가져오기 (0) | 2016.05.02 |
이 내용은 소프트웨어 엔지니어이자 기업가인 마틴 클레프만(Martin Kleppmann)의 블로그에 있는(http://martin.kleppmann.com/2012/12/05/schema-evolution-in-avro-protocol-buffers-thrift.html) 있는 내용이다. 이 내용의 번역은 마틴 클레프만의 동의를 얻어서 진행했다.
에이브로(Avro), 프로토콜 버퍼(Protocol Buffers) 그리고 스리프트(Thrift)의 스키마 변경(evolution).
자 여러분은 파일로 저장하거나 네트워크로 전송하려는 데이터를 가지고 있다. 그리고 변경(진화)의 여러 단계를 거치면서 스스로 찾아갈 수도 있다:
만약, 4.의 단계를 고민한다면, 일반적으로 선택할 수 있는 옵션은 스리프트(Thrift), 프로토콜 버퍼(Protocol Buffers)와 에이브로(Avro)가 있다. 이 세 가지는 효율적이고, 스키마를 이용한 데이터의 언어에 독립적인(cross-language) 직렬화와 자바 진영(folks)을 위한 코드 생성도 제공한다.
이것들에 대한 비교는 이미(Protocol Buffers, Avro, Thrift & MessagePack, Thrift vs Protocol Bufffers vs JSON, Comparison of Protobuff, Thrift, Avro, etc) 확인할 수 있다. 하지만 많은 글이 일상적으로 보이지만, 중요한 세부내용을 간과하고 있다: 스키마를 변경하면, 어떻게 될까?
실제로 데이터는 항상 유동적이다. 완성된 스키마를 가지고 있다고 생각하는 순간, 누군가 예상치 않은 사례(use case)를 가지고 올 것이고, “단지 빠르게 필드를 추가”하길 원한다. 다행스럽게도, 스리프트, 프로토콜 버퍼 그리고 에이브로 모두 스키마 변경(schema evolution)를 지원한다: 스키마를 변경할 수 있는 동시에, 스키마의 다양한 버전에 대한 프로듀서(producers)와 컨슈머(consumers)를 사용할 수 있어서, 이전 버전의 스키마를 계속 사용할 수 있다. 이것으로, 호환성 걱정 없이, 서로 다른 시간에, 시스템의 각 컴포넌트를 독립적으로 갱신할 수 있게 해서, 매우 큰 시스템을 다룰 때, 매우 중요한 기능이다.
이것이 이 글의 주제이다. 실제로 프로토콜 버퍼, 에이브로 그리고 스리프트가 데이터를 데이터를 바이트로 인코딩하는 방법을 살펴본다. 이 내용은 개별 프레임웍이 스키마 변경을 처리하는 방법을 이해하는데 도움이 될 것이다. 이 프레임웍들이 만들어진 설계의 선택에 대해서 관심과 비교를 통해서 더 좋은 엔지니어가 될 수 있을 것이다.
예로, Person을 나타내는 작은 객체를 사용할 것이고, JSON으로 아래처럼 기술할 수 있다:
01 02 03 04 05 | { “userName”: “Martin”, “favouriteNumber”: 1337, “interests”: [“daydreaming”, “hacking”] } |
이 JSON 인코딩이 기준이 될 수 있다. 모든 공백을 지우면, 82바이트다.
프로토콜 버퍼
Person 객체에 대한 프로토콜 버퍼의 스키마는 아래와 같다:
01 02 03 04 05 | message Person { required string user_name = 1; optional int64 favourite_number = 2; repeated string interests = 3;} |
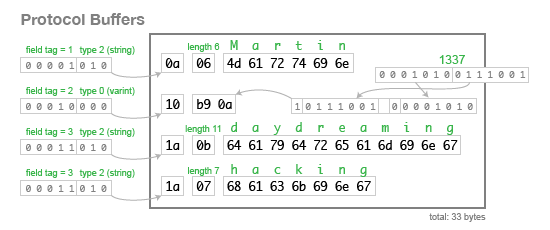
이 스키마로 데이터를 인코딩하면, 아래와 같이 33 바이트를 사용한다.

바이너리 형태가 어떻게 바이트 단위로 구성되는지 정확하게 살펴봐라. Person 레코드는 단지 필드의 연속이다. 각 필드는 태그 넘버(위의 스키마에서 1, 2, 3)를 지정하는 1 바이트로 시작하고, 다음으로 필드의 타입이다. 필드의 첫 바이트를 타입인 문자열로 지정한다면, 다음으로 문자열의 바이트 수와, UTF-8로 인코딩된 문자열이 따라온다. 첫 바이트를 정수로 지정한다면, 가변 길이로 인코딩된 수(값)가 나온다. 배열 타입은 없지만, 다중 값(multi-valued) 필드를 나타내기 위해서 태그 번호를 여러 번 사용할 수 있다.
이 인코딩 형태는 스키마 변화에 대해서 아래의 결과를 가진다:
개별 필드를 나타내기 위해서 태그 번호를 사용하는 방식은 간단하고 효과적이다. 하지만 이 방식이 유일하지 않다는 것은 금방 알 수 있을 것이다.
에이브로
에이브로 스키마는 2가지 방법으로 사용할 수 있고, 한 가지 방법은 JSON 포맷을 사용하는 것이고:
01 02 03 04 05 06 07 08 09 | { “type”: “record”, “name”: “Person”, “fields”: [ {“name”: “userName”, “type”: “string”}, {“name”: “favouriteNumber”, “type”: [“null”, “long”]}, {“name”: “interests”, “type”: {“type”: “array”, “items”: “string”}} ]} |
다른 방법은 IDL을 사용하는 것이다:
01 02 03 04 05 | record Person { string userName; union { null, long } favouriteNumber; array<string> interests;} |
스키마에 태그 번호가 없는 것을 확인해라! 그럼 어떻게 동작할까?
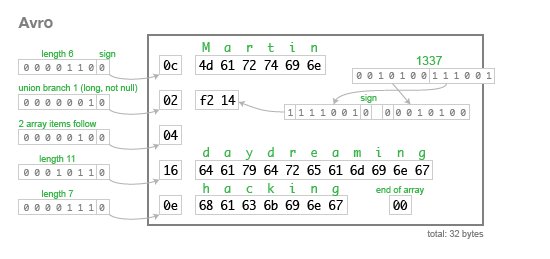
아래는 32바이트로 인코딩(http://avro.apache.org/docs/current/spec.html)된 같은 예제 데이터다.

문자열 앞은 길이(length)이고 다음으로 UTF-8 바이트지만, 바이트스트림(bytestream)은 그것이 문자열이라고 알려주지 않는다. 이것(바이너리 데이터)은 단지 가변 길이 정수가 될 수 있지만, 완전히 다를 수 있다. 이 바이너리 데이터를 파싱할 수 있는 유일한 방법은 스키마와 같이 읽는 것이고, 스키마는 다음에 나오는 타입이 무엇인지 알려준다.
데이터의 작성자(writer)가 사용한 스키마의 정확히 같은 버전이 필요하다. 다른 스키마를 가지고 있다면, 파서는 바이너리 데이터의 헤드(head)나 테일(tail)을 만들 수 없게 될 것이다.
그런데 에이브로는 어떻게 스키마 변화를 지원할까? 비록 작성자의 스키마로 작성된 데이터와 정확한 스키마를 알 필요가 있지만, 컨슈머(consumer)가 기대하는(구독자(reader)의 스키마) 스키마가 같아야 한다는 것은 아니다. 실제로, 에이브로 파서에 다른 두 개의 스키마를 제공할 수 있고, 파서는 작성자 스키마를 구독자 스키마로 변환하기 위해서 해결 규칙(resolution rules)을 사용한다.
이것은 스키마 변화에 대해 몇 가지 흥미로운 결과를 가지게 한다:
이것은 작성된 특정 레코드의 정확한 스키마를 알아야 하는 문제를 남긴다. 그래서 가장 좋은 해결책은 데이터가 사용되고 있는 상황(context)에 따르는 것이다.
이것을 고려하는 한 방법으로: 프로토콜 버퍼에서는, 레코드의 모든 필드를 태그하고, 에이브로에서는, 전체 레코드, 파일 또는 네트워크 연결을 스키마 버전으로 태그한다.
언뜻 보기에는, 스키마 배포에 부가적인 노력이 필요하기에, 에이브로 방식이 더 복잡하게 보일 수 있다. 하지만, 에이브로 방식이 가지고 있는 몇 가지 의미있는 장점에 대해서 생각해 보자:
스리프트
스리프트는 데이터 직렬화 라이브러리 뿐 아니라, 전체가 RPC 프레임워크라서, 에이브로나 프로토콜 버퍼보다 큰 프로젝트이다. 스리프트는 또 다른 방식을 가지고 있다: 에이브로나 프로토콜 버퍼는 단일 바이너리 인코딩을 표준으로 하지만, 스리프트는 다양한 직렬화 포맷(“프로토콜”이라고 하는)을 포함(embraces)한다.
사실, 스리프트는 두 가지(1, 2) JSON 인코딩 방식이 있으며, 최소한 3가지의 바이너리 인코딩 방식을 가지고 있다(하지만, 바이너리 인코딩의 하나인 DenseProtocol은 오직 C++ 구현만 지원하고 있다: 언어 중립적인(cross-language) 직렬화에 관심이 있기에, 다른 두 가지에 중점을 둘 것이다).
모든 인코딩은 스리프트 IDL에서 정의된 같은 스키마를 공유한다:
01 02 03 04 05 | struct Person { 1: string userName, 2: optional i64 favouriteNumber, 3: list<string> interests} |
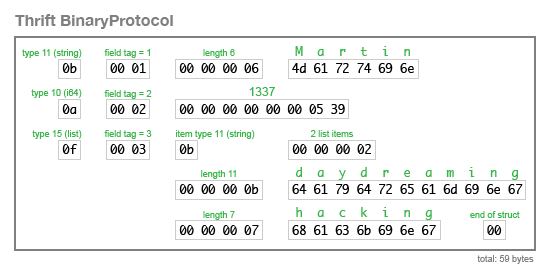
바이너리 프로토콜(BinaryProtocol) 인코딩은 매우 간단하지만, 상당히 비효율적(위의 예제 레코드를 인코딩하기 위해서 59바이트를 사용)이다:

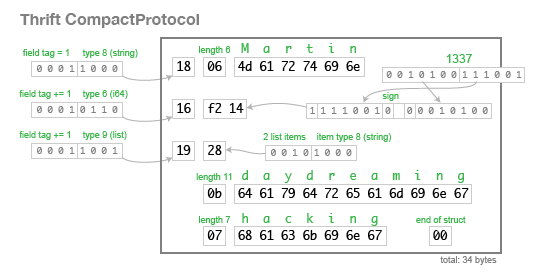
컴팩트 프로토콜(CompactProtocol) 인코딩은 의미상 같지만, 크기를 34바이트로 줄이기 위해서 가변-길이 정수와 비트 패킹을 사용한다:

보다시피, 스리프트의 스키마 변화에 대한 대처 방식은 프로토콜 버퍼와 같다: 각 필드는 IDL에 수동으로 태그를 할당하고, 태그와 필드 타입은 인코딩된 바이너리에 저장하고, 이것으로 파서가 알지 못하는 필드는 생략할 수 있도록 한다. 스리프트는 프로토콜 버퍼의 반복 필드 방식보다 명시적인 리스트 타입을 정의하지만, 이 두 개는 매우 유사하다.
사상적인 관점에서, 위 라이브러리들은 매우 다른 관점을 가지고 있다. 스리프트는 전체가 통합된 RPC 프레임웍이고, 많은 선택(다양한 언어를 지원)을 주는 “한 상점에서 여러 가지 상품을 파는(one-stop shop)” 형태를 선호한다. 반면에, 프로토콜 버퍼와 에이브로는 “한 가지 일을 더 잘하는” 형태를 더 선호하는 것으로 보인다.
원 글에 있는 답글 중에 하나로 “에이브로는 스리프트보다는 작지만 RPC 프레임웍이고, IPC도 지원한다”고 한다.
| [펌] 직렬화 방법, Facebook의 Thrift와 Protocol Buffers의 비교. (0) | 2014.12.26 |
|---|---|
| Thrift vs Protocol Buffers 비교문 요점 정리 (0) | 2014.12.26 |
[사진 : 서브웨이 서퍼 플레이 스크린샷]
출처 : http://answers.unity3d.com/questions/288835/how-to-make-plane-look-curved.html
http://devkorea.co.kr/bbs/board.php?bo_table=m03_lecture&wr_id=3315&page=0&sca=&sfl=&stx=&sst=&sod=&spt=0&page=0¤tId=42
위의 사진처럼 땅이 평평하지 않고 휘어지는 듯한 효과를 연출하기 위함이다.
땅 자체를 곡선으로 만들수도 있겠지만
카메라가 보는 부분의 렌더링을 수정함으로써 효과를 낼 수 있다.
BendTheWorldShader.unitypackage
위의 파일은 예제 파일이며,
https://dl.dropboxusercontent.com/u/7761356/UnityAnswers/Web/BendTheWorld/WebPlayer.html
웹에서도 실행을 해볼 수 있다.
적용 방법 :
위의 예제파일이나, 웹에서 보듯이 shader프로그래밍을 하면 된다.
shader 파일을 생성한다.
shader 파일에 아래와 같이 코드를 입력한다.
접기
Shader "Custom/Curved" {
Properties {
_MainTex ("Base (RGB)", 2D) = "white" {}
_QOffset ("Offset", Vector) = (0,0,0,0)
_Dist ("Distance", Float) = 100.0
}
SubShader {
Tags { "RenderType"="Opaque" }
Pass
{
CGPROGRAM
#pragma vertex vert
#pragma fragment frag
#include "UnityCG.cginc"
sampler2D _MainTex;
float4 _QOffset;
float _Dist;
struct v2f {
float4 pos : SV_POSITION;
float4 uv : TEXCOORD0;
} ;
v2f vert (appdata_base v)
{
v2f o;
// The vertex position in view-space (camera space)
float4 vPos = mul (UNITY_MATRIX_MV, v.vertex);
// Get distance from camera and scale it down with the global _Dist parameter
float zOff = vPos.z/_Dist;
// Add the offset with a quadratic curve to the vertex position
vPos += _QOffset*zOff*zOff;
o.pos = mul (UNITY_MATRIX_P, vPos);
o.uv = mul( UNITY_MATRIX_TEXTURE0, v.texcoord );
return o;
}
half4 frag (v2f i) : COLOR
{
half4 col = tex2D(_MainTex, i.uv.xy);
return col;
}
ENDCG
}
}
FallBack "Diffuse"
}
작성한 shader 파일을 texture의 shader로 적용한다.
그러면 카메라의 위치에서 멀리 있는 객체일수록 z축의 아래로 쳐져 있는 듯한 효과를 나타낼 수 있다.
이제, 휘어지게 보여질 객체에 스크립트에서 처리해야 한다
mOffset = new Vector2(0.0f,-1.8f)
mModelsRenderer = mModel.GetComponentsInChildren<Renderer>();
mModelsMeshFilter = mModel.GetComponentsInChildren<MeshFilter>();
foreach( Renderer render in mModelsRenderer )
render.material.SetVector("_QOffset", mOffset );
foreach( MeshFilter meshfilter in mModelsMeshFilter )
meshfilter.mesh.bounds = new Bounds( Vector3.zero, Vector3.one * 3000 );
render.material.SetVector("_QOffset", mOffset )
는 휘어지는 방향과 크기를 정하며
meshfilter.mesh.bounds = new Bounds( Vector3.zero, Vector3.one * 3000 );
는 mesh범위를 키워 카메라에서 멀리 있어도 휘어지는 효과 그대로 화면에 보이도록 함이다.
| [펌] Super-Blur: Screen and UI gaussian blur for Unity (0) | 2017.02.09 |
|---|---|
| [펌] Dvornik Unity Distortion (0) | 2016.08.31 |
| [NGUI] Overlay Shader with Panel Clipping (0) | 2015.06.09 |
| Shader: Photoshop Overlay Effect (0) | 2015.04.27 |
| Unity3d Shader Syntax Highlighting(Visual Studio 2010/2012/2013) (0) | 2015.03.24 |
유니티 5.3.1 f1 로 버전업 했더니, NGUI 에서 범상치 않은 워닝을 내뱉었다.
1 2 3 | Assets/NGUI/Examples/Scripts/Other/LoadLevelOnClick.cs(15,37): warning CS0618: `UnityEngine.Application.LoadLevel(string)' is obsolete: `Use SceneManager.LoadScene' |
Application.LoadLevel 로 씬 이동 하던 것을 SceneManager.LoadScene 으로 사용하란다.
그래서 유니티의 바람대로 SceneManager.LoadScene 으로 고쳐썼더니 네임스페이스가 없다고 한다....
검색해보니 UnityEngine.SceneManagement 라는 네임 스페이스가 추가된 듯..
1 | using UnityEngine.SceneManagement; | cs |
위와 같이 네임스페이스를 추가하니 정상적으로 작동한다.
알고보니 유니티 5.3에서 멀티 씬 편집(Multi-Scene Editing) 을 지원한다고 한다.
아래와 같이 프로젝트 뷰 에서 오른쪽 클릭을 한 후, Open Scene Additive 를 클릭하면...
▼ 이렇게 하이라키 뷰에 여러 씬이 열린다.
또한 SceneManager 추가되었고, 덕분에 자주쓰는 메소드들도 거의 다 구식이 되어버렸다.
변경점은 다음과 같다.
1 2 3 4 5 6 7 8 9 10 11 12 13 14 15 16 17 18 19 20 21 22 23 24 25 26 27 28 29 30 31 32 33 34 35 36 37 38 39 40 41 42 43 44 45 46 47 48 49 50 51 52 53 54 55 56 | // old Application.LoadLevel(0); // 로드. Application.LoadLevel("SceneName"); AsyncOperation ao = Application.LoadLevelAsync(0); // 로드. (비동기) AsyncOperation ao = Application.LoadLevelAsync("SceneName"); Application.LoadLevelAdditive(0); // 씬 병합 추가. Application.LoadLevelAdditive("SceneName"); Application.LoadLevelAdditiveAsync(0); // 씬 병합 추가. (비동기) Application.LoadLevelAdditiveAsync("SceneName"); Application.UnloadLevel(0); // 언로드. Application.UnloadLevel("SceneName"); Application.levelCount; // BuildSetting 에 등록 된 씬 개수. Application.loadedLevel; // 현재 씬 인덱스. Application.loadedLevelName; // 현재 씬 이름. // 5.3 SceneManager.LoadScene(0); // 로드. SceneManager.LoadScene("SceneName"); AsyncOperation ao = SceneManager.LoadSceneAsync(0); // 로드. (비동기) AsyncOperation ao = SceneManager.LoadSceneAsync("SceneName"); SceneManager.LoadScene(0, LoadSceneMode.Additive); // 씬 병합 추가. SceneManager.LoadScene("SceneName", LoadSceneMode.Additive); SceneManager.LoadSceneAsync(0, LoadSceneMode.Additive); // 씬 병합 추가. (비동기) SceneManager.LoadSceneAsync("SceneName", LoadSceneMode.Additive); SceneManager.UnloadScene(0); // 언로드. SceneManager.UnloadScene("SceneName"); SceneManager.sceneCount; // 현재 로드 된 씬 개수. SceneManager.sceneCountInBuildSettings; // BuildSetting 에 등록 된 씬 개수. SceneManager.GetActiveScene().buildIndex; // 현재 씬 인덱스. SceneManager.GetActiveScene().name; // 현재 씬 이름. // 씬 정보 조회. Scene activeScene = SceneManager.GetActiveScene(); Scene scene1 = SceneManager.GetSceneAt(0); Scene scene2 = SceneManager.GetSceneByName("SceneName"); Scene scene3 = SceneManager.GetSceneByPath("Assets/SceneName.unity"); Scene[] loadedScenes = SceneManager.GetAllScenes(); // Scene 구조체. int buildIndex; string name; string path; bool isLoaded; bool isDirty; // 씬을 변경(수정)했는지 여부. int rootCount; // 씬의 Root에 있는 GameObject 개수. bool IsValid(); // 유효한 씬인지 여부. // 기타. Scene scene = gameObject.scene; // 게임오브젝트가 속해있는 씬을 가져오기. GameObject go = new GameObject("New Object"); // 게임오브젝트를 생성하면 현재 씬에 추가 됨. SceneManager.MoveGameObjectToScene(go, scene); // 게임오브젝트를 다른 씬으로 이동. SceneManager.MergeScenes(sourceScene, destinationScene); // 씬을 병합. // SceneManager.Get~() 으로 가져올 수 있는 것은 로드가 끝난 씬만 가능. Scene scene = SceneManager.GetSceneByName("SceneName"); bool isValid = scene.IsValid(); // false 가 리턴 됨. | cs |
정리하다보니 꽤 많네;;;
아, 그리고 DontDestroyOnLoad 메소드 비스므리 한 것은 아예 없었는데,
Tips 를 참조해 보면, DontDestroyOnLoad 의 사용은 피하는 것이 좋고, Manager 씬을 만들어서 병합하는 것이 좋다고 한다.
앞으로 개발 시 참고해야 할 사항인 것 같다.
PS. Unity 5.3 에서는 과금 플러그인을 이용할 필요가 없을 수도 있겠다.
Unity Service Tab 에서 여러가지를(Unity Ads, Analytics, Cloud Build, In-App Purchasing, Multiplayer) 지원함..
| [펌] 윈도우 빌드시 해상도 선택 다이얼로그 안나오게 하는 방법 (0) | 2016.06.14 |
|---|---|
| [UNITY & IOS] WWW auto caching 문제 해결하기 (Cache-Control) (0) | 2016.05.19 |
| [펌] Unity로 다수의 인원이 개발할 때 알아두면 좋은 9가지 (0) | 2016.05.11 |
| [펌] Unity 에서 장치 ID, MAC 주소 가져오기 (0) | 2016.05.02 |
| [펌] 유니티 작업에 대한 50 팁 (모범 사례) 50 Tips for Working with Unity (Best Practices) (0) | 2016.03.22 |
| [펌] [자막재생] 시놀로지 NAS, 아이폰, LG TV, TVG(유플러스IPTV) 조합 (0) | 2016.07.13 |
|---|---|
| [펌] NAS2 와 LG TV 간 DLNA 구성기 (0) | 2016.07.13 |
| [펌] 시놀로지 DS Video 한글자막 나오게 하기 (0) | 2016.07.12 |
| [링크] NAS의 활용 - Synology DSM (0) | 2016.06.20 |
| [펌] 시놀로지 NAS로 24시간 토렌트 이용하기 (0) | 2016.06.20 |