First thing to do was to switch to Unity beta 2018.1. There you have the UnityWebRequest.certificateHandler This allows to set up custom certificate validation. one last thing to do is to create an object extending CertificateHandler to manage Certificate validation. (Seeherein Unity beta documentation)
Here is the code :
MyMonoBehaviour :
 IEnumerator GetRequest(string uri){
     UnityWebRequest request = UnityWebRequest.Get(uri);
     request.certificateHandler = new AcceptAllCertificatesSignedWithASpecificKeyPublicKey();
     yield return request.SendWebRequest ();
     if (request.isNetworkError)
     {
         Debug.Log("Something went wrong, and returned error: " + request.error);
     }
     else
     {
         // Show results as text
         Debug.Log(request.downloadHandler.text);
     }
 }
Here's a toon/cel/anime shader I've been working on that I am redying up for release. It has been designed to be easy for artists to use but also to offer heavy customizability. I'm making this thread to gauge if there is interest in any particular features, or just general feedback.
The gist of the asset is:
Forward-rendered cel-shader with full support for realtime lights + shadows
Ramp texture support for custom styles or skin shading
Smoothly control the cel-effect with a slider, ranging from "normal" smooth shading to 100% sharp edges
Supports a number of effects aimed towards making a material appear to be animated/drawn (specular, rim lighting, cubemap reflections)
Supports vertex colors, HSV adjustment with color masking, specular/gloss maps, normal maps, alpha testing, alpha blending (separate material), vertex-displaced outline (integrated in the same material or as a separate shader) as well as some custom ambient lighting
Also bundled with the asset is a number of stylized cubemaps useful for toon-like reflections (such as hair reflections or eye glints)
Runs well on mobile and plan is to test and make sure it is VR-compatible as well.
Anyway, here are some screenshots:
Currently I am interested in testing it out with more models (as well as gathering some screenshots and feedback). If you've got a smiple-styled model (preferably a character) and you'd like to give it a try, send me a PM with an image of it and I'll send you the asset so you can test it out!
You will learnto write a lit toon shader from scratch. The shader will be lit by a single directional light, and cast and receive shadows.
Toon shading(often calledcel shading) is a rendering style designed to make 3D surfaces emulate 2D, flat surfaces. This style entered the mainstream with games likeJet Set RadioandThe Wind Waker.
This tutorial will describe step-by-step how to write a toon shader in Unity. The shader will receive light from asingle directional source, and havespecular reflectionsandrim lighting. We will use the art style ofThe Legend of Zelda: Breath of the Wildas our reference, although we will not implement some of the more complex rendering techniques used in the game.
Breath of the Wilddivides surfaces into two bands of lightness, adding rim and specular on top. The rim is only applied to surfaces illuminated by the main directional light.
The completed projectis provided at the end of the article. Note that it also contains a large amount of comments in the created shader file to aid understanding.
Prerequisites
To complete this tutorial, you will need a working knowledge of Unity engine, and a basic understanding of shader syntax and functionality.
These tutorials are made possible, and keptfreeandopen source, by your support. If you enjoy them, please consider becoming mypatron through Patreon.
Getting started
Download the starter project provided above and open it in the Unity editor. Open theMainscene, and open theToonshader in your preferred code editor.
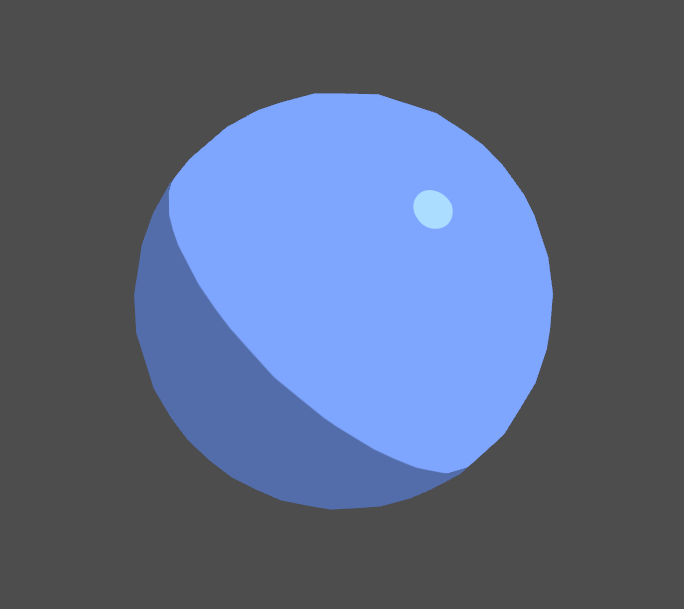
This file contains a simple shader that outputs a sampled texture, tinted by a color (with the default color set tocornflower blue). We will build off this file to create our toon shader.
1. Directional lighting
When writing shaders in Unity that interact with lighting it is common to useSurface Shaders. Surface shaders use code generation to automate the object's interaction with lights and global illumination. However, as our shader will only interact with a single directional light, it willnotbe necessary to use surface shaders.
We will set up our shader to receive lighting data. Add the following code at the top of thePass, just after its opening curly brace.
The first line requests some lighting data to be passed into our shader, while the second line further requests to restrict this data to only the main directional light. You canread more about Pass tags here.
To calculate our lighting, we will use a common shading model calledBlinn-Phong, and apply some additional filters to give it a toon look. The first step is to calculate the amount of light received by the surface from the main directional light. The amount of light is proportional to the direction, ornormalof the surface with respect to the light direction.
Blinn-Phongshading vectors, whereLis the vector to the light source andNis the normal of the surface.
We'll need access to the object's normal data within our shader. Add the following code.
// Inside the appdata struct. float3 normal : NORMAL; … // Inside the v2f struct. float3 worldNormal : NORMAL;
The normals inappdataare populated automatically, while values inv2fmust be manually populated in the vertex shader. As well, we want to transform the normal fromobject spacetoworld space, as the light's direction is provided in world space. Add the following line to the vertex shader.
With the world normal now available in the fragment shader, we can compare it to the light's direction using theDot Product.
The dot product takes in two vectors (of any length) and returns a single number. When the vectors are parallel in the same direction and areunit vectors(vectors of length 1), this number is 1. When they are perpendicular, it returns 0. As you move a vector away from parallel—towards perpendicular—the dot product result will move from 1 to 0non-linearly. Note that when the angle between the vectors isgreater than 90, the dot product will be negative.
Add the following to the fragment shader. Note that existing code that ismodifiedwill behighlighted in yellow. New code isnothighlighted.
// At the top of the fragment shader. float3 normal =normalize(i.worldNormal);float NdotL =dot(_WorldSpaceLightPos0, normal); … // Modify the existing return line.return _Color *sample*NdotL;
This has rendered out a realistic style of illumination. To modify it to be toon-like, we will divide the lighting into two bands: light and dark.
What if we wanted more than two discrete bands of shading?
2. Ambient light
This looks good, but the dark side istoodark; right now it is completely black. Also, the edge between dark and light looks a bit sharp, but we'll deal with that later. For now, we will addambient light.
Ambient lightrepresents light that bounces off the surfaces of objects in the area and is scattered in the atmosphere. We will model it as a light that affects all surfaces equally and is additive to the main directional light.
// Add as a new property.[HDR]_AmbientColor("Ambient Color", Color)=(0.4,0.4,0.4,1) … // Matching variable, add above the fragment shader. float4 _AmbientColor; … return _Color * sample * (_AmbientColor + lightIntensity);
You'll notice that modifying the intensity or color of theDirectional Lightin the scene does not affect our shader. We will add some code to include this in our lighting calculations.
What does [HDR] mean above the _AmbientColor property?
We multiply our existinglightIntensityvalue and store it in afloat4, so that we include the light's color in our calculation._LightColor0is the color of the main directional light. It is afixed4declared in theLighting.cgincfile, so we include the file above to make use of the value.
Before going further, we'll soften the edge between light and dark to remove the jaggedness. Right now, the transition from light to dark is immediate and occurs over a single pixel. Instead, we'll smoothly blend the value from one to zero, using thesmoothstepfunction.
smoothsteptakes in three values: alower bound, anupper boundand a value expected to be between these two bounds.smoothstepreturns a value between 0 and 1 based on how far this third value is between the bounds. (If it is outside the lower or upper bound,smoothstepreturns a 0 or 1, respectively).
Comparison betweensmoothstep(left) and a linear function (right). The values are mapped to the greyscale background, as well as the curves in red.
smoothstepisnotlinear: as the value moves from 0 to 0.5, it accelerates, and as it moves from 0.5 to 1, it decelerates. This makes it ideal for smoothly blending values, which is how we'll use it to blend our light intensity value.
float lightIntensity =smoothstep(0, 0.01, NdotL);
Our lower and upper bounds, 0 and 0.01, are very close together—this helps maintain a relatively sharp, toony edge. WhenNdotLis above 0.01 or below 0 it returns one and zero like before, respectively. However, in between that range it will smoothly blend between 0 and 1.
3. Specular reflection
Specular reflectionmodels the individual, distinct reflections made by light sources. This reflection isview dependent, in that it is affected by the angle that the surface is viewed at. We will calculate theworld view directionin the vertex shader and pass it into the fragment shader. This is the direction from the current vertex towards the camera.
// Add to the v2f struct. float3 viewDir : TEXCOORD1; … // Add to the vertex shader. o.viewDir =WorldSpaceViewDir(v.vertex);
We'll now implement the specular component of Blinn-Phong. This calculation takes in two properties from the surface, aspecular colorthat tints the reflection, and aglossinessthat controls the size of the reflection.
// Add as new properties. [HDR]_SpecularColor("Specular Color", Color)=(0.9,0.9,0.9,1)_Glossiness("Glossiness", Float)=32 … // Matching variables.float _Glossiness; float4 _SpecularColor;
The strength of the specular reflection is defined in Blinn-Phong as the dot product between the normal of the surface and thehalf vector. Thehalf vectoris a vector between the viewing direction and the light source; we can obtain this by summing those two vectors and normalizing the result.
// Add to the fragment shader, above the line sampling _MainTex. float3 viewDir =normalize(i.viewDir); float3 halfVector =normalize(_WorldSpaceLightPos0 + viewDir);float NdotH =dot(normal, halfVector);float specularIntensity =pow(NdotH * lightIntensity, _Glossiness * _Glossiness); … return _Color *sample*(_AmbientColor + light +specularIntensity);
We control the size of the specular reflection using thepowfunction. We multiplyNdotHbylightIntensityto ensure that the reflection is only drawn when the surface is lit. Note that_Glossinessis multiplied by itself to allow smaller values in the material editor to have a larger effect, and make it easier to work with the shader.
Once again we will usesmoothstepto toonify the reflection, and multiply the final output by the_SpecularColor.
Rim lighting is the addition of illumination to the edges of an object to simulate reflected light or backlighting. It is especially useful for toon shaders to help the object'ssilhouettestand out among the flat shaded surfaces.
The "rim" of an object will be defined as surfaces that are facingawayfrom the camera. We will therefore calculate the rim by taking the dot product of the normal and the view direction, andinvertingit.
// In the fragment shader, below the line declaring specular. float4 rimDot =1-dot(viewDir, normal); … return _Color *sample*(_AmbientColor + light + specular +rimDot);
Once again, we'll toonify the effect by thresholding the value withsmoothstep.
// Add as new properties.[HDR]_RimColor("Rim Color", Color)=(1,1,1,1)_RimAmount("Rim Amount",Range(0,1))=0.716 … // Matching variables. float4 _RimColor;float _RimAmount; … // Add below the line declaring rimDot.float rimIntensity =smoothstep(_RimAmount -0.01, _RimAmount +0.01, rimDot); float4 rim = rimIntensity * _RimColor; … return _Color *sample*(_AmbientColor + light + specular +rim);
With the rim being drawn around the entire object, it tends to resemble an outline more than a lighting effect. We'll modify it to only appear on theilluminatedsurfaces of the object.
This is better, but it would be useful to be able to control how far the rim extends along the lit surface. We'll use thepowfunction to scale the rim.
// Add as a new property._RimThreshold("Rim Threshold",Range(0,1))=0.1 … // Matching variable.float _RimThreshold; … float rimIntensity = rimDot *pow(NdotL, _RimThreshold);
5. Shadows
As a final step, we will add the ability for our shader tocastandreceiveshadows. Shadow casting is very simple. Add the following line of code below theentirePass(outside the curly braces).
// Insert just after the closing curly brace of the existing Pass. UsePass "Legacy Shaders/VertexLit/SHADOWCASTER"
UsePassgrabs a pass from a different shader and inserts it into our shader. In this case, we are adding a pass that is used by Unity during the shadow casting step of the rendering process.
In order to receive shadows, we will need to know in the fragment shader whether a surface is in a shadow or not, and factor that in to our illumination calculation. To sample the shadow map cast by a light, we'll need to transfer texture coordinates from the vertex shader to the fragment shader.
// As a new include, below the existing ones.#include "AutoLight.cginc" … // Add to the v2f struct.SHADOW_COORDS(2) … // Add to the vertex shader.TRANSFER_SHADOW(o)
We includeAutolight.cginc, a file that contains several macros we will use to sample shadows.SHADOW_COORDS(2)generates a 4-dimensional value with varying precision (depending on the target platform) and assigns it to theTEXCOORDsemantic at the provided index (in our case, 2).
TRANSFER_SHADOWtransforms the input vertex's space to the shadow map's space, and then stores it in theSHADOW_COORDwe declared.
Before we can sample the shadow map, however, we need to ensure our shader is set up to handle two different lighting cases: when the main directional lightdoesanddoes notcast shadows. Unity will help us handle these two configurations by compiled multiplevariantsof this shader for each use case. You canread more about shader variants here. We will use a built-in shortcut to compile our variants. Add the following line of code just below the#pragma fragment fragline.
#pragma multi_compile_fwdbase
This shortcut instructs Unity to compile all variants necessary for forward base rendering. We can now sample the value in the shadow map, and apply it to our lighting calculation.
// In the fragment shader, above the existing lightIntensity declaration.float shadow =SHADOW_ATTENUATION(i);float lightIntensity =smoothstep(0,0.01, NdotL *shadow);
SHADOW_ATTENUATIONis a macro that returns a value between 0 and 1, where 0 indicates no shadow and 1 is fully shadowed. We multiplyNdotLby this value, as it is the variable that stores how much light we received from the main directional light.
Conclusion
Toon shaders come in a wide variety of graphical styles, but achieving the effect usually centers around taking a standard lighting setup (as we did with Blinn-Phong) and applying a step function to it. In fact, when normals and lighting data is available it can be done as a post process effect. An example of this can be found inthis tutorial for Unreal Engine 4.
Send me some feedback about the tutorial in the form below. I'll get back to you as soon as I can! You can alternatively message me throughTwitterorReddit.