개발자분들과 만나 Firebase Analytics 관련된 이야기를 나누어보면, 다음과 같이 이야기하시는 경우가 종종 있습니다. "Firebase Analytics를 통해 앱 이벤트를 분석하면 좋겠지요. 하지만 지난 몇 년 동안 Google Analytics를 통해 데이터를 분석하고, 이를 튜닝하는데 많은 시간을 썼기 때문에, 새로운 도구를 사용하여 처음부터 다시 이러한 작업을 시작하고 싶지는 않네요."
그럼에도 Firebase Analytics의 몇몇 기능은 개발자 여러분의 일을 덜고 효과적인 앱 비지니스를 구축하는데 큰 도움이 될 수 있습니다. 예를들어 서버 구현 없이 특정 잠재 고객을 생성한 후 이를 대상으로 알림을 보내거나,
Firebase 원격 구성(Remote Config)을 적용하기 위한 사용자 속성을 생성하는 것을 생각해볼 수 있습니다. 이러한 기능을 Google Analytics와 함께 활용할 수 있는 방법은 없을까요?
Google Analytics 기반 앱에 Firebase Analytics를 추가하는 데 관심이 있는 경우에 시도해볼 수 있는 몇 가지 전략을 살펴봅시다.
먼저 이벤트부터 검토
모바일 게임에서 매 라운드가 끝날 때마다 총 점수, 무찌른 적 수, 생존한 라운드 수의 세 가지 이벤트를 Google Analytics로 보낸다고 가정해봅시다. 다음과 같은 방법으로 Google Analytics에 값을 기록할 수 있습니다.
func recordGameOver() {
    let tracker = GAI.sharedInstance().defaultTracker
    let gameOverEvent = GAIDictionaryBuilder.createEvent(withCategory: "gameOver",
       action: "totalScore",
       label: "",
       value: myGameStats.totalScore as NSNumber)
    let enemiesBeatenEvent = GAIDictionaryBuilder.createEvent(withCategory: "gameOver",
       action: "enemiesBeaten",
       label: "",
       value: myGameStats.enemiesBeaten as NSNumber)
    let roundsSurvivedEvent = GAIDictionaryBuilder.createEvent(withCategory: "gameOver",
       action: "roundsSurvived",
       label: "",
       value: myGameStats.roundsSurvived as NSNumber)
    tracker?.send(gameOverEvent.build() as [NSObject: AnyObject])
    tracker?.send(enemiesBeatenEvent.build() as [NSObject: AnyObject])
    tracker?.send(roundsSurvivedEvent.build() as [NSObject: AnyObject])
}
틀림없이 이런 질문을 하고 싶으실 겁니다. 바로 대답해 드리죠. 네, 맞습니다. 맞춤 측정기준(Custom Dimension)을 구성하고 하나의 이벤트로 이 작업을 수행할 수도 있습니다. 이런 방법으로 Google Analytics에서 플레이어의 최종 점수, 무찌른 적군 수, 생존한 라운드 수를 볼 수 있는 멋진 보고서를 만들 수 있습니다.
이제 이것을 Firebase Analytics 이벤트로 변환하는 방법에 대해 생각해봅시다. Google Analytics는 각각 하나의 연관된 값을 가진 계층적 이벤트를 중심으로 구성되지만, Firebase Analytics는 여기에서 한발 더 나아가 이벤트 매개변수로 함께 전달되는 다수의 연관된 키-값 쌍을 포함한 단일 이벤트를 기록합니다.
따라서 다음과 같이 Google Analytics 이벤트에서 Firebase Analytics 이벤트로 말 그대로 적절히 일대일 변환을 수행할 수 있습니다.
  FIRAnalytics.logEvent(withName: "gameOverTotalScore",
      parameters: [kFIRParameterValue: myGameStats.totalScore as NSObject])
  FIRAnalytics.logEvent(withName: "gameOverEnemiesBeaten",
      parameters: [kFIRParameterValue: myGameStats.totalScore as NSObject])
  FIRAnalytics.logEvent(withName: "gameOverTotalScore",
      parameters: [kFIRParameterValue: myGameStats.totalScore as NSObject])
하지만 Firebase Analytics 환경에서는 이것을 다수의
맞춤 매개변수(Custom Parameter)를 포함한 하나의 이벤트로 기록하는 것이 더 자연스럽습니다.
  let finalStats = ["totalScore": myGameStats.totalScore as NSObject,
                    "enemiesBeaten": myGameStats.enemiesBeaten as NSObject,
                    "roundsSurvived": myGameStats.roundsSurvived as NSObject]
  FIRAnalytics.logEvent(withName: "gameOver", parameters: finalStats)
맞춤 측정기준 방식을 사용하는 개발자에게는 위 방법이 좀 더 익숙할 것 입니다.
두 번째 접근 방식을 선택하면, BigQuery를 사용하여
맞춤 매개변수를 분석해야 하지만, 이는 진지하게 데이타를 분석 하고 원하는 결과를 도출하기 위해서는 꼭 필요한 부분입니다. 이 과정 전체를 단계별로 설명하는
동영상을 참고하시면 도움이 될 듯 합니다.
올바른 방법으로 Firebase 추가하기
Firebase Analytics를 설치하고 실행하는 데 있어 가장 먼저 혼란을 느끼게 되는 사항 중 하나는 Google Analytics와 Firebase Analytics 모두 비슷한 설치 프로세스를 사용한다는 사실입니다.
예를 들어, iOS에서는 많은 개발자가 Google Analytics를 설치하고 실행하기 위해 Xcode 프로젝트에
GoogleService-info.plist 파일을 생성하고 추가했습니다. 하지만 Firebase Analytics를 올바로 구성하려면 또 하나의
GoogleService-info.plist 파일을 생성하고 Xcode 프로젝트에 추가하기도 해야 합니다. 이 두 가지를 모두 어떻게 수행할 수 있을까요?
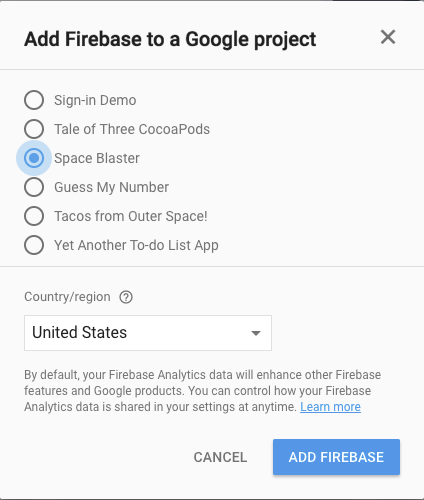
이에 대한 대답은 콘솔에서 새 Firebase 프로젝트를 생성하는 것이 아니라 기존 Google Analytics 사용 프로젝트를 Firebase로 가져와서 Firebase를 설치하는 것입니다.
Firebase 프로젝트를 생성할 때 "Import Google Project" 버튼을 클릭하여 생성할 것입니다. Google Analytics 프로젝트를 선택한 다음 프로젝트 설정에서
GoogleService-info파일을 다시 다운로드하세요.
그러면 Firebase Analytics와 Google Analytics 양쪽에서 가져오는 plist 파일의 상위 집합을 얻게 될 것입니다. 내용을 살펴보면 새로운 Firebase 정보 전체와 함께 Google Analytics 추적 ID와 동일한 TRACKING_ID 항목이 보일 것입니다. 이전의 GoogleService-info파일을 이 새로운 파일로 바꾸고 나머지 Firebase 설치 프로세스를 진행하면 바로 사용할 수 있습니다.
Android에서는 이 프로세스가 기본적으로 동일하지만 .plist 대신 .json 파일을 사용하는 점만 다릅니다. 그리고 아마 Xcode 대신 Android Studio를 사용할 것입니다.
프로젝트를 올바로 설정했다고 가정하고, Google Analytics와 Firebase Analytics 모두에 원하는 데이터를 포함하려면 어떻게 해야 할까요? 다음과 같이 세 가지 옵션을 시도할 수 있습니다.
옵션 1: 2개의 Analytics SDK 사용
가장 간단한 시나리오는 단순히 Google Analytics 서비스를 계속 실행하면서 Firebase Analytics 추적도 앱에 추가하는 것입니다. 클라이언트에서 결과 코드는 다음과 같은 내용일 것입니다.
func recordGameOver() {
    // All the old code you had previously to record Google Analytics
    // …
    // … So much code …
    // …
    // Now add the Firebase stuff
    let finalStats = ["totalScore": myGameStats.totalScore as NSObject,
                      "enemiesBeaten": myGameStats.enemiesBeaten as NSObject,
                      "roundsSurvived": myGameStats.roundsSurvived as NSObject]
    FIRAnalytics.logEvent(withName: "gameOver", parameters: finalStats)
}
개발자 관점에서 볼 때 왜 이런 해결 방법이 매력적인지 쉽게 상상할 수 있습니다. 구현이 매우 간단하고 위험도 낮기 때문이죠. 현재 Google Analytics 보고서의 문제가 생기지 않을까 걱정할 필요 없습니다. 모든 클라이언트 코드가 계속 Google Analytics를 항상 동일한 방식으로 호출하기 때문입니다. 추가로 Firebase Analytics도 호출하고 해당 시스템으로 데이터를 가져오면 됩니다.
그러나 이 해결 방법에는 몇 가지 단점이 있습니다. 첫째로, 두 가지 다른 분석 패키지로 데이터를 전송하게 되는데, 이는 일반적으로 클라이언트가 전보다 많은 네트워크 호출을 하게 됨을 의미합니다. 즉, 앱이 사용자의 모바일 데이터를 더 많이 사용하고 배터리 수명에 부정적인 영향을 미칩니다. 반면에 Firebase Analytics는 네트워크 호출을 수행하는 문제에 관한 한 상당히 보수적인 경향이 있으므로, 아주 큰 문제가 되지는 않을 것 입니다.
아마도 더 큰 단점은 모든 곳에서 분석 코드가 중복된다는 사실일 것입니다. 이미 분석 호출을 구현 세부 정보를 숨기는 별도의 메서드로 추상화했다면 이는 별로 중요한 문제가 아닙니다. 이제 이 하나의 메서드에 Firebase를 그냥 추가할 것입니다. 그러나 추상화하지 않았다면 이 코드를 앱 전체에 추가한다는 아이디어는 개발자에게 그다지 설득력 있게 들리지 않을 것입니다. 그래서 고려할 수 있는 또 다른 옵션이 있습니다.
옵션 2: Google 태그 관리자를 사용하여 어디에서나 이벤트 보고
Google 태그 관리자는 제 개인적으로 '언젠가 따로 시간을 내어서라도 꼭 배우고 싶은' 도구 목록에 항상 올라있는 멋진 만능 도구입니다. 그만한 이유가 있습니다. Google 태그 관리자가 제공하는 정말로 멋진 기능 중 하나는 발신되는 Firebase Analytics 이벤트에서 Google 애널리틱스는 물론 타사 애널리틱스 제공업체에게도 동일한 이벤트를 보고할 수 있다는 점입니다.
이 솔루션의 좋은 점은 클라이언트에서 한 세트의 분석-보고 코드만 필요하다는 사실입니다. 이 예시에서는 Google Analytics 호출을 완전히 제거할 수 있는 훨씬 간단한 구현 방법을 제시합니다.
func recordGameOver() {
    let finalStats = ["totalScore": myGameStats.totalScore as NSObject,
                      "enemiesBeaten": myGameStats.enemiesBeaten as NSObject,
                      "roundsSurvived": myGameStats.roundsSurvived as NSObject]
    FIRAnalytics.logEvent(withName: "gameOver", parameters: finalStats)
    // That's it!
}
Google 태그 관리자를 사용하여 이러한 이벤트를 Google Analytics에 보고하려면 CocoaPods/Gradle을 통해 라이브러리를 설치하고 프로젝트에 .json 파일을 추가해야 합니다. 이 모든 작업은 클라이언트 측에서 진행됩니다. 대부분의 작업은 태그 관리자 콘솔 내에서 수행됩니다.
태그 관리자 콘솔에서 Google Analytics로 보낼 모든 값에 대해 Firebase 이벤트 매개변수를 생성하고 싶을 것입니다. 이 예시에서는 totalScore, enemiesBeaten 및 roundsSurvived에 대한 값이 필요합니다.
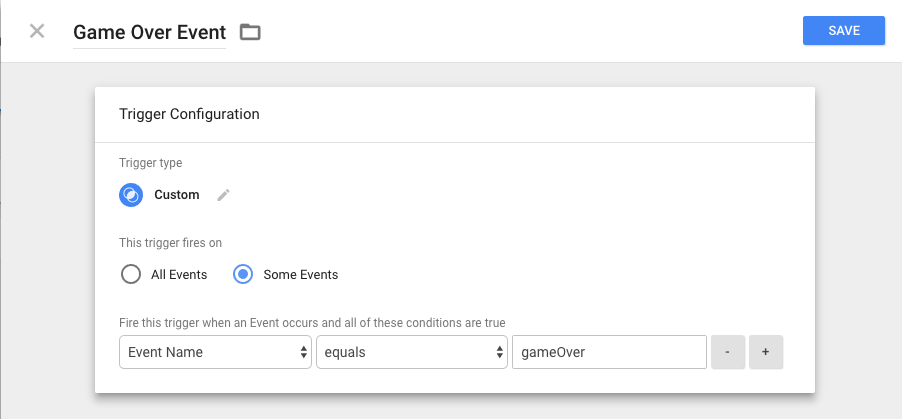
다음으로, 대응시키려는 각각의 Firebase Analytics 이벤트에 대한 트리거를 생성할 것입니다. 이 경우에는 "gameOver"라는 이벤트 이름이 나타날 때마다 발생하는 트리거를 생성하려고 합니다.
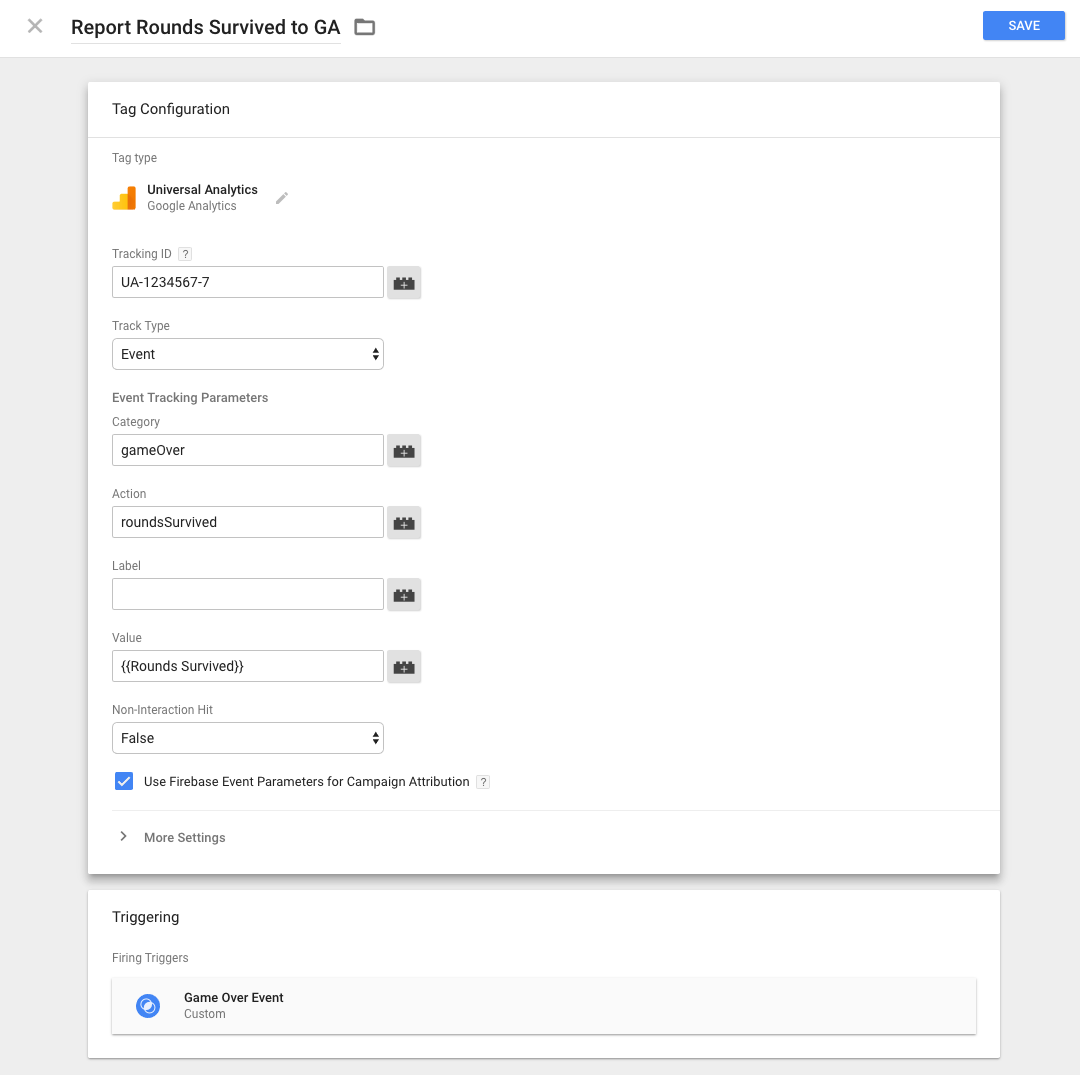
마지막으로, Google Analytics(Google 태그 관리자 내에서는 Universal Analytics로 지칭함)로 이벤트를 보내 이러한 트리거에 응답하는 태그를 생성할 것입니다. AppsFlyer, Kochava, Tune 등과 같은 서비스로 이벤트를 보낼 수도 있습니다.
솔직히 기회만 된다면 보통은 코드를 적게 작성하는 것이 좋기 때문에 저는 이 접근 방식을 좋아합니다. 이 접근 방식을 취하면 일부 이벤트를 다른 곳은 말고 Google Analytics로만 보고하거나, (일부 이벤트를 Firebase Analytics에만 보고하기 시작하려는 경우) 앱이 출시된 이후라도 Firebase Analytics 이벤트를 Google Analytics로 보고하는 방법을 변경할 수 있는 유연성을 누릴 수도 있습니다.
한 가지 주목할 중요한 점은 현재 Firebase Analytics와 Google 태그 관리자를 함께 사용하여 전자 상거래 데이터를 Google Analytics에 보낼 수는 없다는 사실입니다. 담당 팀에서 이 문제를 해결하기 위해 노력하고 있지만 그동안은 Google Analytics에서 전자 상거래 데이터가 필요한 경우 다른 옵션 중 하나를 고려하거나 전자 상거래 이벤트를 Google 애널리틱스로 바로 보내도록 코드에 그냥 둘 수 있습니다.
위에서 언급했듯이, 클라이언트로부터 중복된 보고 분석 호출을 계속 수행한다는 단점도 있습니다. 또한, 모든 트리거, 이벤트 및 태그를 Google 태그 관리자 패널에 추가하는 데 많은 시간을 써야 합니다. 그러나 이보다 더 나쁜 상황도 생각할 수 있습니다. 클라이언트에서 2개의 분석 SDK를 실행한다는 아이디어에 반대하는 입장이라면 어떻게 해야 할까요? 그렇다면 다른 어떤 옵션을 사용할 수 있을까요? 당연한 질문입니다!
옵션 3: BigQuery를 사용하여 모든 항목 병합
고려할 수 있는 또 다른 옵션은 클라이언트에서 Google Analytics를 Firebase Analytics로 완전히 대체한 다음에 백엔드에서 BigQuery를 사용하여 이전 Google Analytics 데이터를 새 Firebase Analytics 데이터와 병합하는 것입니다.
이 솔루션은 이미 Google Analytics 360 고객으로서 현재 대부분의 맞춤 보고서를 BigQuery를 사용하여 작성하는 경우에만 적합하다는 점은 당연합니다. 이런 경우라면 BigQuery 쿼리를 업데이트하여 두 데이터 소스에서 모두 데이터를 가져오는 것이 합리적인 옵션일 수 있습니다.
앞서 제시한 예로 다시 돌아가서, 다음과 같은 쿼리를 실행하여 BigQuery 내에서 '일일 평균 최종 점수' 보고서를 이미 생성해오고 있다고 가정해봅시다.
SELECT
  AVG(hit.eventInfo.eventValue)
FROM
  `my_awesome_app.ga_sessions_20170123`,
  UNNEST(hits) AS hit
WHERE
  hit.eventInfo.eventCategory = "gameOver"
  AND hit.eventInfo.eventAction = "totalScore"
이제 Firebase Analytics로 전환합시다. 클라이언트에서 Firebase Analytics에 대해서만 호출하는 이전 예시의 간단한 구현을 사용할 수 있습니다.
func recordGameOver() {
    let finalStats = ["totalScore": myGameStats.totalScore as NSObject,
                      "enemiesBeaten": myGameStats.enemiesBeaten as NSObject,
                      "roundsSurvived": myGameStats.roundsSurvived as NSObject]
    FIRAnalytics.logEvent(withName: "gameOver", parameters: finalStats)
    // That's it!
}
그리고 시간에 따라 무찌른 평균 적군 수를 보려면 두 데이터 세트를 병합해야 합니다. 이를 위한 SQL은 다음과 비슷한 내용일 것입니다.
SELECT
  COUNT(*),
  AVG(total_score) AS average
FROM (
  SELECT
    event_param.value.int_value AS total_score
  FROM
    `firebase-project.com_example_awesome_app.app_events_20170123`,
    UNNEST(event_dim) AS event,
    UNNEST(event.params) AS event_param
  WHERE
    event.name = "gameOver"
    AND event_param.key = "totalScore"
  UNION ALL
  SELECT
    hit.eventInfo.eventValue AS total_score
  FROM
    `my_awesome_app.ga_sessions_20170123`,
    UNNEST(hits) AS hit
  WHERE
    hit.eventInfo.eventCategory = "gameOver"
    AND hit.eventInfo.eventAction = "totalScore" )
분명히 이것은 아주 간단한 예시입니다. 수행하려는 작업과 데이터 구조에 따라 상황이 더욱 빠르게 복잡해질 수 있습니다. 그러나
Google 클라우드 빅 데이터 블로그 게시물 작성에 참여 중인 (훨씬 똑똑한) 몇몇 동료가 이처럼 정교한 몇 가지 쿼리에 대한 글을 써서 올릴 것입니다. 그러니 계속 저희 블로그를 지켜봐 주세요!
이미 Google Analytics에 맞게 설정되어 있는 앱에 Firebase Analytics를 추가하는 방법에 대한 몇 가지 지침이 있습니다. 또는 그런 점에서는 다른 분석 플랫폼도 마찬가지입니다. 일단 설정을 마치면 Firebase Analytics 데이터를 사용하는 몇 가지 Firebase 기능을 시험해보는 것이 좋습니다. 특정 사용자 속성을 가진 사용자에게 새로운 원격 구성 설정을 제공하거나 자신이 만든 Firebase Analytics Audience에 알림을 보내보세요. 더 많은 Firebase Analytics 이벤트를 자유롭게 추적해 보세요. 앱 사용자 수에 관계없이 무료이고 무제한이므로 맘껏 이용하세요. 더욱 매력적인 도구와 기능이 계속 추가될 예정임으로 개발하려는 모바일 앱에 지금 바로 Firebase Analytics를 추가하더라도 그리 때이른 일이 아닐 것입니다. 한번 시도해보세요!