In this Unity Input System tutorial, you’ll learn how to convert player input in your existing projects from the old Input Manager to the new Input System.
Version
C# 7.3, Unity 2020.1, Unity
Handling input is a pillar of creating a successful game. Input devices help player characters perform actions inside the game such as walking, jumping and climbing.
Recently, many new platforms have come out, introducing more Unity input devices. These include touch screens, VR controllers and gamepads from different game consoles. If you want your game to support different platforms, you need to write code to handle the logic for different devices. The more platforms you support, the more complex your code will be.
Luckily, there’s a new UnityInput Systemthat helps developers deal with this situation, making input-related code easier to manage.
In this tutorial, you’ll learn:
The features of the new Input System.
How the new system works.
How to migrate apps to the new Input System from the old Input Manager.
The materials for this tutorial were built inUnity version 2020.1. You can get this version of Unity from theUnity websiteor install it with the Unity Hub.
Note: Although this tutorial is for beginners, you’ll need to have some basic knowledge of Unity development and how to work with Unity Editor to complete it. If you’re new to Unity development, check out our tutorial onGetting Started In Unity.
Getting Started
First, download the starter project for this tutorial using theDownload Materialsbutton at the top or bottom of this page. Unzip its contents and openNewUnityInputSystem-Starterin Unity.
After the project loads, you’ll see theRWfolder in the Project Window:
Take a look at the organization of the folder:
Fonts: Fonts used in the scene.
Materials: Materials for the scene.
Models: 3D meshes for the player character and game environments.
Prefabs: Pre-built components composed of Scripts and Models.
Scenes: The game scene.
Scripts: Scripts with game logic.
Settings: The settings file, which is where you’ll put the input settings.
Shaders: Shaders for special effects like the player’s shadow.
Textures: The graphics used by Materials and UIs.
The starter project is a simple platformer game. You control the player character by moving around and jumping to collect coins.
The game is ready to play. OpenGameScenefrom theScenesfolder and clickPlayto try the game for yourself!
Currently, theMoveandJumpcontrols use the old Unity Input Manager. You’ll learn how to use the new Input System to replace the old system later in the tutorial.
What’s New in the Unity Input System
Before diving into the code, take a look at the new Input System’s features.
Simpler Action and Binding Architecture
The old input system checked input from different devices every frame to determine whether players took an action.
The following code, which supports both gamepads and keyboards, is an example of the old way of doing things:
The code usesif-elsebranching to handle support for different devices and their associated actions.
The newInput Systemseparates device input from code actions. That means you only have to handle the actions the players trigger. You don’t need to know which device the player is using or which button they’re clicking.
An input event in the new system is called anaction, while the mapping between an action and an input device is abinding.
Gathering Information With the Input Debug Tool
The Input System provides you with a new tool calledInput Debugger. Open it by selectingWindow ▸ Analysis ▸ Input Debuggerfrom the menu.
The Input Debugger helps developers by gathering the following information in one place:
The state of the Input System, including:
Device: Information about the connected devices.
Layout: Which controls those devices provide.
Setting: The configuration of the input system.
It also provides real-time information about a specific device. Open this by double-clicking the device from the device list in the Input Debugger window.
Here’s a demo of the Input Debugger in action:
Feel free to keep the Input Debugger open while you work through the tutorial.
Support for Multiple Devices and Platforms
With the increased flexibility from the Input System’s new architecture, Unity can support many different input devices, including:
Keyboard
Mouse
Pen
TouchScreen
Sensor
Joystick
GamePad
Note: The Input System also supports devices that implement theUSB HIDspecification. For more details, check out Unity’sSupported Devices Documentation.
Understanding the New Input System
The new Input System has four building blocks that funnel events from player devices to your game code:
Input Action Assets: A settings file that contains the properties of the actions and their associated bindings.
Actions: Actions define the logical meanings of the input. You can find that information in the Input Action Assets.
Bindings: Bindings describe the connection between an action and the input device controls. You’ll find this information in the Input Action Assets, too.
PlayerInput: PlayerInput is a script that manages and links action events to the corresponding code logic.
Sometimes it’s easier to understand a new workflow if you can visualize it, so take a look at the image below:
Break this down into its simplest steps:
First, the Unity Engine collects information from theconnected devicesand sends correspondingevents, like a button click, to theInput System.
TheInput Systemthen translates thoseeventsintoactions, based on theactionandbindinginformation stored in theInput Action Assets.
It then passes theactionsto thePlayerInputscript, which invokes the corresponding methods.
Now that you know a little more about how the Input System works, you’ll use it to control the game character in the coming sections.
Installing the New Input System
The first thing you’ll do is install the newInput System package. The standardUnityinstallation doesn’t include it.
OpenWindow ▸ Package Managerin the menu bar. Make sure that you selectUnity Registryin thePackagesdropdown, if you haven’t already.
FindInput Systemon the list. Select it and clickInstall.
Creating an Input Action Asset
Once you’ve installed the Input System package, you’ll create an Input Action Asset to store the settings for your actions and bindings.
Open theProjectwindow and selectSettingsfromRW. Right-click, selectCreate ▸ Input Actionsand rename it toMyControl.
Setting up the Action Editor
Double-clickMyControlinSettingsto open theAction Editor, which helps you manipulate actions and control bindings.
Since this is a new window, take a look at the sections:
Action Maps: Groups of actions that occur in the game. You can group actions for different purposes, like player, gameplay or UI.
Actions: The list of actions and bindings associated with the selected Action Map. In this panel, you create, modify or delete actions and bindings.
Properties: Edit the action or binding properties in this panel, such the type of action and the controls you associated with the binding.
Save Assets: This is a very important function: You must clickSave Assetafter making any changes to theInput Action Asset. If you forget to save, the setting won’t work. Thus, you won’t see the expected result and may think there’s a bug in the code.
You can switch onAuto Saveto prevent the problem, but it’s quite slow.
Now you’re ready to create your first action, theJumpaction.
Creating a Jump Action
First, open theAction Editorand click the+icon in theActionMapto create a newAction Map. Rename it from the default,New Action Map, toPlayer.
Then, in theActionpanel, double-clickNew Actionand rename it to a meaningful name:Jump.
Finally, you need to add a binding to the Jump action. You’ll bind theSpacebarandLeft Mouse Buttonto this action by following these steps:
Select theJumpaction, click the+icon and selectAdd Binding.
Click the new binding item,<No binding>.
Click thePathfield in theBinding propertiespanel.
TypeSpacebar Keyboardand selectSpace [Keyboard]to create the binding for theSpacebar.
Repeat steps 1–3 to create another binding for theLeft Mouse Button.
TypeLeft Buttonin thePathfield and selectLeft Button [Mouse]to create the binding.
Congratulations, you’ve now associated the Jump action with the Spacebar on the keyboard and the left button on the mouse.
Now to hook up those actions with your code!
Implementing the Jump Logic
First of all, you need to remove the old input logic from the project. OpenPlayer.csand navigate to theUpdate()method.
As you can see, the current code triggers the animation updates, then it checks if the player has pressed the space bar in order to start a jump.
Now that the Jump action and its control bindings are ready, the next thing to do is link the action to the code.
Linking the Jump Action to the Code
Start by deleting the code inUpdateto remove the implementation of the old Input Manager so you can add Jump logic using the new Input System.Updatewill now only control the animations.
voidUpdate() { UpdateAnimation(); }
Save the script and go back to the editor. Select thePlayerobject in the Hierarchy and add aPlayerInputcomponent from the Inspector.
Next, you’ll dragMyControltoPlayerInput’s Actions. Make sure to set theDefault MaptoPlayer.
Finally, openPlayer.csand add a new method calledOnJump()with the following code:
publicvoidOnJump() { HandleJump(); }
You’ve associated this method with the Jump action by using this pattern to name it:public void On[Action Name Goes Here]().
For example, the Jump action invokesOnJump(), while the Attack action invokesOnAttack().
ClickSave Assetin theAction Editorand run the game. Now you can use the SpaceBar or the left mouse button to make the player character jump. It’s really that easy!
Creating the Move Action
You’ve learned how to use the Input System to create a Jump action. Next up is theMoveaction!Moveis similar toJump, but it has a few key differences.
For example, the Jump action is a simple trigger event, while the Move action is an event thatcarries values: the movement direction, which comes from user input.
Again, you need to create the action and its binding. Start by going toAction Editor(double clickMyControlif you lost the window) and click the+icon in theActions panelto create a new action. Rename it toMove.
Next, open theAction properties panel, changeAction TypetoValueandControl TypetoVector 2.
Finally, remove<No Binding>by right-clicking and selectingDelete.
Now, you need to create the Move action’s bindings.
First, you’ll click the+icon in the header of the Move action. Then, selectAdd 2D Vector Composite, which will create four binding items corresponding to the up, down, left and right directions.
Now, you’ll set the path of each binding as follows:
Up: Up Arrow [Keyboard]
Down: Down Arrow [Keyboard]
Left: Left Arrow [Keyboard]
Right: Right Arrow [Keyboard]
Don’t forget to save the asset in theAction Editor!
Implementing the Move Logic
Before adding new movement logic, you need to remove the implementation of the old Unity input.
Note thatFixedUpdate()is called inevery fixed frame-rate frame.
Now, break this down:
Input.GetAxisRawreturns the value ofAxis.Input.GetAxisRaw("Horizontal")gives the value of theX-Axis, whileInput.GetAxisRaw("Vertical")gives the value ofY-Axis.
These two values define the movement vectormoveVec, which you use to control the direction of the player movement.
The logic of the player character’s behavior while it’son the ground.
The logic of the player character’s behavior while it’sjumping.
Now, delete all the code prior to theifstatement to remove the old input logic. Add the following code above the class definition:
using UnityEngine.InputSystem;
This allows you to access values from the newInput System.
When a player presses theUp,Down,LeftorRightkeys, it passes aMoveaction to this method, along with the values. Here’s how the key presses affect the values:
Up: (0, 1)
Down: (0, -1)
Left: (-1, 0)
Right: (1, 0)
No Key: (0, 0)
Up and Left: (1, -1)
InputValueis a new type you may not know. This class has aGet\()method that you can use to access its values. In this instance, you want the 2D Vector Composite you set in the binding to calculate the movement vector.
ClickPlayto test the logic.
Handling Actions
The new Input System provides four ways to handle action events.
In this tutorial, you used theSendMessagesapproach. You can change this option in theBehaviorfield in thePlayerInputcomponent.
SendMessageandBroadcastMessageare the simplest ways to handle actions. When you use these two options, the system invokes the method with a name matching the name of the action.
For example, in this tutorial, the Jump action invokesOnJump()and the Move action invokesOnMove().
BroadcastMessageis similar toSendMessage, except it can invoke the methods onany child GameObject. These two options are easy to use because you don’t need to configure anything to use them.
Using Invoke Unity Events
When usingInvoke Unity Events, you configure the action much as you’d configure a button click inUnity UI.
This approach is more flexible, letting you use different methods in different objects. Those GameObjects don’t even need to have thePlayerInputcomponent.
Using Invoke C# Events
This approach is as flexible asInvoke Unity Events. You can define the methods you want to use instead of using methods with a specific name. However, if you use this approach, you need to write code to control which methods to invoke.
Gets thePlayerInputcomponent and registers the method toonActionTriggered.
Controls which method to call for different actions.
Using the Update Cycle of the New Input System
In the old Unity Input Manager, you checked the input in every frame usingUpdate(). In the new Input System, you may wonder when actions are being sent, and if they’re sent before everyUpdate().
The new Input System uses a different update cycle that’s independent ofMonoBehaviour‘s lifecycle. You can read more about it inUnity’s Execution Order documentation.
The system offers threeUpdate Modesto control the update cycle. You can configure them inProject Settings ▸ Input System Package ▸ Update Mode.
Take a look at each of these nodes:
Dynamic Update: Processes events atirregular intervalsdetermined by the current frame rate. This is the default setting.
Fixed Update: Processes events atfixed-length intervals.Time.fixedDeltaTimedetermines the length of the interval.
Manually:Events aren’t processed automatically; you process them when you callInputSystem.Update(). If you want a check similar to the old system, you can callInputSystem.Update()inUpdate().
These new options, as part of the new Input System, give you a lot more control over input, whilst also making it easier to support multiple input devices :]
Where to Go from Here?
Download the completed project using theDownload Materialsbutton at the top or bottom of this tutorial.
In this Unity Input tutorial, you’ve learned:
The basic layout of the new Input System.
How to use actions and bindings.
How to handle different kinds of player input efficiently.
To test your skill, try to add aPauseaction to the game!
For the past couple of weeks, I have been trying to replicate the Photoshop blend modes in Unity. It is no easy task; despite the advances of modern graphics hardware, the blend unit still resists being programmable and will probably remain fixed for some time. SomeOpenGL ES extensions implement this functionality, but most hardware and APIs don’t. So what options do we have?
1) Backbuffer copy
A common approach is to copy the entire backbuffer before doing the blending. This is what Unity does. After that it’s trivial to implement any blending you want in shader code. The obvious problem with this approach is that you need to do a full backbuffer copy before you do the blending operation. There are certainly some possible optimizations like only copying what you need to a smaller texture of some sort, but it gets complicated once you have many objects using blend modes. You can also do just a single backbuffer copy and re-use it, but then you can’t stack different blended objects on top of each other. In Unity, this is done via aGrabPass. It is the approach used by theBlend Modesplugin.
2) Leveraging the Blend Unit
Modern GPUs have a little unit at the end of the graphics pipeline called the Output Merger. It’s the hardware responsible for getting the output of a pixel shader and blending it with the backbuffer. It’s not programmable, as to do so has quite a lot of complications (you can read about ithere) so current GPUs don’t have one.
The blend mode formulas were obtainedhereandhere. Use it as reference to compare it with what I provide. There are many other sources. One thing I’ve noticed is that provided formulas often neglect to mention that Photoshop actually uses modified formulas and clamps quantities in a different manner, especially when dealing with alpha.Gimp does the same. This is my experience recreating the Photoshop blend modes exclusively using a combination of blend unit and shaders. The first few blend modes are simple, but as we progress we’ll have to resort to more and more tricks to get what we want.
Two caveats before we start. First off, Photoshop blend modes do their blending in sRGB space, which means if you do them in linear space they will look wrong. Generally this isn’t a problem, but due to the amount of trickery we’ll be doing for these blend modes, many of the values need to go beyond the 0 – 1 range, which means we need an HDR buffer to do the calculations. Unity can do this by setting the camera to beHDRin the camera settings, and also settingGammafor the color space in the Player Settings. This is clearly undesirable if you do your lighting calculations in linear space. In a custom engine you would probably be able to set this up in a different manner (to allow for linear lighting).
If you want to try the code out while you read ahead, download it here.
You can see discrepancies between the Photoshop and the Unity version in the alpha blending, especially at the edges.
H) Linear Dodge
Formula
SrcColor + DstColor
Shader Output
color.rgb=color.rgb;
Blend Unit
SrcColor · SrcAlpha+DstColor · One
Linear Dodge
This one also exhibits color “bleeding” at the edges. To be honest I prefer the one to the right just because it looks more “alive” than the other one. Same goes for Color Dodge. However this limits the 1-to-1 mapping to Photoshop/Gimp.
All of the previous blend modes have simple formulas and one way or another they can be implemented via a few instructions and the correct blending mode. However, some blend modes have conditional behavior or complex expressions (complex relative to the blend unit) that need a bit of re-thinking. Most of the blend modes that follow needed atwo-passapproach (using thePass syntax in your shader). Two-pass shaders in Unity have a limitation in that the two passes aren’t guaranteed to render one after the other for a given material. These blend modes rely on the previous pass, so you’ll get weird artifacts. If you have two overlapping sprites (as in a 2D game, such as our use case) the sorting will be undefined. The workaround around this is to move theOrder in Layerproperty to force them to sort properly.
How I ended up with Overlay requires an explanation. We take the original formula and approximate via a linear blend:
We simplify as much as we can and end up with this
The only way I found to get DstColor · DstColor is to isolate the term and do it in two passes, therefore we extract the same factor in both sides:
However this formula doesn’t take alpha into account. We still need to linearly interpolate this big formula with alpha, where an alpha of 0 should return Dst. Therefore
If we include the last term into the original formula, we can still do it in 2 passes. We need to be careful to clamp the alpha value with max(0.001, a) because we’re now potentially dividing by 0. The final formula is
For the Soft Light we apply a very similar reasoning to Overlay, which in the end leads us toPegtop’s formula. Both are different from Photoshop’s version in that they don’t have discontinuities. This one also has a darker fringe when alpha blending.
Hard Light has a very delicate hack that allows it to work and blend with alpha. In the first pass we divide by some magic number, only to multiply it back in the second pass! That’s because when alpha is 0 it needs to result in DstColor, but it was resulting in black.
[29/04/2019]Roman in the comments below reports that he couldn’t get Linear Light to work using the proposed method and found an alternative. His reasoning is that the output color becomes negative which gets clamped. I’m not sure what changed in Unity between when I did it and now but perhaps it relied on having an RGBA16F render target which may have changed since then to some other HDR format such as RG11B10F or RGB10A2 which do not support negative values. His alternative becomes (using RevSub as the blend op):
GoogleMobileAds iOS SDK 7.68 이상은 Firebase 7.x 이상에서 지원합니다.
Firebase 업데이트 하세요
Unity: 2019.4.8f1
AdMob v5.4.0
Firebase v6.16.1 (Messaging & Analytics)
Target minimum iOS Version 12.0
Problem
I can't build the project. XCode error:
../Libraries/Plugins/iOS/GADUAdLoader.h:5:9: 'GoogleMobileAds/GoogleMobileAds.h' file not found
When I trying to update pods terminal throw the next error:
[!] CocoaPods could not find compatible versions for pod "GoogleAppMeasurement":
  In Podfile:
    Firebase/Analytics (= 6.32.2) was resolved to 6.32.2, which depends on
      Firebase/Core (= 6.32.2) was resolved to 6.32.2, which depends on
        FirebaseAnalytics (= 6.8.2) was resolved to 6.8.2, which depends on
          GoogleAppMeasurement (= 6.8.2)

    Google-Mobile-Ads-SDK (~> 7.68) was resolved to 7.68.0, which depends on
      GoogleAppMeasurement (~> 7.0)
Attempts
Add 'pod 'GoogleAppMeasurement', '7.0'' to Podfile.
Result
CocoaPods could not find compatible versions for pod "GoogleAppMeasurement":
  In Podfile:
    Firebase/Analytics (= 6.32.2) was resolved to 6.32.2, which depends on
      Firebase/Core (= 6.32.2) was resolved to 6.32.2, which depends on
        FirebaseAnalytics (= 6.8.2) was resolved to 6.8.2, which depends on
          GoogleAppMeasurement (= 6.8.2)

    Google-Mobile-Ads-SDK (~> 7.68) was resolved to 7.68.0, which depends on
      GoogleAppMeasurement (~> 7.0)

    GoogleAppMeasurement (= 7.0)
Uninstall and install cocoapods
Result
Same error
Project Podfile
source 'https://github.com/CocoaPods/Specs.git'
source 'https://github.com/CocoaPods/Specs'
platform :ios, '12.0'

target 'UnityFramework' do
  pod 'Firebase/Analytics', '6.32.2'
  pod 'Firebase/Core', '6.32.2'
  pod 'Firebase/Messaging', '6.32.2'
  pod 'Google-Mobile-Ads-SDK', '~> 7.68'
end
How can I resolve this problem?
[Answer]
Google-Mobile-Ads-SDKversion 7.68 is only compatible with Firebase 7.x. If you want to use Firebase 6.x, you need to use 7.67 or earlier.
Unity Application.persistentDataPath의 경로는 Android의 버전과 Write Access에 따라 달라짐
Android에서 Application.persistentDataPath가 돌려주는 값이 Write Access에 따라 달라지기에 조사해봤습니다. Unity 5.3.6에서 돌려주는 경로에 사양변경이 있었으므로, Unity 5.3.6 이전 버전에서 작성한 애플리케이션을 Unity 5.3.6 이후로 버전업할 때 주의를 기울이지 않으면 데이터가 사라질 위험이 있습니다. 갖고 있는 Android기기와 Unity 4.7.2f1, 5.3.6f1에서 검증했습니다.
외부 저장소라고 불리는 영역이지만 SD 카드가 아니라 빼낼 수 없게 내장된 저장소를 참조하는 기기도 있음. Android 4.4 이후에는 권한을 요구하지 않고 외부 저장소에 읽고 쓰기가 가능.
Windows PC를 예로 들면 오래된 Android 기기 C드라이브: 내장 드라이브 (Android 내부 저장소) D드라이브: USB로 접속된 외장 하드디스크 (Android 외부 저장소) 최신 Android 기기 C드라이브: 내장 드라이브 파티션 0 (Android 내부 저장소) D드라이브: 내장 드라이브 파티션 1 (Android 외부 저장소) E드라이브: USB로 접속된 외장 하드디스크 (Android 외부 저장소)
WRITE_EXTERNAL_STORAGE를 추가한 경우, Android 6 이후에는 Permissions Storage의 물음에서 ALLOW를 선택할 때까지는 기동할 때마다 물어봄. ALLOW를 선택한 후에도 Application의 설정에서 Permissions Storage 허가의 변경은 가능. 4.1.2 (200SH): Write Access: External (SDCard) 만이 SD 카드의 경로를 돌려줌. SD 카드를 뽑았을 경우에는 Internal Only와 같은 경로를 돌려줌. 그 외에는 내부 저장소를 참조. Unity 4.7.2 Android 6.0.1는 Permissions Storage의 허가 유무로 돌려주는 경로가 달라짐. Unity 5.3.6 Android 4.4 이후는 Permissions Storage의 허가 유무와 상관없이 돌려주는 값이 같음.
Unity 4.7.2에서 작성한 애플리케이션에서 Application.persistentDataPath에 저장한 데이터를 Unity 5.3.6에서 작성한 애플리케이션에서 덮어씌웠을 경우 읽어들일 수 있을까?
UnauthorizedAccessException: Access to the path "/storage/sdcard0/Android/data/{package name}/files/{file name}" is denied. external-storage를 internal-storage에 복사하려고 해서 실패?
UnauthorizedAccessException: Access to the path "/storage/sdcard0/Android/data/{package name}/files/{file name}" is denied. external-storage를 internal-storage에 복사하려고 해서 실패?
Internal Only, External (Permissions Storage: DENY)일 때에는 internal-storage를 external-storage에 복사한 후에 읽어들이도록 되어 있음. external-storage로 변경해도 internal-storage는 복사 시점 그대로 변경은 되지 않음.
정리
Internal Only -> External (SDCard)로의 변경은 데이터를 이어받지 못하는 경우가 있음. 그 경우, 수동으로 /data/data/{package name}/files/ 를 복사하는 등의 대응이 필요. External (SDCard) -> Internal Only로의 변경은 오래된 Android 기기기에서 정상으로 처리되지 않을 가능성이 있음. Android 6 이후에는 Unity 4.7.2의 Write Access가 어느쪽이든 Unity 5.3.6의 Write Access: Internal Only로 해두면 데이터를 이어받아 읽고 쓰기가 가능.
You should also be able to use .NET to get the current culture instead:
using System;
using System.Globalization;
using System.Threading;

CultureInfo myCulture = Thread.CurrentThread.CurrentCulture;


// You can then use all these member variables
myCulture.DisplayName
myCulture.EnglishName
myCulture.Name (e.g. es-ES / en-GB)
myCulture.Parent (e.g. es / en)
myCulture.ThreeLetterISOLanguageName (e.g. spa/eng/hin)
myCulture.TwoLetterISOLanguageName (e.g. es/en/hi)
Here's a selection of the Indian 3 and 2 letter ISO codes (see attached jpg)
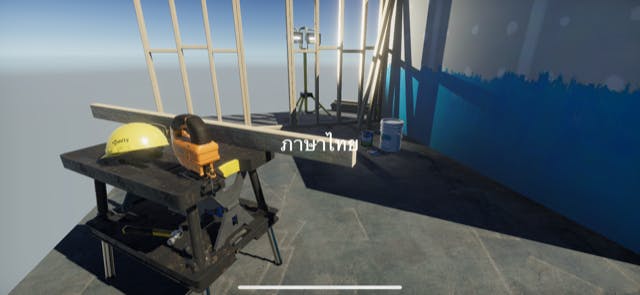
If when you try to multi-lingual in Unity Oke Select the default font asset referred to as "Arial", so you use Yoshinani the system font, but I did not have a problem until now, generating a phenomenon that garbled in iOS13 are you with.
Screenshot is iOS13.2.1 (iPhone8). In the middle of the screen [?] [?] [?] [?] And is in a place that is garbled applicable. VIEW IMAGE
Investigation
Even Unity of the Issue have been reported, Armenian in addition to Thai, it seems to become garbled in Georgian.
For more details, it might be good to get a look at the people of Issue.
It summarizes the results of actually examined.
If you set the Thai fonts will be displayed without any problems.
In Android10 it will be as normally displays the Thai below.
Unity version was also confirmed at 2018.3 and 2019.1, but it was the same result.
The method and the iOS language settings to use the system font to fall back a font to another tried such as the Thai, but it did not change.
temporary solution
Since it has published an app that was the Thai correspondence, it does not need to wait for the renovation of Unity.
Thinking of correspondence has the following procedure.
Put the Thai font, eliminate garbled
Raise Unity and is After the corresponding version
Since there is a free font Fortunately Thai, and the garbled solve with it.
Since a little thinner than the default font, it may not afford the alternative as long as there is a commitment.
I learned for the first time a license that GPL font exception. I did not know what I do a credit notation, it was for the time being added. If you have somebody who is familiar wait for information.
Font size was 480KB. I thought one more font size increases, but I have put in a not too nervous and if this much. But does not recommend because as far as possible towards the size of the app is small, I think good for the user.
Something like the following, we have set the font in the timing of switching to Thai.
It was also good as switched fallback, but because the provisional support of easy-to-understand on the codeTODOhas been switched by the code this time on the grounds that I wanted to write a.
Summary
Because of what is in the Unity side, but have no idea what is in the iOS side, is a story that has survived for the time being in the provisional support.
We look forward to information If you know the other way.
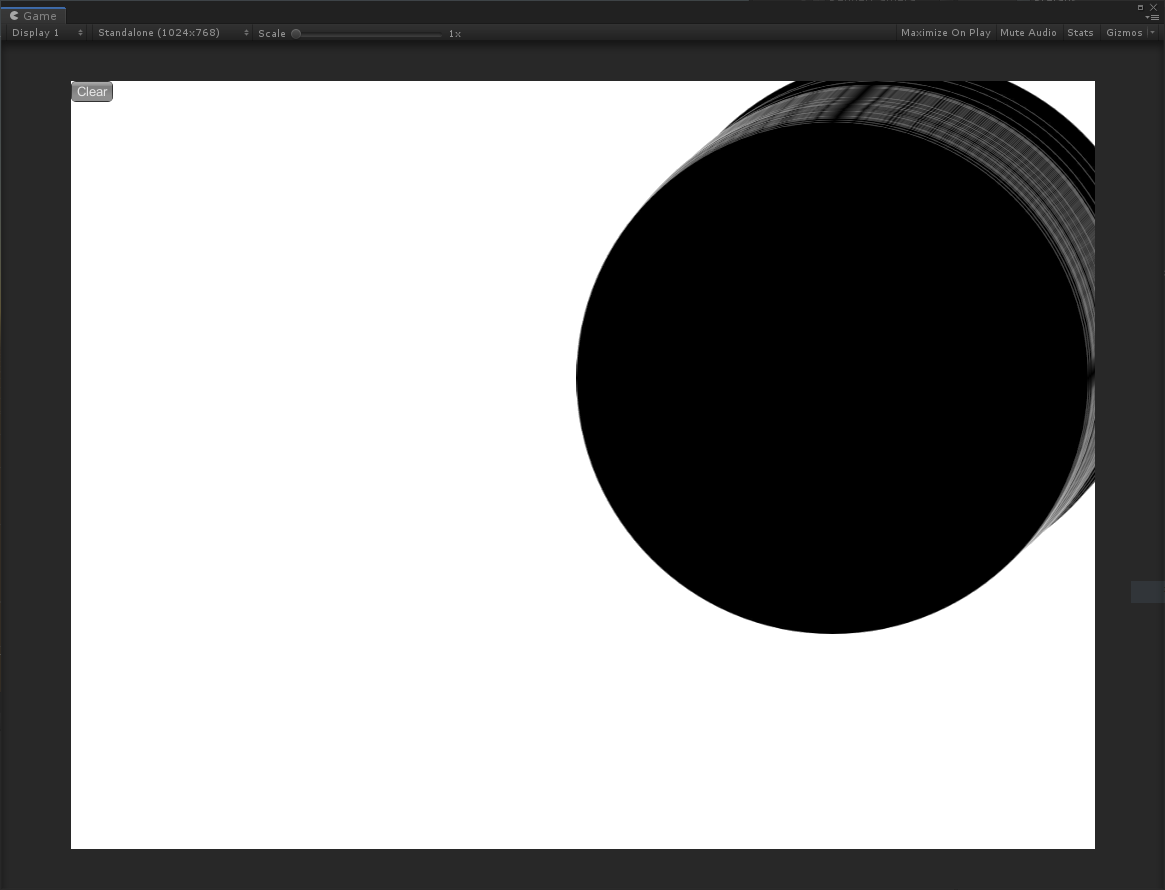
Unity 를 이용해 그림판 같은 기능을 구현하는 중에 겹치는 이미지의 테두리가 흰색으로 나타나는 현상이 발생 하였다.
위 화면은 Canvas 에 검정색 원 Image 여러개가 겹쳐 있고 이를 RenderTexture 를 통해 RawImage 로 출력하고 있는 예제 이다. 사용한 이미지는 아래와 같은 설정이 되어 있다.
Scene 화면을 통해 RawImage 의 테두리 부분을 확대해 보면 다음과 같이 투명하게 처리가 되고 있는 것이 보였다.
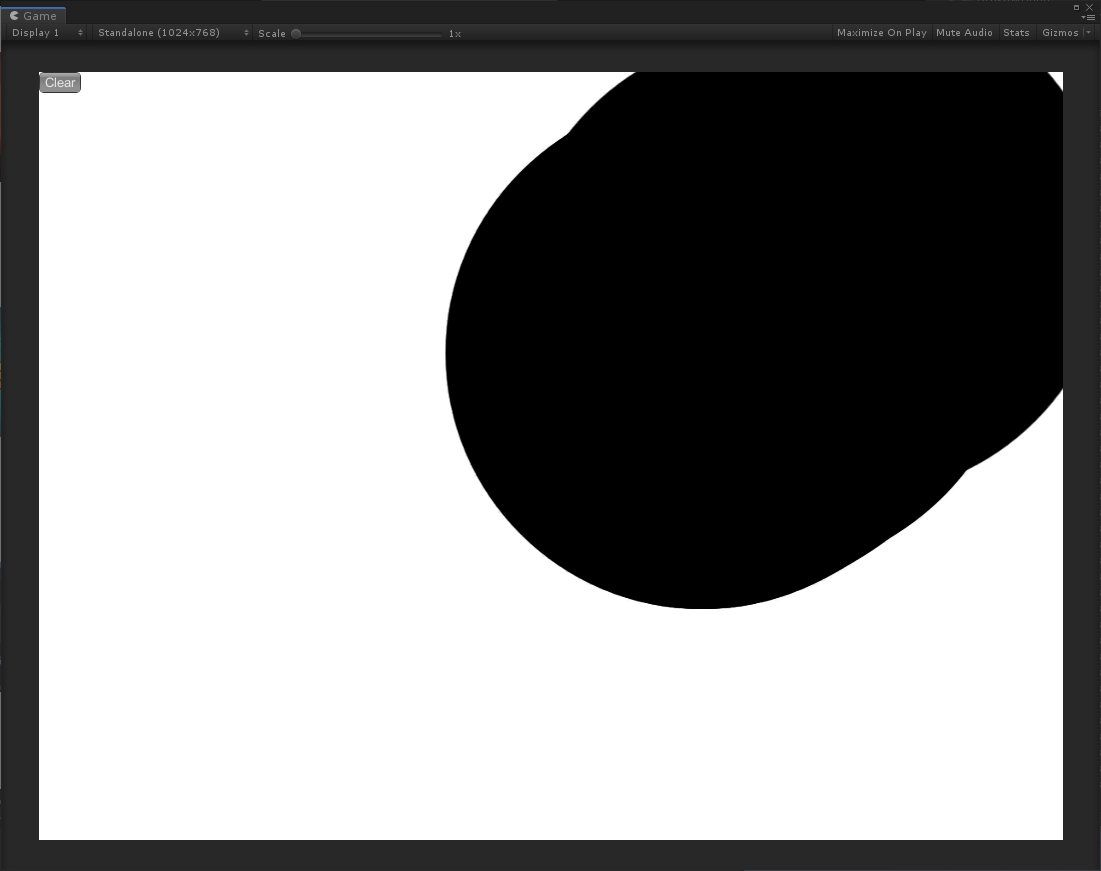
RenderTexture 로 그려주던 Canvas 를 메인으로 돌려보면 아래와 같이 의도 했던 대로 출력이 된다.
1. 이미지 테두리 부분의 픽셀이 기존 픽셀과 겹쳐지면서 혹은 덮어 쓰면서 해당 픽셀을 투명하게 바꾸고 있다.
2. RenderTexture 로 변환되 RawImage 로 출력하는 과정에서 테두리 부분이 투명해 지는 현상이 일어난다.
1. 이미지가 문제가 있다
2. RenderTexture 가 잘못 그려주고 있다
3. RawImage 가 잘못 출력하고 있다.
이미지에 육안으로 확인 되지 않는 투명한(?) 부분이 있다고 가정하고 이를 보정하는 것은 어떨까? 로 시작해 쉐이더를 추가한 Material 을 추가해 보았다.
그 결과 이미지에 Sprites/Default 쉐이더를 사용하는 Material 을 사용하니 간섭 현상이 사라졌다. Material 이 추가되지 않은 이미지의 기본 쉐이더는 UI/Default 쉐이더인데 Sprites/Default 쉐이더와의 차이가 이런 현상을 만드는 것 같다.
UI/Default 쉐이더 코드와 Sprite/Default 쉐이더 코드를 비교하며 테스트 했더니 다음과 같이 수정해 문제 해결이 가능했다.
- UI/Default 쉐이더의 Blend SrcAlpha OneMinusSrcAlpha 값을Blend One OneMinusSrcAlpha 값으로 변경
Blend - 투명 오브젝트를 만드는데 사용합니다.
SrcAlpha - 스테이지 값을 소스 알파 값으로 곱합니다.
One -1값입니다. 소스 또는 대상 컬러가 완전히 표시되도록 하려면 이 값을 사용합니다.
정리하자면 소스 알파 값이란 새로 그려진 이미지의 알파 값이고 스테이지 값은 기존 화면에 그려져 있는 값인데 이둘을 곱하면 새로 그려진 이미지의 알파값을 따라가기 때문에 이를 1값으로 변경해 새로 그려진 이미지의 알파 값을 따라가지 않게 수정 함으로써 해결 됬다고 생각한다.
위와 같은 문제 때문이 었다면 RenderTexture 를 통하지 않고 직접 그리는 이미지에서도 해당 상황이 재현되야 하지 않을까?하지만 직접 그리는 이미지에서는 해당 이슈가 발생하지 않는다.
RenderTexture 설정이 잘못되어 출력이 잘못 되고 있는 것은 아닐까?
RenderTexture 의 Color Format 설정을 바꿔보니 다음 두 경우에 원했던 형태의 출력이 되는 것을 확인 하였다.


