블로그 이미지
Every unexpected event is a path to learning for you. blueasa

카테고리

분류 전체보기 (2861)
Unity3D (899)
Programming (479)
Server (33)
Unreal (4)
Gamebryo (56)
Tip & Tech (192)
협업 (65)
3DS Max (3)
Game (12)
Utility (142)
Etc (99)
Link (34)
Portfolio (19)
Subject (90)
iOS,OSX (53)
Android (16)
Linux (5)
잉여 프로젝트 (2)
게임이야기 (3)
Memories (20)
Interest (38)
Thinking (38)
한글 (30)
PaperCraft (5)
Animation (408)
Wallpaper (2)
재테크 (19)
Exercise (3)
나만의 맛집 (3)
냥이 (10)
육아 (16)
Total
Today
Yesterday

[참조] https://mentum.tistory.com/150


유니티 퍼미션 체크 적용기. (Unity Permission Check) 2019.11.14 재작성.

2019.11.14 재작성. 유니티 안드로이드에서 스크린샷을 저장하기 위해 권한 부분을 다시 작성해야해서 하는 김에 이 글도 재작성 하였다. 2019/11/14 - [Unity/프로그래밍] - 유니티 안드로이드 스크린샷

mentum.tistory.com


참조 사이트에 포스팅 된 내용을 참고해서 나한테 맞게 만듬.

(Unity2018 / 저장공간(선택) 권한만 필요)


using System;
using UnityEngine;
using System.Collections;
using UnityEngine.SceneManagement;
using UnityEngine.Assertions;
using UnityEngine.Android;

public class UICheckPermissionManagerSGT : MonoBehaviour
{
    public GameObject m_panelCheckPermission = null;
    public GameObject m_panelDeniedConfirm = null;

    private bool m_bOnCheckPermission = false;


    void Start()
    {
        Debug.Log("[Scene] CheckPermission");

        InitCheckPermission();
        CheckCountryCode_KR();
    }

    void InitCheckPermission()
    {
        m_bOnCheckPermission = false;

        ActivateCheckPermission(false);
        ActivateDeniedConfirm(false);

    }

    void CheckCountryCode_KR()
    {
        // GetIP가 한국인지 체크하는 외부 함수
        SGT.Global.CheckCountryCode_KR(ConfirmCountryCode_KR);
    }

    void ConfirmCountryCode_KR(bool _bIsCountryCode_KR)
    {
        if (true == _bIsCountryCode_KR)
        {
            // 한국 : Permission 확인
            DoCheckPermission();

            //CallPermission();
        }
        else
        {
            // No 한국 : Next Scene으로 이동
            GoToNextScene();
        }
    }

    void DoCheckPermission()
    {
        // 저장공간(Write) 권한 체크(선택 권한)
        if (Permission.HasUserAuthorizedPermission(Permission.ExternalStorageWrite) == false)
        {
            // 지정된 권한이 없으면 CheckPermission UI 활성화
            ActivateCheckPermission(true);
        }
        else
        {
            GoToNextScene();
        }
    }

    IEnumerator CheckPermissionCoroutine()
    {
        m_bOnCheckPermission = true;

        yield return new WaitForEndOfFrame();

        // 저장공간(Write) 권한 체크(선택 권한)
        if (Permission.HasUserAuthorizedPermission(Permission.ExternalStorageWrite) == false)
        {
            // 권한 요청
            Permission.RequestUserPermission(Permission.ExternalStorageWrite);

            yield return new WaitForSeconds(0.2f); // 0.2초의 딜레이 후 focus를 체크하자.
            yield return new WaitUntil(() => Application.isFocused == true);

            if (Permission.HasUserAuthorizedPermission(Permission.ExternalStorageWrite) == false)
            {
                // 권한 거절하면 안내 팝업
                OnEventDenied();
                yield break;
            }
        }

        // 권한이 있으면 다음 Scene으로 이동
        GoToNextScene();

        m_bOnCheckPermission = false;
    }


    // 해당 앱의 설정창을 호출한다.(권한 설정할 수 있도록 유도)
    // https://forum.unity.com/threads/redirect-to-app-settings.461140/
    private void OpenAppSetting()
    {
        try
        {
#if UNITY_ANDROID
            using (var unityClass = new AndroidJavaClass("com.unity3d.player.UnityPlayer"))
            using (AndroidJavaObject currentActivityObject = unityClass.GetStatic<AndroidJavaObject>("currentActivity"))
            {
                string packageName = currentActivityObject.Call<string>("getPackageName");

                using (var uriClass = new AndroidJavaClass("android.net.Uri"))
                using (AndroidJavaObject uriObject = uriClass.CallStatic<AndroidJavaObject>("fromParts", "package", packageName, null))
                using (var intentObject = new AndroidJavaObject("android.content.Intent", "android.settings.APPLICATION_DETAILS_SETTINGS", uriObject))
                {
                    intentObject.Call<AndroidJavaObject>("addCategory", "android.intent.category.DEFAULT");
                    intentObject.Call<AndroidJavaObject>("setFlags", 0x10000000);
                    currentActivityObject.Call("startActivity", intentObject);
                }
            }
#endif
        }
        catch (Exception ex)
        {
            Debug.LogException(ex);
        }
    }

    void ActivateDeniedConfirm(bool _bActive)
    {
        GgUtil.Activate(m_panelDeniedConfirm, _bActive);
    }

    void ActivateCheckPermission(bool _bActive)
    {
        GgUtil.Activate(m_panelCheckPermission, _bActive);
    }

    void GoToNextScene()
    {
        // 패치씬으로 이동
        SGT.Scene.RunCheckPermissionToPatch();
    }

    //////////////////////////////////////////////////////////////////////////
    // Event
    //////////////////////////////////////////////////////////////////////////

    void OnEventCheckPermission()
    {
        if (true == m_bOnCheckPermission)
            return;

        StopCoroutine("CheckPermissionCoroutine");
        StartCoroutine("CheckPermissionCoroutine");
    }

    void OnEventDenied()
    {
        ActivateDeniedConfirm(true);
    }

    void OnEventDeniedConfirm()
    {
        // 저장공간은 선택권한이라 권한요청 거절해도 게임 진행
        GoToNextScene();
    }

    //////////////////////////////////////////////////////////////////////////
    // UI Event
    //////////////////////////////////////////////////////////////////////////

    // 권한 동의 버튼
    public void OnUIEventCheckPermission()
    {
        if (SGT.Global.bPreventDoubleClick)
            return;

        SGT.Global.PreventDoubleClick();

        OnEventCheckPermission();
    }

    // 거절 확인
    public void OnUIEventDeniedConfirm()
    {
        OnEventDeniedConfirm();
    }

    // 권한 설정 열기
    public void OnUIEventOpenAppSetting()
    {
        OpenAppSetting();
    }
}


반응형
Posted by blueasa
, |


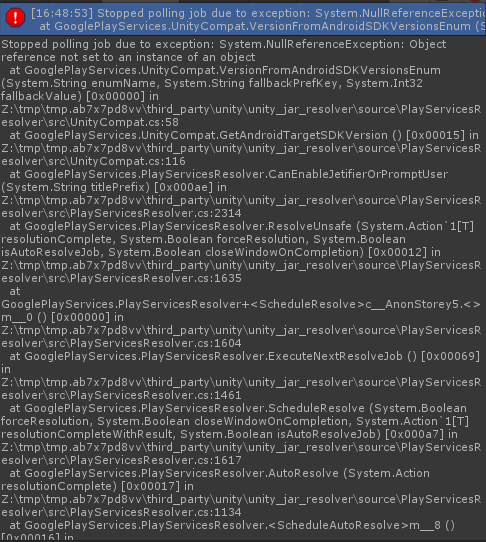
Target API 29로 올렸을 때 Error 스크린샷


Android Target API Level을 28에서 29로 올리니 에러가 떠서 무슨 문제인지 확인해보니 Play Services Resolver 버전 이슈가 있는 것 같다.


현재 v1.2.135를 쓰고 있는데 v1.2.138에서 버그 수정 됐다는 아래와 같은 답변이 있다.

버전업을 해야 될 것 같다.


[답변]


[답변 출처] https://github.com/googlesamples/unity-jar-resolver/issues/344


A null reference exception occurs when setting the target api level to API 29 in Unity. · Issue #344 · googlesamples/unity-jar

Settings Unity editor version: Unity 2019.2.13 through Unity 2019.3.7 are the ones I tested External Dependency Manager version: v0.10.07 Features in External Dependency Manager in use (Android Res...

github.com


반응형
Posted by blueasa
, |

[링크] https://www.shadertoy.com/browse


Browse (1) - Shadertoy BETA

Results (40693):

www.shadertoy.com


반응형
Posted by blueasa
, |

[판매사이트] https://www.mixamo.com


Mixamo


www.mixamo.com

[유니티 적용 방법] blog.naver.com/cksk0018/221474744330


유니티 mixamo 사용

1. mixamo에서 다운로드하고 싶은 캐릭터의 FBX를 다운로드합니다.( https://www.mixamo.com/#/?page&#x...

blog.naver.com


[출처] 게임코디 방 무명님


반응형
Posted by blueasa
, |

[추가]

- 상대경로 기준 : 프로젝트 폴더


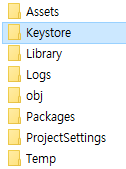
프로젝트 하위 폴더

프로젝트 하위에 위와 같이 Keystore 폴더 아래 debug.keystore 파일이 있을 때 상대경로는 아래와 같다.

[상대경로] ./Keysotre/debug.keystore


----------------------------------------------------------------------------------------------------------

유니티의 안드로이드 빌드 환경을 설정에서 키스토어 파일을 등록할 때, 일반적으로 Browe Keystore 버튼으로 파일을 등록하게 되면 위 사진과 같이 절대경로가 설정된다.


자동 빌드 환경이나, 서로 다른 빌드 머신에서 빌드하고자 할 때 굉장히 짜증나는 부분이며 제대로된 해결 방법은 없고 편법을 사용해야 하는 것을 보인다.


유니티 상단 메뉴 -> Edit -> Project Settings -> Editor -> Asset Serialization

값을 Force Text 로 변경한다.

이 작업은 다른 설정 또는 .unity 파일도 모두 변경합니다.


프로젝트 경로 -> ProjectSettings 폴더 -> ProjectSettings.asset 을 열면 텍스트로 변환되어 있다. 이중 AndroidKeystoreName 을 검색하여 절대 경로를 상대 경로로 변경한다.


유니티를 다시 실행시켜 결과를 확인한다.


빌드 머신에서 실행해 결과를 확인한다.


출처: https://pjc0247.tistory.com/44 [pjc0247]


[Unity] Android keystore 경로 상대경로로 지정하기

유니티의 안드로이드 빌드 환경을 설정에서 키스토어 파일을 등록할 때, 일반적으로 Browe Keystore 버튼으로 파일을 등록하게 되면 위 사진과 같이 절대경로가 설정된다. 자동 빌드 환경이나, 서로

pjc0247.tistory.com


반응형
Posted by blueasa
, |


[링크] slee16.blog.me/221706003164


Tip : Unity 자이로 & 가속도 센서 관련

​기기의 기울기를 사용하는 게임제작 외주를 하고 있는데, 분명 나온지 오래된 기능이고 많이 사용했을 것...

blog.naver.com


반응형
Posted by blueasa
, |
    /// <summary>
    /// 회전 없이 유도 이동만 하는 함수
    /// </summary>
    /// <param name="_trTarget">목표 지점</param>
    /// <param name="_v3CurrentDirection">현재 오브젝트가 이동할 방향</param>
    /// <returns></returns>
    IEnumerator Move_Guided(Transform _trTarget, Vector3 _v3CurrentDirection)
    {
        Transform trTarget = _trTarget;
        Vector3 v3TargetDirection = (trTarget.position - this.transform.position).normalized;
        Vector3 v3CurrentDirection = _v3CurrentDirection;
        if (v3CurrentDirection == Vector3.zero)
        {
            v3CurrentDirection = v3TargetDirection;
        }

        float fLookSpeed = 7f;
        float fMoveSpeed = 50f;
        float fAccumTime = 0f;

        while (0.01f < (this.transform.position - trTarget.position).sqrMagnitude)
        {
            // Rotate
            v3TargetDirection = (trTarget.position - this.transform.position).normalized;
            v3CurrentDirection = Vector3.RotateTowards(v3CurrentDirection, v3TargetDirection, Time.deltaTime * fLookSpeed, 0f);
            v3CurrentDirection = v3CurrentDirection.normalized;
            // Translate
            fAccumTime += Time.deltaTime * fMoveSpeed;
            this.transform.localPosition += (v3CurrentDirection * fAccumTime);
            yield return null;
        }

        yield return null;
        
        // 도착했으면 Destroy or Recycle
    }


보통 유도 기능 만들때 오브젝트 자체를 회전시키고, transform.forward 방향으로 Translate만 하면 됐는데


이번에는 유도 기능으로 이동만 하고 회전하지 않게 하기 위해서

Direction Vector를 따로 두고 Vector3.RotateTowards()를 사용해서 이동하게 만들었다.


P.s. 적당히 테스트 한거니 더 이쁘게 만들고 싶은분은 직접 수정 및 테스트 해보세요.


[참조] https://docs.unity3d.com/ScriptReference/Vector3.RotateTowards.html

반응형
Posted by blueasa
, |

[링크]

https://qits.tistory.com/m/entry/NGUI-%EC%8A%A4%ED%81%AC%EB%A1%A4-%EB%8A%90%EB%A0%A4%EC%A7%80%EB%8A%94-%ED%98%84%EC%83%81-%EC%9E%AC%EC%82%AC%EC%9A%A9%EB%A6%AC%EC%8A%A4%ED%8A%B8%EB%A5%BC-%EC%82%AC%EC%9A%A9%ED%95%98%EC%A7%80-%EC%95%8A%EA%B3%A0-%EA%B8%B0%EB%8A%A5-%EA%B0%9C%EC%84%A0


NGUI 스크롤 느려지는 현상 (재사용리스트를 사용하지 않고 기능 개선)

NGUI로 스크롤 을 구현하다보면 Grid를 사용하는 것이 일반적인데, 아이템이 많아지면 느려지는것을 자주 보게 된다. 아이템이 많아지니까 느려지는것은 어찌보면 당연한 일이다. 하지만 그대로 사용할수없으니 해..

qits.tistory.com


반응형
Posted by blueasa
, |

[링크] https://redforce01.tistory.com/242


[NGUI] Infinite ScrollView (AT)

최근 회사에서 채팅UI의 구조 개선에 대한 이슈가 발생하여 만들어두었던 채팅창을 모두 갈아엎게 되었다. 기존의 채팅 UI구조는 채팅메세지가 들어올 때마다 Instantiate ( ) 가 수행되어 말풍선 UI가 계속해서..

redforce01.tistory.com


반응형
Posted by blueasa
, |

[링크] https://mentum.tistory.com/156


유니티 Easy Save 정리

# 20190329 추가 : 개발자는 EasySave 2는 호환성 때문에 남겨놓은 것이기 때문에 EasySave 3를 사용해줄 것을 당부했음. #. EasySave 간단 정리 - Class, Structure 등 어떤 것이든 저장할 수 있습니다! - Save /..

mentum.tistory.com


반응형
Posted by blueasa
, |